


EUROGRAND
Advanced operation10
Use the -/NO- and +/YES buttons in the VALUE/SONG sec-3)
tion to adjust the value of your choice.
Quick access to layer mode functions5.1.1
Use the following operating procedure for direct access to the
layer mode menu pages.
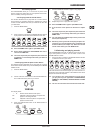
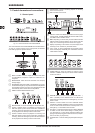
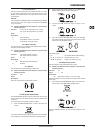
Press and hold down the two sound buttons selected for layer 1)
mode (e.g. GRAND PIANO 1 and STRINGS) and press the
SELECT button in the TEMPO/EDIT MODE section.
+
The EDIT MODE LED lights up and the EDIT page E3.1 is dis-
played.
Transposition5.2
The sounds produced by the EUROGRAND can be transposed
up or down by half-tones (key by key). This is useful, for example
if you want to play a piece in a key that is easier to play because
it has few or no accidentals at all (e.g. C major), but intend the
piece is to sound in a difficult key with lots of accidentals (e.g. D
flat major).
Example: D flat major has five flats (accidentals). In this key you
would have to play a lot of black keys. However, if you transpose
the sounds up by one half-tone, you can easily play the piece on
the white keys (C major).
It can be helpful to transpose the keyboard by an octave (12 half-
tones), for example to play low notes in the middle register where
they can be played more comfortably.
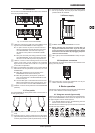
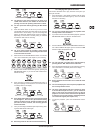
Press and hold the TRANSPOSE button and use the -/NO 1)
and +/YES buttons in the VALUE/SONG section to adjust the
transposition value of your choice in half-tone steps.
+
The display reads:
0: No transposition (default setting)
1 ... 12: Keyboard is transposed up by the number of
half-tones selected.
-1 ... -12: Keyboard is transposed down by the number of
half-tones selected.
Release the TRANSPOSE button when the desired value 2)
has been selected.
The LED above the TRANSPOSE button lights up when +
the transposition feature is active, i.e. when a value other
than zero has been set.
If a transposition interval has already been set, you +
can enable/disable the transposition function using the
TRANSPOSE button.
Layer mode settings5.3
In layer mode you can effect additional settings for advanced
playing with two sounds at the same time.
All sounds are numbered internally from 1 through 14. This order
of sounds determines which sound is addressed internally as
voice #1, voice #2, etc., which in turn is important for making
changes to the sounds selected.
In our example the two sounds GRAND PIANO 1 and STRINGS
are being used in layer mode. Internally, GRAND PIANO 1 is #1,
STRINGS is #11. The sound with the lower number is addressed
internally as voice #1 (here: GRAND PIANO 1), the sound with
the higher number as voice #2 (here: STRINGS).
Please note the order of voices used in the sound com- +
bination selected, in order to understand which settings
apply to which voice in the examples below.
A layer combination consisting of two sounds must be +
set up before you can adjust the following functions
(see chapter 4.1).
Volume ratio5.3.1
Use this function to adjust the volume ratio of the selected
sounds.
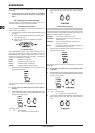
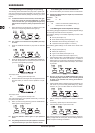
Please enter EDIT mode (see chapter 5.1) and select the +
following function.
Function: E3.1
Value: 0 ... 20
Description:
10: Same volume for voice #1 and voice #2
...10: Voice #2 louder than voice #1
10 ...: Voice #1 louder than voice #2
Detune5.3.2
This function allows you to detune the selected sounds slightly
against each other.
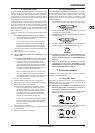
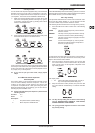
Please enter EDIT mode (see chapter 5.1) and select the +
following function.
Function: E3.2
Value: -10 ... 10
Description:
0: Same pitch for voice #1 and voice #2
... 0: Voice #2 higher than voice #1
0 ...: Voice #1 higher than voice #2