ULTRA FLANGER UF300
Thank you for showing your confidence in us by purchasing the BEHRINGER ULTRA
FLANGER UF300. This high-quality effects pedal delivers two flangers in one—from jet-
plane thick chorus, vibrato to short delay effects. Thanks to its high-performance features
you can choose between classic and detuned flanger effects with extensive parameter
controls for awesome sound shaping.
Originally, the flanger effect was generated with two tape recorders running
synchronously. The same audio signal was recorded on both machines. If you put a
finger on the left spool of one of the machines, the spool and the playback speed are
slowed down. The generated delay results in phase shifting of the signals.
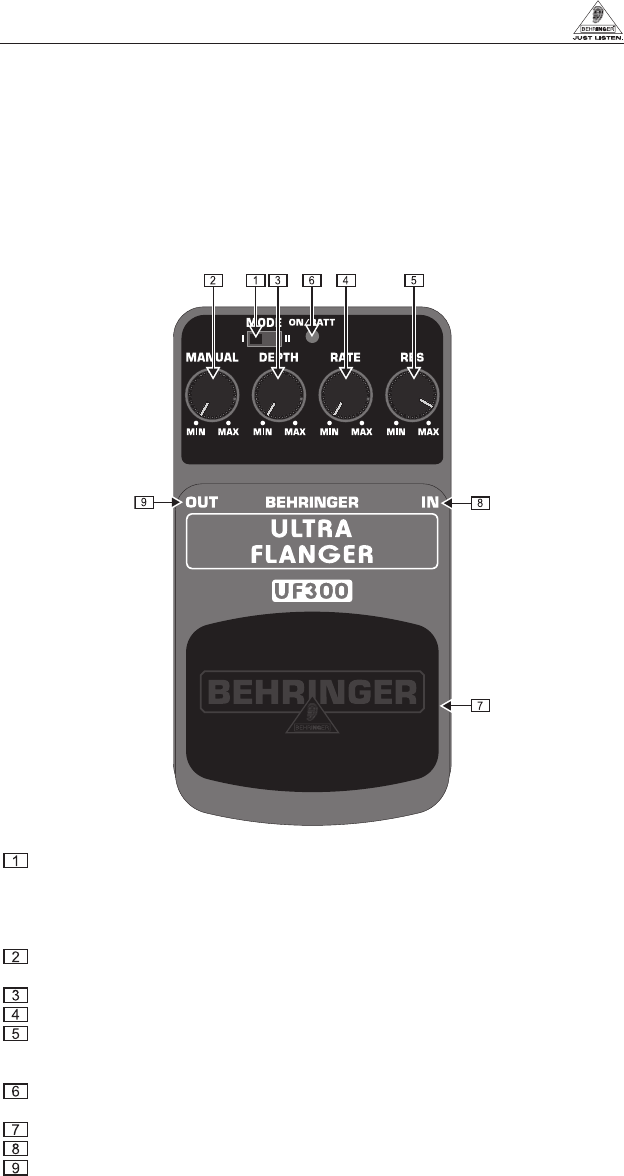
1. CONTROLS
Top view
The MODE switch lets you choose between negative feedback (Mode 1) or positive
feedback (Mode 2) flanger modes. Negative feedback means that the delayed
signal is inverted before it is fed back to the original signal. In positive feedback
mode the delayed signal is not inverted. In this case the effect has a more detuned
character perfect for vibrato effects.
With the MANUAL control you can adjust the flanger delay time. Longer delay times
produce a sharper, more detuned sound, very close to a chorus effect.
Turn up the DEPTH control to achieve a fuller and deeper effect sound.
The RATE control determines the speed of the flanger effect.
The RES(onance) control determines the amount of output signal fed back to the
flanger input to increase the resonance frequency. That way the flanger effect
gets more intensive.
The ON/BATT LED illuminates when the effect is activated. It also serves as a
battery level indicator.
Use the footswitch to activate/deactivate the effect.
Use this 1/4" TS IN connector to plug in the instrument cable.
The 1/4" TS OUT connector sends the signal to your amp.
Use the DC IN connection at the front of the unit to plug in a 9 V power supply (not included).
The BATTERY COMPARTMENT is located underneath the pedal cover. To install or
replace the 9 V battery, press the hinges with a ballpen and remove the pedal cover. Be
careful not to scratch the unit.