


15
U-CONTROL UMA25S
5.5 MIDI Messages
5.5.1 Program Change and MIDI Bank Select
Program Change messages are used to activate the memory
banks of the connected devices. 128 program numbers are
available to activate presets. For devices with more than 128
presets, there is the Bank Select function which allows you to
select a memory bank before sending a Program Change.
The Bank Select message consists of two parts: an MSB (Most
Significant Bit) part and an LSB (Least Significant Bit) part. The
MSB part defines a range of 128 values and is the more important
part of the Bank Select message for many MIDI devices. The LSB
part defines each one of the 128 MSBs in 128 additional steps.
The numbering for both parts ranges from 0 to 127.
In total, the Bank Select message offers an enormous range of
128 x 128 = 16,384 different values available for bank numbers.
In theory, this means that you could use external devices with
as many different banks. Considering the fact that each single
bank includes another 128 single programs, you get unbelievable
2,097,152 different possibilities to organize your programs.
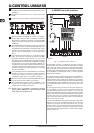
Use the E11 and E12 rotary knobs to select the banks. If a MIDI
device contains more than 128 presets/programs, a Bank Select
message has to be sent beforehand. Even though this is a
controller command, it has to be sent before the Program Change
(and is therefore adjustable) since it is linked to the preset change.
If the Bank Select message is not needed, simply select “Off”.
If you choose a control which is a rotary knob, you can
use the knob to select a program number directly. It is
also possible to assign a permanent program number
(selectable with E13), which is sent when using the
control. For push buttons/switch elements, you can use
the push button to select a permanently assigned
program number (using E13). This is practical when using
the same preset over and over again. Adjust the switch
behavior by using E14: “Increment” means that every time you
press the push button the next incremental preset number—in a
predefined interval—is activated. “Single Preset” means that the
push button always switches to the same preset number.
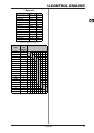
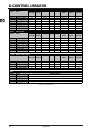
Table A.1 on the supplementary sheet gives you an
overview of the rotary knob assignment in
Edit Mode.
Examples of Program Changes:
Example 1:
You want the push buttons E1 – E8 to switch the program
numbers 71 – 78 of your external rack synth. Program
the first push button as follows:
1. Press and hold down the EDIT/EXIT push button while
pressing the E1 push button. When E01 appears on the
display, release the EDIT/EXIT push button.
2. Turn E9 completely to the left so that the display shows
“PC” (which stands for Program Change).
3. Use E10 to select the MIDI channel on which your
synth is ready to receive.
4. Turn E11 and E12 completely to the right so that “OFF”
appears on the display.
5. Select the program number 71 by using E13.
6. Select “Single Preset” by using E14.
7. If the program number is to show on the display when
pressing the push button, select “ON” with E16.
8. Press the ENTER key to confirm. The EDIT LED goes
out.
Result: Each time you press the push button, the program
number 71 is activated on the slave unit.
Program the push buttons E2 – E8 the same way with
ascending program numbers up to 78.
Example 2:
In case you want to program a push button in order for it
to activate a new preset every time it is pressed, this can
be accomplished in the following way: E11 = Off, E12 = 0;
E13 = 127; E14 = Increment; E15 = +8.
Result: The program number 0 is transmitted the first time
the push button is pressed, 8 the second time, 16 the
third time, then 24, etc. This way you can select each
first preset of a sound bank, which is organized in groups
of eight.
Example 3:
In case you want to activate preset no. 6 in bank 8, adjust
as follows: E11 = 8, E12 = Off, E13 = 6.
Result: First, the UMA25S transmits the higher ranking
bank number 8 as CC, followed by the program number
6.
5. UMA25S as USB/MIDI controller