


Safety Precautions
Congratulations on your selection of the CASIO product.
• Before assembling the stand, be sure to carefully read through the instructions contained in this manual.
• Please keep all information for future reference.
Symbols
Various symbols are used in this operating manual and on the product itself to ensure that the product is used
safely and correctly, and to prevent injury to the user and other persons as well as damage to property. Those
symbols along with their meanings are shown below.
WARNING
This indication stipulates matters that have the risk of causing death or serious injury if the product is operated incorrectly
while ignoring this indication.
CAUTION
This indication stipulates matters that have the risk of causing injury as well as matters for which there is the likelihood of
occurrence of physical damage only if the product is operated incorrectly while ignoring this indication.
A I
1
2
Ȣ
A B
3
C D E
1
C
v
2
D F
E
3
E C D G H
E H
E G
G H
Ȣ
H G
E
D
E
4
I
1
C D
Ȣ
WARNING
Do not place the piano or stand in a location that is unstable.
Do not place in an unstable location such as on a wobbly stand or inclined surface. This can cause the piano and stand
to fall or tip over resulting in injury.
CAUTION
Regarding the Stand
• Properly place the piano on the stand after securely assembling the stand in accordance with the instruction
manual. If the screws are not securely tightened at their correct locations, or if the piano itself is out of position,
the stand may tip over or the piano may fall off resulting in injury.
• During assembly, be sure to exercise sufficient caution to avoid personal injury.
• Since the piano is quite heavy, movement and installation should be performed by at least two people.
• Periodically inspect the stand screws to check for looseness caused by changes in temperature or humidity and
vibrations and so on. If a screw has become loose, retighten it securely. If screws are not retightened when
necessary, the piano may fall off the stand resulting in injury.
Do not place heavy objects on the piano.
Do not place heavy objects on the piano. This may cause the piano to tip over or fall off the stand.
Do not sit on the piano or stand.
Do not sit on the piano or stand. This is particularly important in homes where there are young children. Sitting on the
piano or stand may cause it to tip over or break resulting in injury.
Assembly Instructions
Caution
• This stand should be assembled by two people working together.
• When assembling the stand, you should have the piano standing up with its back facing downwards, as shown in Figure 5.
IMPORTANT!
• Be sure to assemble the stand on a flat surface.
• This stand does not include any of the tools required to assemble it. You should have a large Phillips head (+) screwdriver
on hand for assembly.
• The polystyrene foam packing material of the stand is required for assembly. Do not throw away the packing material
and keep it on hand for assembly.
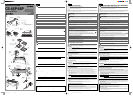
• Check the items that come with the unit to make sure that everything shown in Figure 1 (A through I) is included.
All screws are in a plastic bag inside of the packing cardboard.
Before Assembling the Stand
1
Place the piano onto a blanket, pillow, or other soft object, and then remove the left and right end covers from the
piano (Figure 2).
• Keep the two black screws (v) from the left end cover on hand. You will need them when assembling the stand. You will not
need the two screws from the right end cover for assembly, so keep them in a safe place in case you need them in the future.
2
Turn over the piano, insert the support piece A into the groove along the bottom (Ȣ in Figure 3), and secure it in
place with two B screws (Figure 3).
3
Break the polystyrene packing material into six pieces as shown in Figure 4.
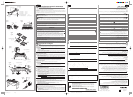
Assembling the Stand
When assembling the stand, you should have the piano standing up with its back facing downwards.
PREPARATION
• Use the six pieces of polystyrene foam to secure side panels C, D and back panel E in place. There should be some
space between the edges of the side panels and the floor as shown in Figure 5.
• If you do not have any packing material available, use a magazine or some other thick item.
Perform the following steps.
1
Attach side panel C to the piano. Secure the side panel in place using the two black screws (v) that you removed
from the left side cover (Figure 6).
• Be sure to tighten the screws securely.
2
Attach side panel D to the other side of the piano. Partially tighten the two screws F (Figure 6).
• In this case, do not tighten the screws all the way. If you do, you will not be able to insert the back panel E in the following
step.
3
Attach back panel E to sides C and D. Use the four screws G and four joint connectors H (Figure 6).
• Insert the four joint connectors at the four locations on back panel E. The holes in the joint connectors should be aligned
with the holes in the back panel.
• Lift up back panel E so its screw holes align with the screw holes in the side panels, and then tighten the screws G.
• If you have trouble inserting the screws G into the joint connector H holes, use a screwdriver to rotate the joint connector
(Ȣ in Figure 6).
CAUTION!
• Never try to force the screws! Forcing the screws G to turn while the joint connector H holes are not aligned correctly can
strip the screw threads.
• Partially tighten the screws on one side of the back panel E and then tighten the screws on the other side completely.
• Fully tighten the screws you partially tightened in step 2, above.
• Next, fully tighten the screws that you partially tightened on one side of the back panel E.
4
After ensuring that all of the screws are fully tightened, remove the packing material and stand up the piano
(Figure 7).
• Two people, one at either end, should hold the front and back of the piano when standing it up.
• Install the screw caps I on each of the six screws (Figure 7).
Protecting the Piano Against Tipping Over
Locating the piano against a wall is normally enough to protect it against tipping over. If you need to locate it away from a
wall, be sure to perform the following steps in order to ensure that it is secure.
1
Remove the metal pieces at the bottom of side panels C and D.
2
Repositioning the metal pieces so they are facing outwards reinstall them onto the side panels (Figure 8).
• If you have trouble inserting the bolts that come pre-installed in the side panels into the joint connector screw holes,
use a screwdriver to rotate the joint connector so the bolts can enter the holes (Ȣ in Figure 8).
PRECAUCIONES RESPECTO A LA SEGURIDAD
Muchas gracias por seleccionar un instrumento musical electrónico CASIO.
• Antes de usar el instrumento, asegúrese de leer cuidadosamente las instrucciones contenidas en este manual.
• Guarde toda información para tener como referencia futura.
Símbolos
En este manual de operación y en el producto propiamente dicho, se usan varios símbolos para asegurar que el
producto sea usado de manera segura y correcta, y para prevenir de lesiones personales como así también de daños
a la propiedad. Estos símbolos junto con sus significados se muestran y explican a continuación.
ADVERTENCIA
Esta indicación estipula la existencia de riesgos de muerte o lesiones serias, si el producto llega a operarse incorrectamente
al ignorarse esta indicación.
PRECAUCIÓN
Esta indicación estipula la existencia de riesgos de lesiones, así también como la posibilidad de ocurrencia de daños
físicos, solamente si el producto se opera incorrectamente ignorándose esta indicación.
ADVERTENCIA
No coloque el piano o soporte en un lugar que sea inestable.
No lo coloque en un lugar inestable tal como un soporte sin firmeza o superficie inclinada. Esto puede ocasionar que el
piano y soporte se vuelquen o caigan resultando en lesiones.
PRECAUCIÓN
En relación al soporte
• Coloque el piano adecuadamente sobre el soporte luego de armar el soporte de acuerdo con las instrucciones
del manual. Si los tornillos no se encuentran seguramente apretados en sus posiciones correctas, o si el piano
propiamente dicho está fuera de posición, el soporte puede volcarse o el piano puede caerse resultando en
lesiones personales.
• Durante el armado, asegúrese de tener suficiente precaución para evitar lesiones personales.
• Como el piano es bastante pesado, la manipulación e instalación debe ser realizada por lo menos por dos personas.
• Inspeccione periódicamente los tornillos del soporte para comprobar por flojedad ocasionada por los cambios
en la temperatura o humedad, vibraciones y otros fenómenos relacionados. Si un tornillo se llega a aflojar,
vuelva a apretar seguramente. Si los tornillos no son vueltos a apretar en el momento necesario, el piano o el
soporte pueden caerse, resultando en lesiones personales.
No coloque objetos pesados sobre el piano.
No coloque objetos pesados sobre el piano. Esto puede ocasionar que el piano se vuelque o caiga fuera del soporte.
No se siente encima del piano o soporte.
No se siente encima del piano o soporte. Esto es particularmente importante en hogares en donde hay niños pequeños.
Sentándose encima del piano o soporte puede ocasionar que el piano se vuelque o rompa resultando en lesiones personales.
Instrucciones de armado
Precaución
• Este soporte debe ser armado por dos personas que trabajen juntas.
• Cuando arma el soporte, deberá tener el piano parado con su parte trasera hacia abajo, como se muestra en la Figura 5.
¡IMPORTANTE!
• Asegúrese de armar el soporte sobre una superficie plana.
• Este soporte no incluye ninguna de las herramientas requeridas para el armado. Para el armado deberá tener un
destornillador tipo Phillips (+) a mano.
• El material de empaque de espuma de poliestireno del soporte es requerido para el armado. No tire el material de empaque
y téngalo a mano para el armado.
•
Verifique los ítemes que vienen con la unidad para asegurarse de que todo lo mostrado en la Figura 1 (
A
a
I
) se encuentra incluído.
Todos los tornillos se encuentran en una bolsa plástica que está encintada dentro del cartón del embalaje.
Antes del armado del soporte
1
Coloque el piano sobre una frazada, almohada u otro objeto blando, y luego retire las cubiertas de extremo
izquierdo y derecho del piano (Figura 2).
• Tenga a mano los dos tornillos negros (v) de la cubierta del extremo izquierdo. Los necesitará cuando arme el soporte. No
necesitará los dos tornillos de la cubierta del extremo derecho para el armado; por lo tanto, guárdelos en un lugar seguro
pues podrá necesitarlos en el futuro.
2
Dé vuelta el piano, inserte la pieza de soporte A en la ranura a lo largo de la parte inferior (Ȣ en la Figura 3), y
asegúrelo en posición con dos tornillos B (Figura 3).
3
Rompa el material de empaque de poliestireno en seis piezas como se muestra en la Figura 4.
Armando el soporte
Cuando arme el soporte, deberá tener el piano parado con su parte trasera hacia abajo.
PREPARACIÓN
• Utilice las seis piezas de espuma de poliestireno para asegurar los paneles laterales C, D y el panel trasero E en
posición. Debe haber algo de espacio entre los bordes de los paneles laterales y el piso como se muestra en la Figura 5.
• Si no tiene ningún material de empaque disponible, utilice alguna revista o algún otro elemento grueso.
Realice los pasos siguientes.
1
Fije el panel lateral C al piano. Asegure el panel lateral en posición usando los dos tornillos negros (v) que ha
retirado de la cubierta lateral izquierda (Figura 6).
• Asegúrese de apretar los tornillos seguramente.
2
Fije el panel lateral D al otro lado del piano. Apriete parcialmente los dos tornillos F (Figura 6).
•
En este caso, no apriete los tornillos en toda su extensión. Si lo hace, no podrá insertar el panel trasero E en el paso siguiente.
3
Fije el panel trasero E a los lados C y D. Utilice los cuatro tornillos G y cuatro conectores de unión H (Figura 6).
• Inserte los cuatro conectores de unión en las cuatro ubicaciones en el panel trasero E. Los orificios en los conectores de
unión deben estar alineados con los orificios en el panel trasero.
• Eleve el panel trasero E de manera que sus orificios de tornillo se alineen con los orificios de tornillo en los paneles
laterales, y luego apriete los tornillos G.
• Si tiene problemas insertando los tornillos G en los orificios H del conector de unión, utilice un destornillador para girar el
conector de unión (Ȣ en la Figura 6).
PRECAUCIÓN
• ¡Nunca intente forzar los tornillos! Si hace girar los tornillos G a la fuerza cuando los orificios H de los conectores de unión
no están correctamente alineados, se dañarían los filetes de los tornillos.
•
Apriete parcialmente los tornillos sobre un lado del panel trasero E y luego apriete completamente los tornillos sobre el otro lado
.
• Apriete completamente los tornillos que ha apretado parcialmente en el paso 2, anterior.
• Luego, apriete completamente los tornillos que ha apretado parcialmente en un lado del panel trasero E.
4
Después de asegurar que todos los tornillos se encuentran completamente apretados, retire el material de empaque
y pare el piano (Figura 7).
• Cuando se para el piano, dos personas, uno en cada extremo, deben sostener la parte delantera y trasera del piano.
• Coloque las tapas de tornillo I en cada uno de los seis tornillos (Figura 7).
Evitando que el piano se vuelque
Ubicando el piano contra una pared es normalmente suficiente para evitar que se vuelque. Si necesita colocarlo alejado de
una pared, asegúrese de realizar los pasos siguientes para asegurar que se encuentra firme.
1
Retire las piezas metálicas en la parte inferior de los paneles laterales C y D.
2
Reposicione las piezas metálicas de manera que se orienten hacia afuera y reinstale las piezas sobre los
paneles laterales (Figura 8).
• Si tiene problemas para insertar los pernos que vienen preinstalados en los paneles laterales dentro de los orificios
de tornillo del conector de unión, utilice un destornillador para girar el conector de unión de manera que los pernos
entren en los orificios (Ȣ en la Figura 8).
CASIO PIANO STAND
CS-65P/66P
Figure 1
Figura 1
Figure 3
Figura 3
Figure 4
Figura 4
Figure 5
Figura 5
Figure 7
Figura 7
Figure 8
Figura 8
Side panel
Panel lateral
L1
R1
R2
L2
L1
Polystyrene foam
Espuma de poliuretano
C
E
D
Polystyrene foam
Espuma de poliuretano
E
Back panel
Panel lateral
D
Side panel
Panel lateral
C
Side panel
Panel lateral
i2
....
B / Screws / Tornillos
i6
....
I
/ Screw caps / Tapas de tornillo
i2
....
F / Screws / Tornillos
i4
....
G / Screws / Tornillos
i4
....
H
/ Joint connectors / Conectores de unión
A
Support piece
Pieza de soporte
CS-65P/66P
SOPORTE DEL PIANO CASIO CS-65P/66P
SUPORTE DE PIANO CASIO CS-65P/66P
Assembly Instructions
Instrucciones de armado
Instruções de montagem
JESPoCkArCS65/66WL1A
B
Figure 2
Figura 2
L1
R1
R2
L2
Left side
Lado izquierdo
v
Right side
Lado derecho
Ȣ
A
/ Covers / Cubiertas
S53-LEAF-001A
I
Polystyrene foam
Espuma de poliuretano
Figure 6
Figura 6
Polystyrene foam
Espuma de poliuretano
G
C
E
D
G
F
HH
v
Ȣ
English Español
CS65P_66P_JES_01.p65 06.11.1, 6:16 PMPage 1 Adobe PageMaker 6.5J/PPC