


POWERMATE
3
42
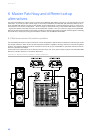
mounts to place the Hi cabinets on top of the
woofer cabinets or, in case this kind of installation
is not possible or you are not using woofer systems,
use the separate speaker pole-stands instead.
3. Do not place the left and the right speakers further
apart than necessary. The less distance there is
between the two speaker “clusters” – the more
compact the sound.
4. Try to avoid the positioning of the main loudspeak-
ers behind the imaginary line of microphones. Oth-
erwise, if you have to drive the system at higher
sound levels, the risk of feedback is very likely.
5. After you have installed all microphone stands and
all artists found their place, the best spot to install
the monitor speakers is up front facing the musi-
cians and vocalists. Nevertheless, please check if a
microphone is directly pointing in the direction of a
monitor. In this case, change its position. You
should also be aware of the individual characteris-
tics of the employed microphones.
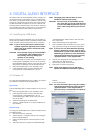
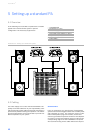
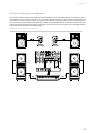
6. Establish connections according to the diagram.
Use the long Speakon cables to connect the
speaker systems to the PowerMate’s power out-
puts. Make sure not to confuse the channels by
accident. Use the short Speakon cables to connect
Hi and Lo cabinets in parallel.
7. Connect the PowerMate‘s MON 1/2 outputs with
the active monitor‘s input, using the XLR LF cables.
8. Connect all microphones preferably to the monau-
ral inputs of the PowerMate and keyboards and
other comparable sound sources to the rest of the
available inputs.
9. Pull all faders down and engage the PowerMate’s
STANDBY switch to prevent unwanted feedback
noise.
10. First, switch the PowerMate on and then the active
monitor speakers.
11. In case you have condenser microphones con-
nected to the PowerMate, you can now turn on the
phantom power by pressing the PHANTOM POWER
switch.
12. Activate the PowerMate’s operational mode through
pressing the STANDBY switch again.
5.4 Soundcheck
First, adjust the input levels of the microphones that are
connected to the PowerMate. Please proceed as follows:
1. Set the corresponding gain controls and the chan-
nel faders to their lowest position.
2. Speak or sing as loud as possible into the micro-
phone.
3. Use the gain control to adjust the level, so that even
at loud passages the red PK LED does not light but
the green SIG LED lights constantly.
Adjust the EQ of the monaural input channels:
1. Slide the channel fader and the master faders up a
bit, so that the sound coming from the main speak-
ers is heard.
2. Turn the MID control carefully all the way to the
right (+15 dB). You should not hear any feedback.
3. Play the sound source or speak into the connected
microphone.
4. Turn the frequency control (kHz) slowly from left to
right.
5. Surely and within no time, you will detect the fre-
quency range that is not to your liking or causing
feedback noise.
6. Leave the frequency control in this position and
turn the MID control to the left until the sound is
natural or to your liking.
7. If necessary, adjust the Hi and LOW controls, start-
ing from their centered position, until the sound
matches your personal taste.
8. Repeat steps 1 - 7 for all monaural input channels in
use.
In case you are also using the stereo input channels, you
can adjust the levels in a similar way:
1. Set the LINE CD/USB controls, the GAIN MIC con-
trols, and the channel fader to their lowest setting.
2. Play the corresponding sound source at the highest
volume that is to be expected during the perform-
ance.
3. Use the LINE CD or LINE USB control to adjust the
level, so that even at loud passages the red PK LED
is not lit but the green SIG present LED lights con-
stantly.
Adjust the EQ of the stereophonic input channels:
1. Slide the channel fader and the master faders a bit
up, so that you can hear the sound through the
main speakers.
2. Set the EQ controls to their center position.
3. Play the corresponding sound source.
4. Starting from the center position, you can adjust
the controls until the sound is to your liking. Please,
keep in mind that major alteration of the EQ-setting
does not necessarily result in the improvement of
the overall sound. Especially when sound shaping is
concerned, less can be more.
5. Repeat steps 1 - 4 for all stereo input channels in
use.
If musical instruments are connected directly to the mon-
aural inputs, follow the descriptions above describing the
adjustment of the microphones.
Make sure, that all channel faders, gain and LINE CD/USB
controls of unused input channels are at their minimum
setting. In this way you avoid unnecessary noise.
M
ASTER MIX
Position the master faders in the range between -30 dB
and -20 dB. Establish a basic mix, using the channel fad-
ers, so that the individual sound levels relate to each oth-
er according to your personal taste. The best range for
the channel faders to be set to is in the area of -5 dB to
0 dB. In this way you are provided with enough tolerance
for later adjustments.
Use the master faders to adjust the overall volume.