


POWERMATE 3
2
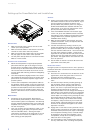
Setting-up the PowerMate fast and trouble-free
PREPARATIONS
1. Make sure that all rotary controls are set to their
center (12 o’clock) position.
2. Make sure that all faders in the bottom area of the
console are set to their minimum position.
3. Make sure that all the smaller faders of the graphic
EQ (top right) are set to their center position.
4. Use the power lead provided to connect the Power-
Mate to a mains socket.
S
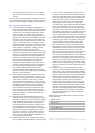
ETTING UP THE LOUDSPEAKERS
5. Mount the loudspeakers on appropriate speaker
pole-stands left and right of the stage or the per-
forming artists. The height of the speakers should
be set so they are above the heads of the audience.
This ensures that sound levels at the front are not
too high, while still achieving sufficient intelligibility
at the back.
6. Turn the loudspeakers slightly towards “the center”.
This enables the performing artists to monitor their
performance even without separate stage monitor
speaker systems.
7. Connect the loudspeakers with Speakon cables to
the amplifier output sockets on the rear of the Pow-
erMate. When connecting the Speakon cables to the
speakers and the amplifier insert the connector into
the socket and turn it clockwise until it clicks into
position. Otherwise a secure connection will not be
achieved.
M
ICROPHONES
8. Positioning of the microphones. Microphones
should not be placed directly in front of the sound
reinforcement system’s loudspeakers. This will help
prevent unwanted feedback which occurs when the
amplified sound coming from a speaker is fed back
into the microphone.
9. First, only connect one microphone to Input 1. Use
only heavy duty, good quality microphone cables.
Thin and inflexible cables – although cheaper –
could lead to accidents on the stage and are one of
the most common reasons for problems to occur
when setting up the equipment.
S
TART-UP
10. Switch on the mains power to the PowerMate, using
the POWER switch on the rear of the device. If you
are using phantom powered condenser micro-
phones, switch the phantom power on, using the
PHANTOM POWER button between the MIC and
LINE sockets. If you are only using dynamic micro-
phones, leave this button unpressed.
11. If the red STANDBY indicator in the bottom right
corner is lit, press the STANDBY switch to activate
the appliance. Note: Playback of intermission music
(using 2TRACK IN) is possible regardless of the
STANDBY switch setting.
12. Make sure the amplifier output power, set in the
„Speaker Protection“ menu, corresponds with the
connected loudspeakers.
13. Test the microphone by holding it close to your
mouth and speaking into it loudly. The green signal
present indicator (SIG) of channel 1 will light. Turn
the first channel’s GAIN control – the control at the
very top of the channel’s module – slowly to the
right until the red peak indicator (PK) starts to flash
briefly. Now turn the GAIN control back to the left
just a little. The signal level for this channel is now
set to its optimum.
14. Set the fader of channel 1 to the 0 dB mark in the
upper third of the fader path.
E
FFECTS AND FILTERS
During the power on sequence the FX 1 unit is preset to
the Reverb effect No. 5 and the FX 2 unit is preset to the
Echo effect No. 55.
15. Press the FX 1 ON and the FX 2 ON buttons on the
right bottom, above the green faders. The corre-
sponding ON LEDs will light up green.
16. Position the FX 1 and FX 2 faders at the -10 dB
mark.
17. Increase the output level by carefully pushing up
the red master output controls (right bottom),
while at the same time speaking into the micro-
phone. Your voice is reproduced through the loud-
speakers, being enhanced by an echo and
reverberation effect. You can change the intensity of
either effect, to the desired amount, by re-adjusting
the FX 1 and FX 2 faders. You can also change the
reverb depth or the delay time by pressing the func-
tion buttons below the display to select another
effect. Within each group of effects the intensity
and depths / delay increases as you increase the
preset number. Individual settings for each input
channel can be adjusted through the use of their
separate FX controls.
18. Engage the LO CUT filter on every channel a micro-
phone is being connected to. This filter suppresses
unwanted low frequencies (foot steps on the stage
and microphone handling noise). It should always
be engaged for all vocal and woodwind / horns
microphones; except when recording trombone,
tuba, bass drum or bass guitar.
19. The VOICE filters of the monaural input channels
are very useful with “thin” sounding microphones
1
2
3
1
2