


40
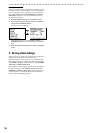
2-6. Deleting track data (Delete)
You can use this operation to delete the data of virtual tracks
that are not currently selected for channel tracks 1 through 8,
and WAV files other the one that is currently selected for the
master track.
By deleting unwanted data you can increase the free space
(the remaining recordable time) on the hard drive.
If you select master tracks for deletion, all WAV files not assigned
to the master track or to a channel track will be deleted.
You can’t use Undo to reverse the result of this operation. Be care-
ful not to delete any important track data.
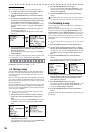
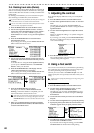
1) Press the MENU button to access the Menu screen.
2) Use the cursor up/down buttons to select “1: Track,”
and use the cursor left/right buttons to select “Delete”.
Alternatively, you can select “1: Track” by pressing
channel button “1” instead of using the cursor up/down
buttons.
3) Press the ENTER/OK button to access the Delete
Unused V.Track screen.
If you change your mind, press the EXIT/CANCEL but-
ton to return to the Menu screen.
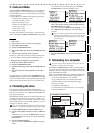
4) Use the cursor up/down buttons to select the track or
master track whose unused virtual track data you want
to delete.
As an alternative to using the cursor up/down buttons,
you can press a channel button 1–8 or the MASTER
button to make your selection.
5) Press the ENTER/OK button. The display will ask
“Delete Unused V.Track: Are you sure?”
If you change your mind, press the EXIT/CANCEL but-
ton to return to the Delete Unused V.Track screen.
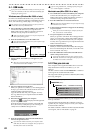
6) Press the ENTER/OK button once again.
The display will indicate “Delete Unused V.Track:
Working...” When the deletion is completed, you will
return to the Delete Unused V.Track screen.
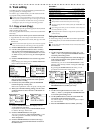
If the track you selected only contains data for the currently-
used virtual track, an error message will appear. Press the
ENTER/OK button to return to the Delete Unused V.Track
screen.
7) When you’ve finished deleting unwanted track data,
press the EXIT/CANCEL button (or the Menu button)
to return to the Menu screen.
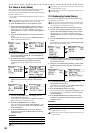
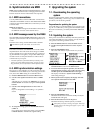
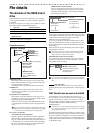
1. Adjusting the contrast
If you find the display difficult to read, you can adjust the
contrast.
1) Press the MENU button to access the Menu screen.
2) Use the cursor up/down buttons to select “6. LCD Con-
trast”.
Alternatively, you can select “6: LCD Contrast” by
pressing channel button “6” instead of using the cursor
up/down buttons.
3) Use the cursor left/right buttons to adjust the contrast
setting.
When you modify the setting, a “?” symbol will appear
after the value.
If you change your mind, press the EXIT/CANCEL but-
ton; the “?” will disappear and you will revert to the pre-
vious contrast setting.
4) Press the ENTER/OK button.
The “?” following the value will disappear, and the new
contrast setting will be applied.
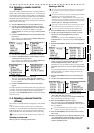
2. Using a foot switch
You can use a foot switch (we recommend the optional Korg
PS-1 pedal switch) to switch between punch-in and punch-
out when performing manual punch recording.
Connect your foot switch to the FOOT SW jack. You will
need to specify the correct polarity for the foot switch you’re
using.
You don’t need to specify the polarity if you’re using a Korg PS-1
pedal switch.
Specifying the foot switch polarity
1) Press the MENU button to access the Menu screen.
2) Use the cursor up/down buttons to select “7. Foot
Switch,” and press the ENTER/OK button.
Alternatively, you can select “7: Foot Switch” by press-
ing channel button “7” instead of using the cursor up/
down buttons.
3) Connect the foot switch you want to use to the FOOT
SW jack.
4) Use the cursor left/right buttons to specify the polarity.
5) Specify the polarity that makes the “Check status” ON
indication appear when you press your foot switch.
6) To confirm the change, press the ENTER/OK button.
You will return to the Menu screen.
If you decide not to change the setting, press the EXIT/
CANCEL button to maintain the existing setting.
Other