


Inserting the Internal Effects into Channels 65
01V96i—Reference Manual
Internal Effects
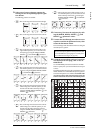
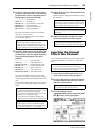
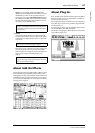
3. To select a signal to be input to the effects
processor, move the cursor to the desired In
parameter box, select a signal from the fol-
lowing options, then press [ENTER].
• – ................................ No assignment
• AUX1–8 ..................Aux Sends 1–8
• INS CH1–32........... Input Channel 1–32 Insert Out
• INS BUS1–8........... Bus 1–8 Insert Out
• INS AUX1–8.......... Aux Send 1–8 Insert Out
• INS ST-L/R............. Stereo Out Insert Out
To use the internal effects processors via Aux Sends,
select Aux 1–8 (in most cases).
You can patch a different signal to the other input of
2-in/2-out effect programs.
4. To patch a signal output from the effects pro-
cessor, move the cursor to the desired OUT
parameter box, select the signal destination
from the following options, then press
[ENTER].
• – ...............................................No assignment
• CH1–32..................................Input Channels 1–32
• ST IN 1L–ST IN 4R.............ST IN Channels 1L–4R
• INS CH1–32..........................Input Channel Insert In
• INS BUS1–8..........................Bus 1–8 Insert In
• INS AUX1–8.........................Aux 1–8 Insert In
• INS ST-L & INS ST-R.........Stereo Bus Insert In
To use the internal effects processors via Aux Sends,
select CH 1–32 or ST IN 1–4 (in most cases). The chan-
nels you assign here will become the effects return chan-
nels.
You can patch a different channel to the other output of a
1-in/2-out or 2-in/2-out effect program to create stereo
effects.
5. Adjust the level of Aux Sends patched to the
effects processor.
Refer to “Aux Outs” on page 36 for information on setting
the Aux Sends.
6. Adjust the level, pan, and EQ of the Input
Channels patched to the effect outputs.
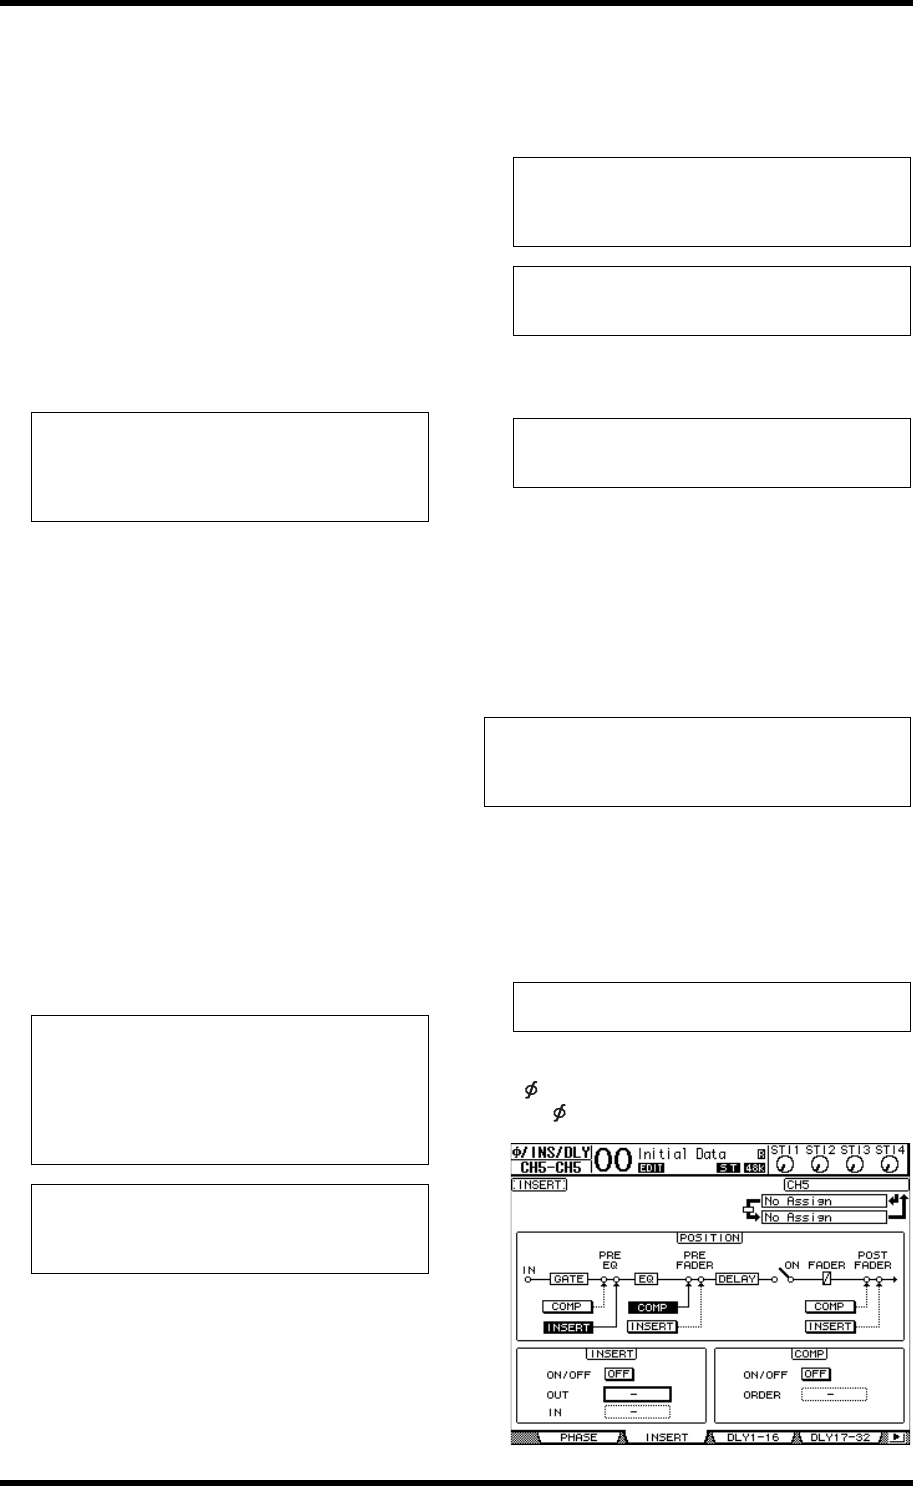
Inserting the Internal
Effects into Channels
You can insert the internal effects into certain Input Channels
or Output Channels (Bus 1–8, Aux Bus 1–8, or the Stereo
Bus).
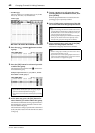
1. Select an internal Effects processor (1–4),
then recall the desired effect programs.
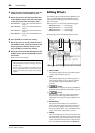
2. Press the [SEL] button of the Input Channel
or Output Channel into which you want to
insert the selected effects.
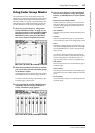
3. Press the DISPLAY ACCESS
[ /INSERT/DELAY] button repeatedly until
the /Ins/Dly | Insert page appears.
Tip:
• You can patch a signal to multiple effect inputs.
• Move the cursor to an IN parameter box and press the
[ENTER] button. The Patch Select window appears. This
window enables you to select the input source quickly.
Tip:
• If you select an ST IN Channel as the destination, you can
patch the L and R channel signals separately.
• You can also use the Patch Select window to set the OUT
parameter boxes, as explained in Step 3.
• The number of inputs available for each effect varies
depending on the type of effect programs initially recalled.
Note: You cannot select a channel as the destination of mul-
tiple effect signals. If you select a channel that is already
selected in another OUT parameter box, that OUT parame-
ter box switches its indicator to “–” (not assigned).
Note: Do not raise the level of the Aux Sends (patched to the
effects processor’s input) on the effects return channels. Oth-
erwise, the signal will return to the same channel, creating a
signal loop and possibly damaging your speakers.
Tip: Use the Master layer fader to adjust the final Aux Send
output level. At this time, you can view the level on the Meter
| Master page.
Tip: To mix the effects sound returned via the Aux sends with
the original dry sound, set the effect’s MIX BALANCE
parameter to 100% (only the effects sound will be output).
Note:
• You cannot use Insert In and Out for ST IN Channels.
• If effects are inserted in channels, you cannot use those effects
via Aux Sends or insert them into other channels.
Tip: Repeatedly pressing the STEREO [SEL] button toggles
between the left and right Stereo Bus channels.