


Pro Tools Remote Layer 87
01V96i—Reference Manual
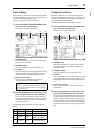
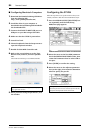
Remote Control
Control Surface Operation
When the Pro Tools Remote layer is selected, the 01V96i con-
trols on the top panel engage the following functions:
■ Channel Strip section
• [SEL] buttons
These buttons select Pro Tools channels, inserts, and
Automation mode.
• [SOLO] buttons
These buttons solo Pro Tools channels. The button indi-
cators for the soloed channels light up.
•[ON] buttons
These buttons mute Pro Tools channels.
•Faders
The faders set Pro Tools channel levels, including the
audio tracks, MIDI tracks, master fader, Aux Ins, etc. If 16
or fewer channels are displayed in Pro Tools, faders are
assigned starting from the left-most channel.
■ FADER MODE Section
• [AUX 1]–[AUX 5] buttons
These buttons select Sends A–E so that you can adjust the
corresponding Pro Tools channel send level.
•[AUX 6] button
Press and hold down this button and press the desired
[SEL] button to reset the corresponding channel fader
level.
Move the cursor to the parameter control on the display,
then press and hold down this button and press [ENTER]
to reset the corresponding channel panpot to center.
While you are holding down the [AUX 6] button, the
SELECT ASSIGN parameter indicates “DFLT.”
•[AUX 7] button
When this button is turned on, you can adjust the selected
channel panpot using the SELECTED CHANNEL [PAN]
control. If you turn on this button while a Channel Dis-
play mode page is selected, you can adjust each channel
panpot using parameter controls 1–16.
To adjust the stereo channel panpots, press this button
repeatedly to toggle between L and R channels.
•[AUX 8] button
Use this button along with the desired [SEL] button to
assign a plug-in to the corresponding Pro Tools channel
(see page 90).
• [HOME] button
This button turns Flip mode (see page 90) on or off. Flip
mode enables you to adjust the Aux Send parameters
using the faders, [ON] buttons, and the [PAN] control.
■ DISPLAY ACCESS section
• [PAIR/GROUP] button
Press this button while a Channel Display mode or Meter
Display mode page is selected to display a Group ID to
which each channel belongs.
• [EFFECT] button
Press this button to display or hide the Insert window in
Pro Tools.
■ Display section
•[F1] button
Press this button to reset the Clipping and Peak Hold
indicators on Meter Display mode pages.
•Tab Scroll buttons ([ ]/[ ])
These buttons switch the INSERT ASSIGN/EDIT param-
eter settings on Insert Display mode pages.
■ Data Entry section
• [ENTER] button
This button switches the on/off status of the buttons on
the display.
• Left, Right, Up, Down ([ ]/[ ]/[ ]/[ ]) cursor
buttons
These buttons move the cursor on the display.
• [INC] & [DEC] buttons
The [INC] button works the same as the Enter key on
your computer keyboard. The [DEC] button works the
same as the Esc key on your computer keyboard.
• Parameter wheel
The Parameter wheel enables you to adjust the cur-
rently-selected parameter, or execute the shuttle and
scrub operation. By default, it adjusts the value of the cur-
rently-selected parameter (The P.WHEEL MODE
parameter indicates “Prm.”).
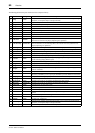
■ USER DEFINED KEYS section
• [1]–[8] buttons
You can assign one of 194 parameters to each of these but-
tons. In particular, if you assign any of 54 Remote Control
parameters to these buttons, you can operate the trans-
port section and select various Pro Tools modes from the
01V96i top panel. For more information on assigning
functions to keys, refer to “Using the User Defined Keys”
in the Owner’s Manual (separate booklet).
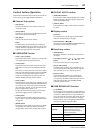
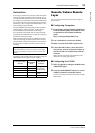
Parameter Function
DAW REC
Places Pro Tools in Record Enabled
mode. The button indicator flashes
while the transport section is
stopped. The indicator lights up
when recording starts.
DAW PLAY
Starts playback from the current cur-
sor position.
DAW STOP Stops playback and recording.
DAW FF Fast forwards the cursor position.