


96 Remote Control
01V96i—Reference Manual
Assigning MIDI Messages to
Channel Controls
You can quickly use the MIDI Remote function if you use the
factory presets in the banks. However, you can also assign the
desired MIDI messages to the faders or [ON] buttons.
This section describes how to assign MIDI messages to the
channel controls, using the example of assigning Hold
On/Off messages (Control Change #64; Values 127 & 0) to the
Channel 1 [ON] button.
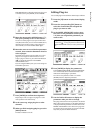
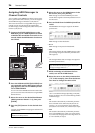
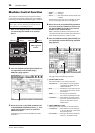
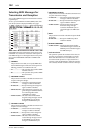
1. Connect the 01V96i’s MIDI IN port to the
MIDI OUT port of a MIDI keyboard to which
a Hold On/Off controllable foot switch is con-
nected. Enable the MIDI Remote function on
the 01V96i.
2. Press the DISPLAY ACCESS [DIO/SETUP] but-
ton repeatedly until the DIO/Setup | Remote
page appears, then set the TARGET parame-
ter to USER DEFINED.
You can now use the MIDI Remote function. Refer to the
previous section for more information on using the MIDI
Remote function.
3. Move the cursor to the desired bank button
(BANK parameter buttons 1–4), then press
[ENTER].
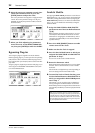
4. Press the [SEL] buttons for the desired chan-
nels.
Currently-assigned MIDI messages appear in the ON and
FADER sections.
5. Move the cursor to the LEARN button in the
ON section, then press [ENTER].
MIDI messages received at the MIDI IN port of the
01V96i will be assigned to the DATA parameter boxes in
the ON section.
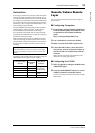
6. Press and hold down the MIDI keyboard foot
switch.
The MIDI Hold On message is assigned in the DATA
parameter box.
MIDI messages are described below:
•00–7F
MIDI messages are expressed in hexadecimal.
•END
This message indicates the end of MIDI messages. Subse-
quent messages assigned in the DATA parameter boxes
will be ignored.
•–
This message indicates that no messages are assigned to
the DATA parameter boxes.
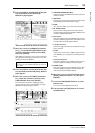
7. While continuing to hold down the foot
switch, turn off the LEARN button.
8. Move the cursor to the third parameter box
(“7F” in this example), then rotate the Param-
eter wheel to change the value to SW.
“SW” is a variable that changes depending on the [ON]
button’s on/off status. You can use the following variables
in MIDI messages.
•SW
This variable is selectable only in the DATA parameter
boxes of the ON section. When the [ON] buttons are
turned on, “7F” (127 in decimal) is output. When the
[ON] buttons are turned off, “00” (0 in decimal) is output.
•FAD
This variable is selectable only in the DATA parameter
boxes of the FADER section. When you operate the fad-
ers, continuously changing values in the range of 00 to 7F
(0–127 in decimal) are output.
Tip: You can also choose the desired channels using the ID,
SHORT, and LONG parameters.
SOLO SOLO
ON ON
SOLO
ON
SOLO
ON
SOLO
ON
SOLO
ON
SOLO
ON
SOLO
ON
SOLO
ON
SOLO
ON
SOLO
ON
SOLO
ON
SOLO
ON
SOLO
ON
SOLO
ON
SOLO
ON
SOLO
ON
SOLO
ONON
PEAK
SIGNAL
PEAK
SIGNAL
PEAK
SIGNAL
PEAK
SIGNAL
PEAK
SIGNAL
PEAK
SIGNAL
PEAK
SIGNAL
PEAK
SIGNAL
PEAK
SIGNAL
PEAK
SIGNAL
PEAK
SIGNAL
PEAK
SIGNAL
PEAK
SIGNAL
PEAK
SIGNAL
1-16 17-32MASTERREMOTE
LAYER
SEL SEL SEL SEL SEL SEL SEL SEL SEL SEL SEL SEL SEL SEL SEL SEL SEL SELSEL
ST IN
ENTER
STEREO
DEC INC
SOLO CLEAR
RECALL
STORE
SCENE MEMORY
PHONES
MONITOR
OUT
MONITOR
2TR IN
CH15
/
16
2TR IN
LEVEL
PHONES
LEVEL
0
10
0
10
+4
-26
GAIN
+4
-26
GAIN
+4
-26
GAIN
GAIN
+4
-26
GAIN
20dB
-16 -60
GAIN
20dB
-16 -60
GAIN
20dB20dB20dB20dB20dB20dB20dB20dB20dB20dB
-16 -60
GAIN
-16 -60
GAIN
-16 -60
GAIN
-16 -60
GAIN
-16 -60
GAIN
-16 -60
GAIN
-16 -60
GAIN
-16 -60
GAIN
-16 -60
GAIN
-16 -60
PAD
FADER MODE
DISPLAY ACCESS
AUX 1
AUX 1 AUX 2 AUX 3 AUX 4 AUX 5 AUX 6 AUX 7 AUX 8 BUS 1 BUS 2 BUS 3 BUS 4 BUS 5 BUS 6 BUS 7 BUS 8
AUX 2 AU X 3 AUX 4
AUX 8AUX 7AUX 6AUX 5
HOME (METER)
DYNAMICS
EQ EFFECTVIEW
PATCH
UTILITYMIDISCENE
DIO/SETUP
/ INSERT/
DELAY
PAN/
ROUTING
PAIR/
GROUP
A
B
A
B
A
B
A
B
A
B
A
B
A
B
A
B
A
B
A
B
A
B
A
B
16
1513
121110987643215
14
INSERT I
/
OINSERT I
/
OINSERT I
/
OINSERT I
/
OINSERT I
/
OINSERT I
/
OINSERT I
/
OINSERT I
/
OINSERT I
/
OINSERT I
/
OINSERT I
/
OINSERT I
/
O
L
R
IN OUT
2TR
-10dBV (UNBAL)
PHANTOM +48V
CH9-12CH5-8CH1-4
INPUT
(BAL)
INSERT
OUTIN
(UNBAL)
ST IN 1 ST IN 2
USER DEFINED
KEYS
12
34
56
78
55
5
+10
5
1010
10
1515
15
2020
20
303030
30
4040
40
5050
50
6060
7070
20
30
40
40
50
50
60
70
00
5
10
15
20
0
0
5
+10
5
10
15
30
20
30
40
40
50
50
60
70
20
30
40
40
50
50
60
70
20
30
40
40
50
50
60
70
20
30
40
40
50
50
60
70
20
30
40
40
50
50
60
70
15
0
5
10
15
20
0
5
+10
5
10
0
30
15
5
10
15
20
0
5
+10
5
10
0
30
15
5
10
15
20
0
5
+10
5
10
0
30
15
5
10
15
20
0
5
+10
5
10
0
30
15
20
30
40
40
50
50
60
70
30
15
20
30
40
40
20
30
40
20
30
40
20
30
40
50
50505050
20
30
40
50
20
30
40
50
60
70
40
50
60
70
40
50
60
70
40
50
60
70
40
50
60
70
40
50
60
70
40
50
60
70
40
50
60
70
30
15
5
10
15
20
0
5
+10
5
10
0
5
10
15
20
0
5
+10
5
10
0
5
10
15
20
0
30
5
10
15
20
0
30
5
10
15
20
0
30
5
10
15
20
0
30
5
10
15
20
0
303030
5
10
15
20
0
5
10
15
20
0
5
10
15
20
0
5
+10
5
10
0
15
5
+10
5
10
0
15
5
+10
5
10
0
15
5
+10
5
10
0
15
20
30
40
50
15 15
20
30
40
50
15
5
+10
5
10
0
5
+10
5
10
0
5
+10
5
10
0
5
+10
5
10
0
123456
123456
7
8 9 10 11 12
7
8 9 10 11 12
13 14 15 16
13 14 15 16
32313029282726252423222120191817
STEREO
13 1415 16
OVER
0
-3
-6
-9
-12
-15
-18
-24
-30
-36
-48
HIGH
HIGH-MID
LOW-MID
LOW
Q
FREQUENCY
GAIN
MIDI OUT
MIDI keyboard
MIDI INMIDI OUT
MIDI IN
Foot switch
Tip: When you click the LEARN button to assign MIDI mes-
sages, the 01V96i automatically recognizes the end of the
messages and assigns END and “–.”