


147
Song management
13
Restoring songs or sample libraries
Here’s how data that you backed up to CD-R/RW media
can be restored to the hard disk of the AW16G.
1
Insert the CD-R/RW media containing the
backup data into the CD-RW drive.
If the backup data occupies more than one volume
of media, insert the first volume.
2
In the Work Navigate section, press the [CD]
key.
The CD screen will appear.
3
Repeatedly press the [CD] key or hold down
the [CD] key and use the CURSOR [ ]/[ ]
keys to access the RESTORE page.
In this page, data that you backed up to CD-R/RW
media can be restored to the internal hard disk.
4
Make sure that the cursor is located at the
READ CD INFO button, and press the
[ENTER] key.
Information will be read from the inserted CD-R/
RW media. When the information has been read, a
display like the following will appear.
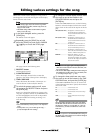
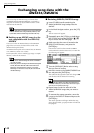
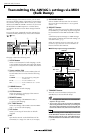
1 List
This area lists the data that has been backed up on
the CD-R/RW media. The symbols at the right of the
list indicate whether an item of data has been
selected (●) or disabled (O) for restore.
B PAD button
When this button is off, the list will show the songs
that were backed up on the CD-R/RW media. When
this button is on, the list will show the sample
libraries that were backed up on the CD-R/RW
media.
C ALL button
You can use this button to select all the data that
appears in the list. If you turn this button on and
then turn the ENABLE/DISABLE button on, all data
displayed in the list will be selected for restore.
D ENABLE/DISABLE button
Selects whether an item of data will be selected for
restore (ENABLE) or not selected (DISABLE).
E SYSTEM button
Selects the system data (AW16G settings you make
in the UTILITY screen) for restoring.
F EXECUTE button
Executes the restore operation
Note
Note
You cannot operate the items in the RESTORE page until
the inserted CD-R/RW media has been read.
5
Turn the [DATA/JOG] dial to select the data
that you want to restore. Then move the cur-
sor to the ENABLE/DISABLE button and press
the [ENTER] key.
The symbol at the right will change to the ● sym-
bol, indicating that this data has been selected for
restoring.
If you turn on the ALL button and then move the
cursor to the ENABLE/DISABLE button and press the
[ENTER] key, all data shown in the list will be
selected in one step.
6
If you want to restore the system data, move
the cursor to the SYSTEM button and press
the [ENTER] key.
The button will be turned on, and the system data
will be selected for restoring.
7
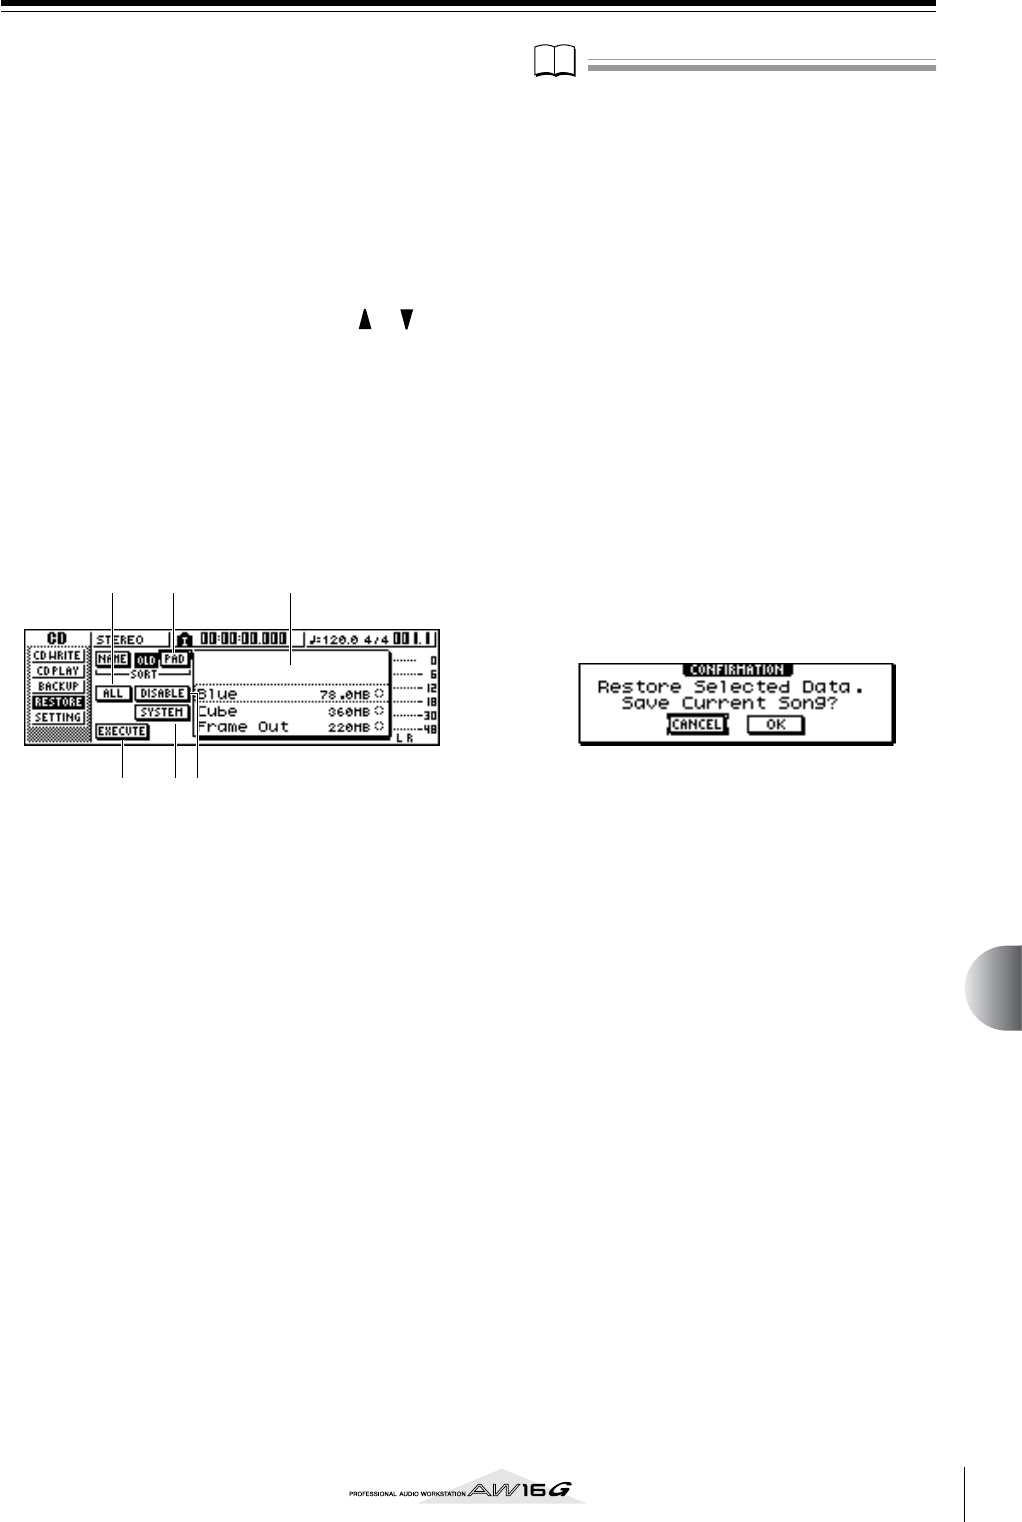
To execute the restore operation, move the
cursor to the EXECUTE button and press the
[ENTER] key.
A popup window will ask you to confirm the opera-
tion.
8
Move the cursor to the OK button if you
want to execute the restore operation (or to
the CANCEL button if you decide not to
restore), and press the [ENTER] key.
The current song will be saved automatically, and
the restore operation will begin.
A popup window will indicate the progress of the
restore operation. When the operation is finished,
you will return to step 3.
If the backup occupied more than one volume of
CD-R/RW media, a message of “Exchange Next
Media #XXX” (where XXX is a number) will be dis-
played during the restore process. Exchange the
CD-R/RW media for the media of the corresponding
number. Then move the cursor to the OK button and
press the [ENTER] key.
6 54
123