


4
Installing the AX44
AX44—Owner’s Manual
Installing the AX44
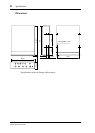
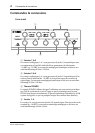
The AX44 installs into a single 5.25-inch drive bay, and is secured using the
four screws supplied. There are three sets of fixing holes in the AX44: two on
the sides and one underneath. Use the set that matches your computer’s drive
bay. If you need to replace a screw, look for M3 x 6 mm machine screws. Do
not use screws longer than 6 mm as they may damage the AX44.
See your computer’s manual for full details on installing drive bay devices.
1
Turn off the computer and disconnect the power cord.
2
Remove the computer’s cover.
3
Install the AX44 into a 5.25-inch drive bay, as explained in your
computer’s manual.
4
Connect an unused power connector from the computer’s power
supply to the AX44 DC IN connector.
5
Connect the AX44 to DS2416 connector “IO-A ( )” using the
supplied 20-pin cable (connect the end with the ferrite core to the
DS2416).
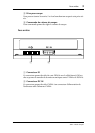
Installing a Second AX44
Two AX44 units can be connected to a single DS2416 card.
1
Install the second AX44 into a 5.25-inch drive bay, as explained in
your computer’s manual.
2
Connect an unused power connector from the computer’s power
supply to the AX44 DC IN connector.
3
Connect the second AX44 to DS2416 connector “IO-B ( )” using
the supplied 20-pin cable.
A
AB