


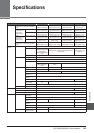
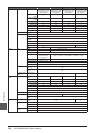
Handling the Floppy Disk Drive (FDD) and Floppy Disks
CVP-509/505/503/501 Owner’s Manual 119
3
Handling the Floppy Disk Drive
(FDD) and Floppy Disks
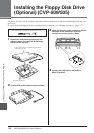
(The floppy disk drive is optional. For instructions on installing the floppy disk drive, see page 127.)
The floppy disk drive lets you save original data you’ve created on the instrument to floppy disk, and allows you to
load data from floppy disk to the instrument.
Be sure to handle floppy disks and treat the disk drive with care. Follow the important precautions below.
3.5" 2DD and 2HD type floppy disks can be used.
If you find that you are unable to use new, blank disks or old disks that
have been used with other devices, you may need to format them. For
details on how to format a disk, see page 107. Keep in mind that all data on
the disk will be lost after formatting. Make sure to check beforehand
whether or not the disk contains important data.
NOTE
Floppy disks formatted on this device may or may not be useable as is on other devices.
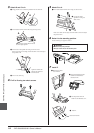
Inserting a Floppy Disk into the Disk Drive:
Hold the disk so that the label of the disk is facing upward and the sliding
shutter is facing forward, towards the disk slot. Carefully insert the disk
into the slot, slowly pushing it all the way in until it clicks into place and
the eject button pops out.
CAUTION
Never insert anything but floppy disks into the disk drive. Other objects may cause
damage to the disk drive or floppy disks.
Removing a Floppy Disk
After checking that the instrument is not accessing* the floppy disk
(checking that the use lamp on the floppy disk drive is off), firmly press the
eject button at the upper right of the disk slot all the way in. When the
floppy disk is ejected, pull it out of the drive. If the floppy disk cannot be
removed because it is stuck, do not try to force it, but instead try pressing
the eject button again, or try re-inserting the disk and attempt to eject it
again.
* Access of the disk indicates an active operation, such as recording, play-
back, or deletion of data.
If a floppy disk is inserted while the power is on, the disk is automatically
accessed, since the instrument checks whether the disk has data.
CAUTION
Do not remove the floppy disk or turn off the instrument itself while the disk is being
accessed. Doing so may result not only in loss of data on the disk but also damage
to the floppy disk drive.
Be sure to remove the floppy disk from the disk drive before turning off the
power. A floppy disk left in the drive for extended periods can easily pick
up dust and dirt that can cause data-read and -write errors.
• Clean the read/write head regularly. This instrument employs a precision
magnetic read/write head which, after an extended period of use, will
pick up a layer of magnetic particles from the disks used that will eventu-
ally cause read and write errors.
• To maintain the disk drive in optimum working order Yamaha recom-
mends that you use a commercially-available dry-type head cleaning disk
to clean the head about once a month. Ask your Yamaha dealer about the
availability of proper head cleaning disks.
Handle floppy disks with care, and follow these precau-
tions:
• Do not place heavy objects on a disk or bend or apply pressure to the disk
in any way. Always keep floppy disks in their protective cases when they
are not in use.
• Do not expose the disk to direct sunlight, extremely high or low tempera-
tures, or excessive humidity, dust or liquids.
• Do not open the sliding shutter and touch the exposed surface of the
floppy disk inside.
• Do not expose the disk to magnetic fields, such as those produced by tele-
visions, speakers, motors, etc., since magnetic fields can partially or
completely erase data on the disk, rendering it unreadable.
• Never use a floppy disk with a deformed shutter or housing.
• Do not attach anything other than the provided labels to a floppy disk.
Also make sure that labels are attached in the proper location.
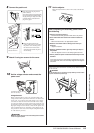
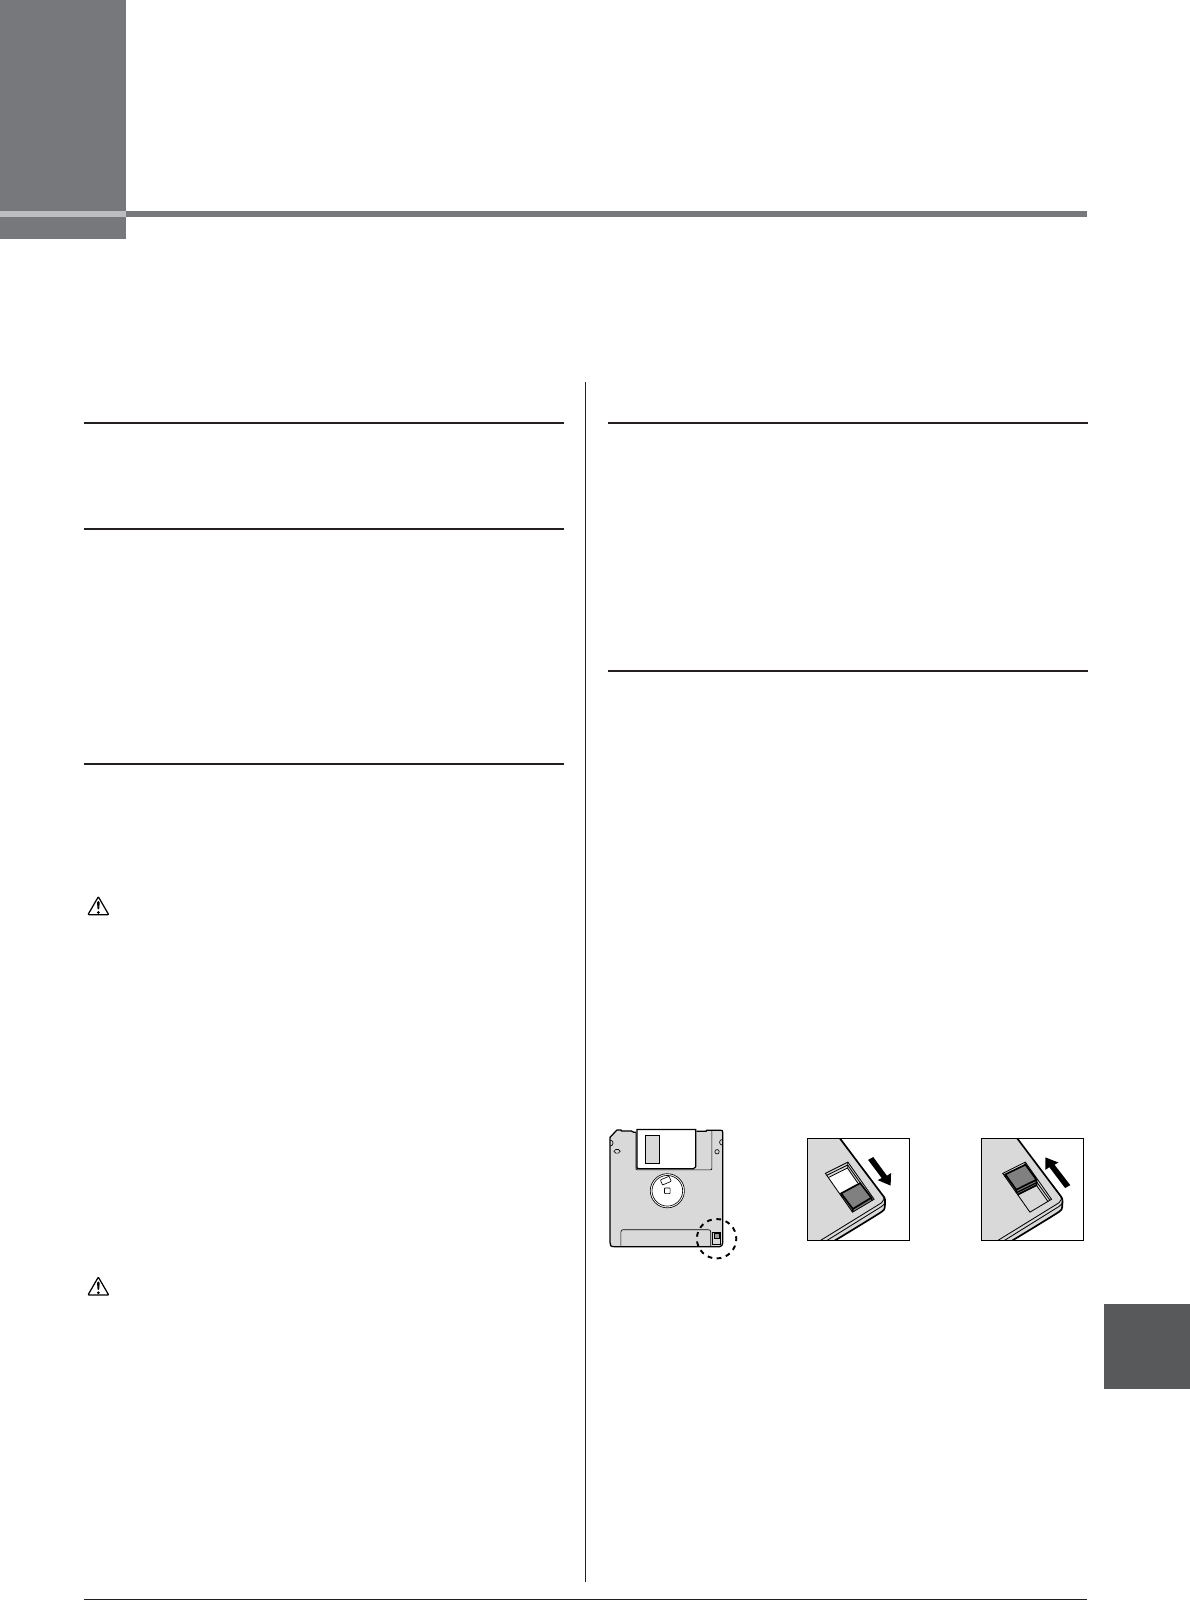
To Protect Your Data (Write-protect Tab):
To prevent accidental erasure of important data, slide the disk’s write-pro-
tect tab to the “protect” position (tab open). When saving data, make sure
that the disk’s write-protect tab is set to the “overwrite” position (tab
closed).
Data Back up
For maximum data security Yamaha recommends that you keep two copies
of important data on separate floppy disks.
Floppy Disk Compatibility
Formatting a Floppy Disk
Inserting/Removing Floppy Disks
Cleaning the Disk Drive Read/Write Head
About Floppy Disks
Write-protect tab
ON
(locked or write
protected)
Write-protect tab
OFF
(unlocked or write
enabled)