


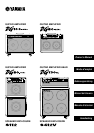


9
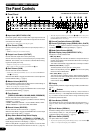
How to use your DG Series Amplifier
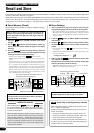
To protect the speaker from possible damage, always set the OUTPUT knob to “0”
before switching the power ON/OFF.
HINT OUTPUT knob and MASTER knob
Turning either knob will change the volume. The MASTER knob
controls the preamp’s master volume. This setting is stored in
memory. The OUTPUT knob controls the power amp’s volume.
This setting is not stored in memory. Volume levels for individual
memory settings should be set with the MASTER knob. The
speaker’s output level should be controlled with the OUTPUT
knob.
* When an AMP SELECT button is pressed, all knobs (except TRIM,
OUTPUT and REVERB) will return to their preset positions. (GAIN
and MASTER = 7, all tone controls = 5. To save edited settings, refer to
the “Store Settings” section on page 10.)
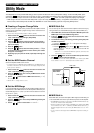
■ First, achieve sound output
1. With the DG amplifier’s power switched OFF, connect your gui-
tar to the INPUT jack on the front panel. To start with, try using
the LOW jack.
2. With the OUTPUT knob set to “0”, switch the power ON.
3. As a starting point, set the TRIM level to “5” and strum the gui-
tar. Then, gradually raise the OUTPUT level.
4. Once you have sound output, proceed to set the TRIM level as
described in the following section.
■ Adjust the TRIM level
The TRIM level allows you to set the output level of the guitar to an
optimum level that matches the DG amplifier’s INPUT jack. With a well
adjusted TRIM level, subtle picking nuances and the attack of a strong
strum can be clearly heard. An improperly adjusted trim level will result
in noise, feedback, and/or a cut up sound.
* The output level between guitars does vary. Whenever you switch guitars, it
will be necessary to readjust the trim level to match the guitar.
* HIGH and LOW input levels are different. Even if the same guitar is used,
make sure the TRIM level is readjusted whenever a different input jack is
used.
* Even when creating distortion, make sure that the TRIM level is properly
adjusted, and use the GAIN control to produce distortion.
1. Set the guitar’s volume to its maximum level and powerfully
strum the guitar. Begin to adjust the TRIM level.
An optimum level is achieved when the Green LED is lit.
2. Continue rotating the TRIM knob to the right, so long as the
Red LED does not light. Set the TRIM level to “10” if the Red
LED does not light.
* If the Red LED still does not light, lower the TRIM level, connect the
guitar to the HIGH input jack and repeat the previous procedure.
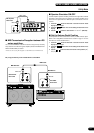
■ Sound Settings
Choose one of the DG amplifier’s eight preset amp types, then use the
GAIN+MASTER, and tone controls to shape the guitar’s sound.
1. Choose an amp type using one of the AMP SELECT buttons.
The selected amp type button’s LED will light.
2. Use the GAIN, MASTER, and the five tone controls to shape the
guitar’s sound.
■ Reverb Settings
1. Press the REVERB button to select a reverb type. Each time
the REVERB button is pressed, the type will cycle through
SPRING → HALL → PLATE settings. The lamp for the selected
reverb type will light.
2. Use the REVERB knob to adjust the amount of reverb.
* Reverb settings (type and REVERB knob settings) will remain in affect,
even if the AMP SELECT button is pressed to change the amp type. When a
different memory number is recalled, the reverb settings for that memory
number will then be in affect.
■
Effect (Tremolo, Chorus, Tape Echo) Settings
1. Press the button so that the EFFECT lamp is lit.
When the EFFECT mode is entered each knob, GAIN — RE-
VERB, will rotate to the positions set in the memory.
2. Use the GAIN — REVERB knobs to adjust the amount of each
effect as needed.
● Tremolo Effect
• GAIN (SPEED: Tremolo Speed)
Sets the speed of the Tremolo Effect (the speed at which the effect’s
volume is increased and decreased). Rotate the knob to the right to in-
crease the speed.
• MASTER (DEPTH: Tremolo Depth)
Sets the depth of the Tremolo Effect (the upper and lower limits of the
effect’s volume). Rotate the knob to the right to produce more effect.
● Chorus Effect
• TREBLE (SPEED: Chorus Speed)
Sets the speed of the Chorus Effect (the speed at which the effect’s pitch
is raised and lowered). Rotate the knob to the right to increase the speed.
• HIGH MID (DEPTH: Chorus Depth)
Sets the depth of the Chorus Effect (the upper and lower limits of the
effect’s pitch). Rotate the knob to the right to produce more effect.
• LOW MID (LEVEL: Chorus Level)
Sets the mix level of the Chorus Effect.
● Tape Echo Effect
• BASS (TIME: Echo Time)
Sets the amount of time between the sounding of the string and the echo
sound (the amount of time it takes between one echo and the next).
Rotate the knob to the right to increase the amount of time.
• PRESENCE (FEEDBACK)
Sets the length of time that the echo will repeat. Rotate the knob to the
right to increase the length of time. Rotating the knob too much can
result in uncontrollable feedback, please use caution.
• REVERB (LEVEL: Echo Level)
Sets the echo’s volume level.
3. When the setting procedure is complete, press the or
button and the AMP lamp will light.
Each of the GAIN — REVERB knobs will revert to the positions
they were to prior to entering the EFFECT mode.
* Effect settings will remain in effect even if the AMP SELECT button is pressed
to select another amp type. When you recall a different memory number
with the “Recall Memory” function (refer to page 10), the settings for that
memory number’s effect will then be in affect.
With the procedures on this page, you can create an
original sound (settings), and along with the reverb
and effect settings they can be stored in the DG
amplifier’s internal memory for instant recall at any-
time. The procedure for storing data in memory is ex-
plained on the next page.
DG100-212A/DG80-210A/DG80-112A/DG130HA