


KMS-3000/KMS-2500
Karaoke Speaker System
Thank you for selecting the Yamaha Karaoke Speaker System.
PRECAUTIONS
OWNER’S MANUAL
English
Read this before using the speaker.
To assure the finest performance, please read this manual carefully. Keep it in a safe place for
future reference.
Install the speaker in a cool, dry, clean place – away from windows, heat sources, sources
of excessive vibration, dust, moisture and cold. Avoid sources of humming (transformers,
motors). To prevent fire or electrical shock, do not expose the speaker to rain or water.
To prevent the enclosure from warping or discoloring, do not place the speaker where it will
be exposed to direct sunlight or excessive humidity.
Do not place the following objects on the speaker:
Glass, china, etc.
If glass etc. falls by vibrations and breaks, it may cause personal injury.
A burning candle etc.
If the candle falls by vibrations, it may cause fire and personal injury.
A vessel with water in it
If the vessel falls by vibrations and water spills, it may cause damage to the speaker, and/or
you may get an electric shock.
Do not place the speaker where foreign objects such as water drips might fall. It might cause
a fire, damage to the speaker, and/or personal injury.
Do not place the speaker where it is liable to be knocked over or struck by falling objects.
Stable placement will also ensure better sound performance.
Placing the speaker on the same shelf or rack as the turntable can result in feedback.
Any time you note distortion, reduce the volume control on your amplifier to a lower setting.
Never allow your amplifier to be driven into “clipping”. Otherwise the speaker may be
damaged.
•
•
•
•
–
–
–
•
•
•
•
When using an amplifier with a rated output power higher than the nominal input power of
the speaker, care should be taken never to exceed the speaker’s maximum input.
Do not attempt to clean the speaker with chemical solvents as this might damage the finish.
Use a clean, dry cloth.
Do not attempt to modify or fix the speaker. Contact qualified Yamaha service personnel
when any service is needed. The cabinet should never be opened for any reasons.
As this unit is heavy, whenever it is moved, two people are required to transport it safely.
Placing the speaker too close to a CRT-type TV may impair the picture color or cause a
buzzing noise. In this case, move the speaker away from the TV. This is not an issue with
LCD and plasma TVs.
When choosing a power amplifier for use with this device, make sure that the output power of
the amplifier is lower than the power capacity of this device. Malfunction or fire may occur.
Even if the output power of the amplifier is lower than the power capacity of this device
(program), use of excessive input signals resulting clipping may cause damage to the device.
Malfunction or fire may occur especially when the following sounds or noises are generated:
feedback, when using a microphone
continuous and extreme volume sound from a musical instrument
extreme continuous distorted sound
noise caused by plugging/unplugging the cable while the amplifier is turned on
Secure placement or installation is the owner’s responsibility. Yamaha shall
not be liable for any accident caused by improper placement or installation of
the speaker.
•
•
•
•
•
•
•
–
–
–
–
•
KMS-3000 KMS-2500
Type 3way bass reflex / Non magnetic shielding
Driver
Tweeter
2.5cm (1") horn type ×1
Middle
12cm (4-4/5") cone type ×1
Woofer
30cm (12") cone type ×1 25cm (10") cone type ×1
Impedance
Nominal 8 W
Frequency response
45 Hz to 30 kHz (-10 dB)
80 kHz (-30 dB)
50 Hz to 30 kHz (-10 dB)
80 kHz (-30 dB)
Crossover frequency
1.5 kHz, 4.5 kHz 1.5 kHz, 4.2 kHz
Rated input power
250 W 175 W
Maximum input power 1000 W 700 W
Sensitivity (2.83V, 1m) 89 dB 88 dB
KMS-3000 KMS-2500
Input terminal Screw / Banana
Dimensions
(W × H × D)
581×380×373.5 mm
22-7/8"×14-15/16"×14-7/10"
521×340×343.5 mm
20-5/8"×13-3/8"×13-13/25"
Weight
18 kg (39.7 lbs) 14 kg (30.9 lbs)
Finish
PVC Sheet
Specifications are subject to change without notice due to product improvements.
Care should be taken not to exceed the input power values noted above.
The woofer employs a material for the surround to achieve high sound
quality. The useful life of the speaker surround depends on usage conditions
and environment (especially ultraviolet radiation exposure and humidity),
etc. When the speaker surround reaches the end of its useful life, refer to your
dealer for replacement.
•
•
•
SPECIFICATIONS
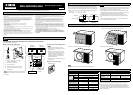
CONNECTING TO YOUR AMPLIFIER
Caution
BEFORE MAKING CONNECTIONS, MAKE SURE THAT THE AMPLIFIER IS SWITCHED OFF.
Connect the cables as shown below.
■
How to connect the speaker cables
KMS-3000/
KMS-2500 (R)
Speaker output
terminals of the
amplifier
Tighten
Loosen
KMS-3000/
KMS-2500 (L)
■ When connecting the speaker cable
Notes
Do not let the bare speaker wires touch
each other as this could damage the speaker
or the amplifier.
Make sure you connect the speakers with
the correct polarity—positive (+) terminals
to positive (+) terminals, and negative (-)
terminals to negative (-) terminals. If you
get them crossed over, the sound will be
unnatural and lack bass.
Refer to the owner’s manual that came with
your amplifier.
•
•
•
Banana plug
1
2
■ When using a banana plug
10 mm
Amplifier
Rear panel
Note
Do not insert the insulation into the hole. Sound may not
be produced.
Remove 10 mm (3/8") of insulation,
and twist the conductors.
Loosen the terminal knob.
Insert the bare wire.
Tighten the knob and secure the cable.
Test the firmness of the connection by
pulling lightly.
1.
2.
3.
4.
5.
1
2
3
4
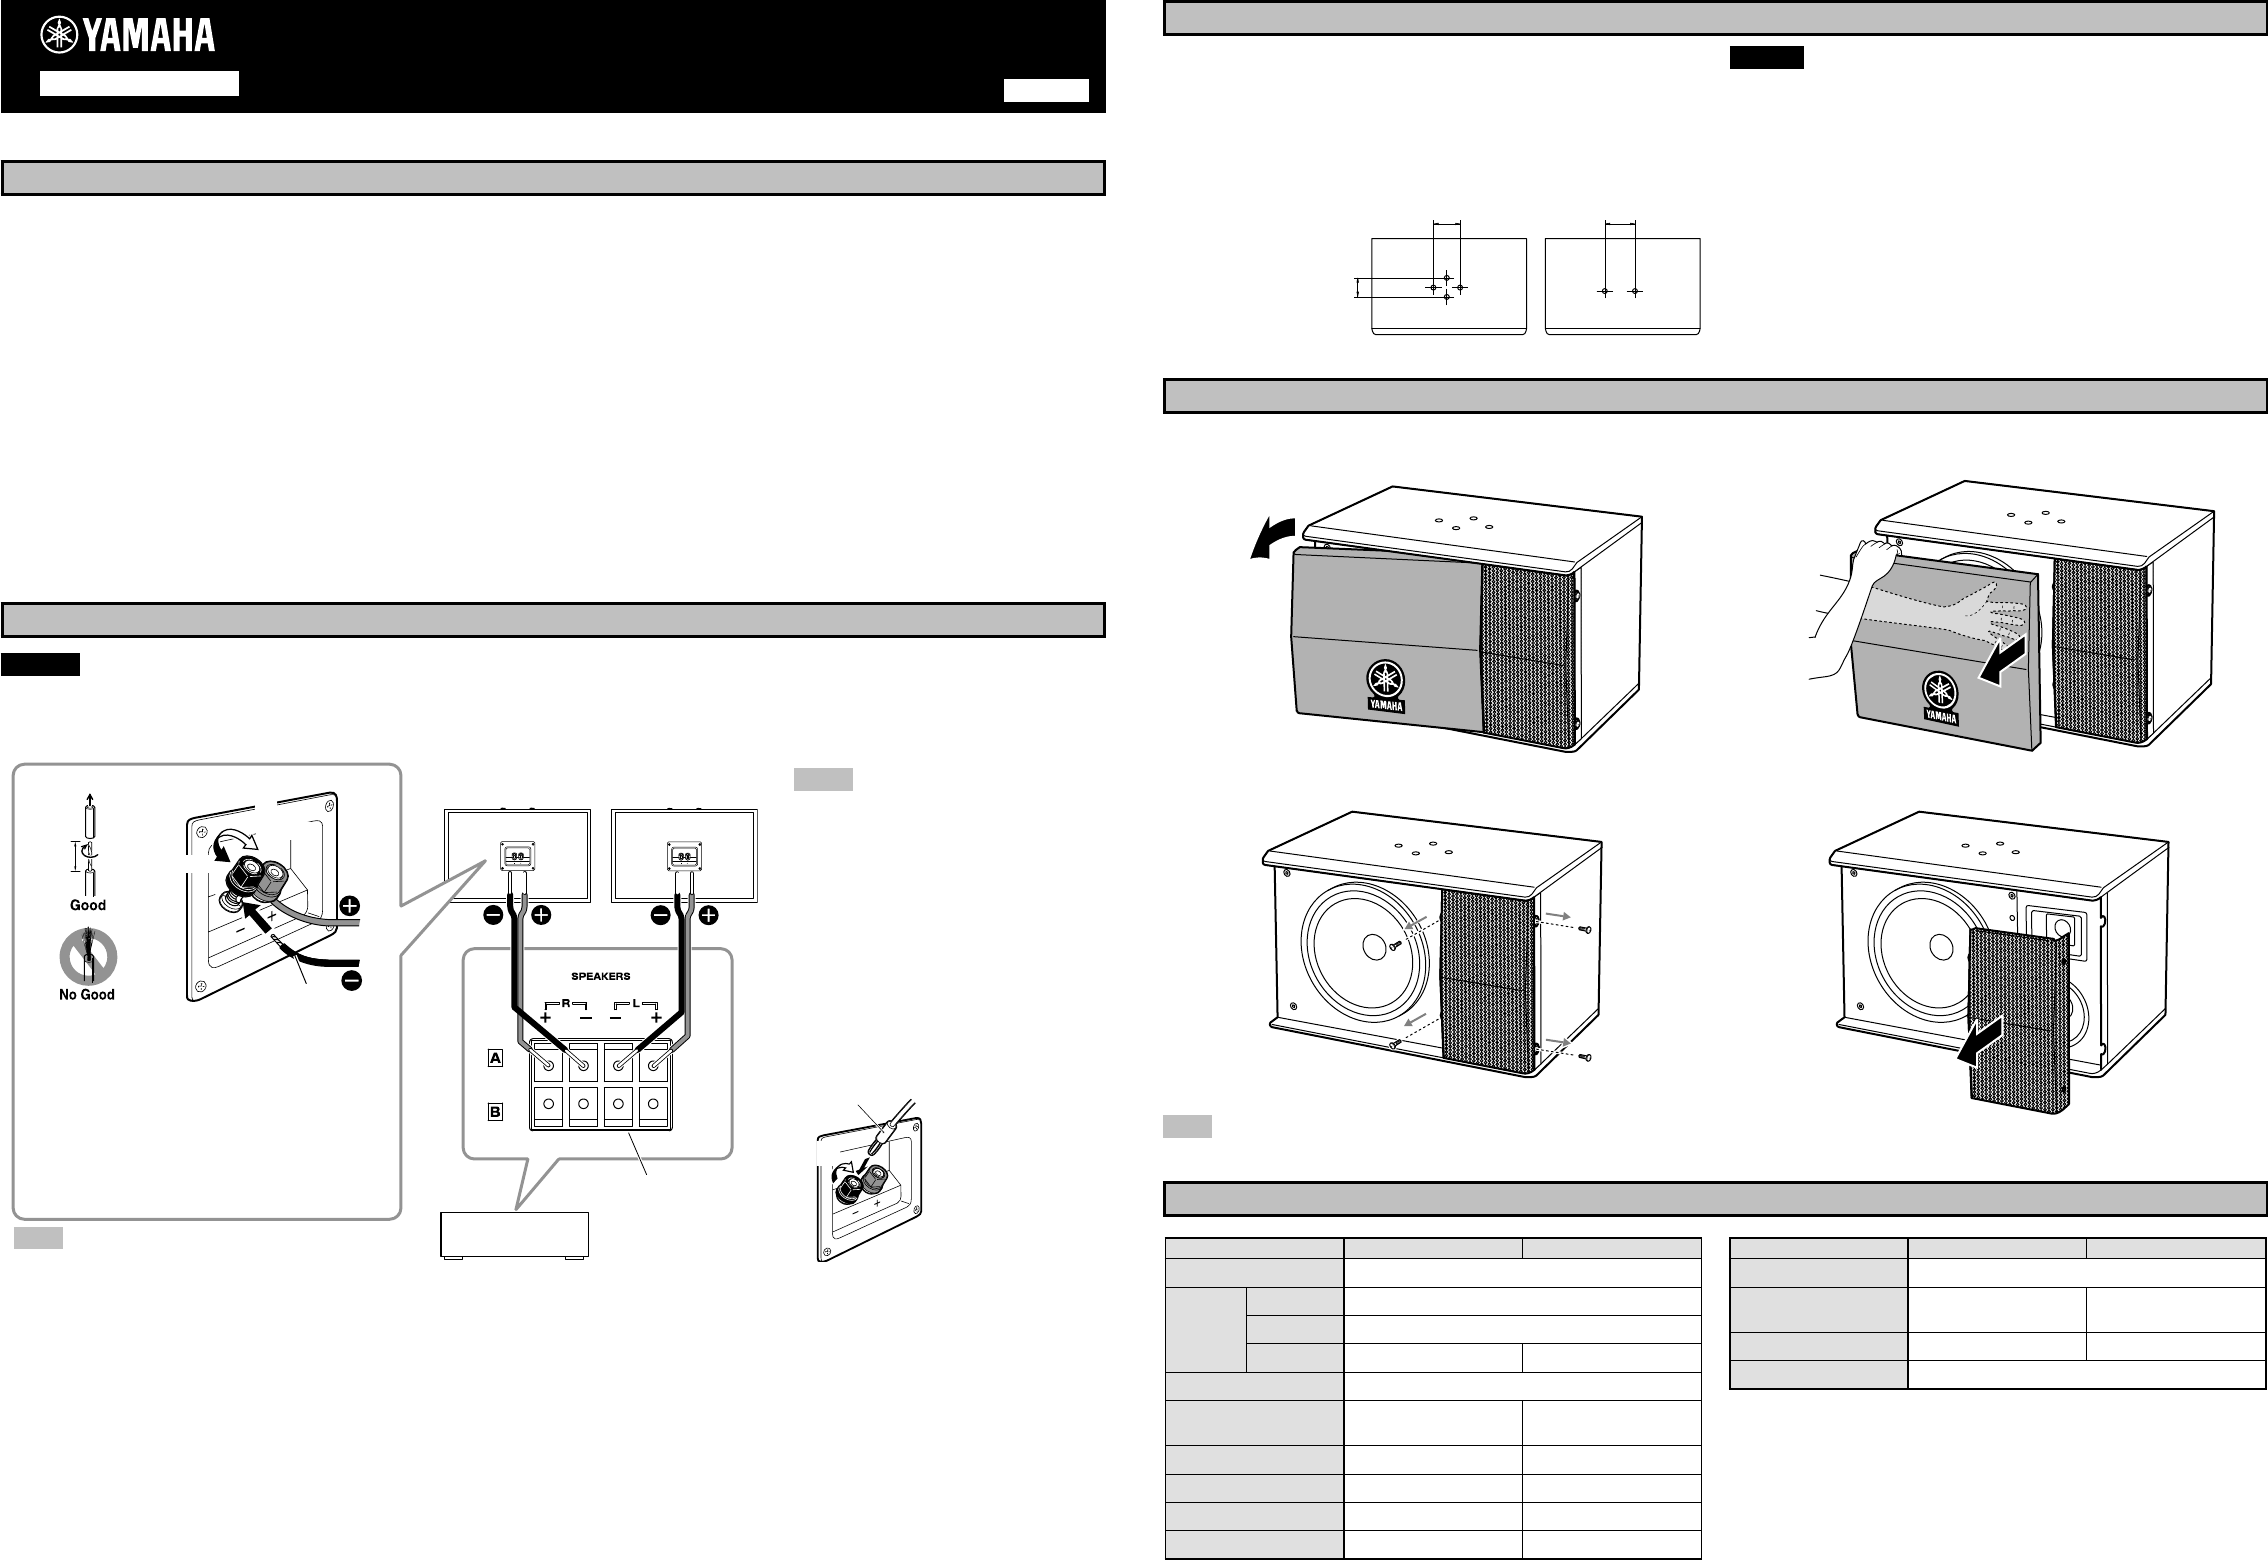
You can also use the screw holes on the top of the speaker for installing the
speaker on the ceiling by using commercially available mounting brackets.
To fix the speaker to a mounting bracket, use the screws inserted to the screw
holes of the speaker as the factory default status. If you use the commercially
available screws, use the screws that matches to the following specifications:
Screw type
............................................. M8
Screw length
......... 35 mm (1-3/8") or more
100 mm (3-7/8") 100 mm (3-7/8")
70 mm (2-7/8")
KMS-3000 KMS-2500
Caution
The required length of a screw differs depending on the mounting bracket to
be used. Select a screw which is suitable for use with the mounting bracket
and can be fully inserted into the hole on the speaker.
As this product is heavy, do not attach them to thin plywoods or soft wall
surface materials, as the screws may tear free from flimsy surfaces, causing
the speaker to fall and be damaged, or result in personal injury.
Do not fasten the speaker to the ceiling with nails, adhesives, or other
unsound hardware. Long-term use and vibrations may cause them to pull
free.
To avoid accidents resulting from tripping over loose speaker cables, fix
these to the wall along with the speaker.
•
•
•
•
MOUNTING THE SPEAKER TO A CEILING
Top panel
REMOVING THE SPEAKER GRILLE
1. Remove the side of the fabric speaker grille.
2. Put your hands inside from the sides of the fabric speaker grille and remove
the fabric front speaker grille by pushing up the other side.
Note
Be careful not to scratch yourself with the edge of the speaker grille.
3. Remove the 4 screws that hold the metal speaker grille. 4. Remove the metal speaker grille.