


224
Pattern Mode
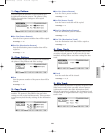
■ No (Pattern Number)
Selects the pattern number of the pattern that will be
recorded. The pattern name will be displayed to the
right of the pattern number.
❏ Settings: 01~50
■ Meas (Measure)
The Measure/Beat numbers will be displayed but
cannot be changed. The start position for recording
is fixed to “001: 1.”
■ Time Signature
Sets the time signature for a pattern.
❏ Settings: 1/4~8/4, 1/8~16/8, 1/16~16/16
You can change the time signature after recording.
■ Track
Selects the track for recording. Tracks 1~8 can also
be selected using the TRACK [1~8] (EX5/7 only).
❏ Settings: Tr1~8(tracks1~8)
The pattern tracks 1~8 are positioned in the same line
at the top of the screen.
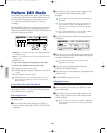
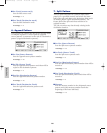
Recording Mode
In the Pattern Record mode various recording modes
have been assigned to[F3] and [F5]~[F7].
[F3]: MULTI
Sets MULTI mode to “on” or “off.” Press [F3],
MULTI is highlighted, MULTI mode is turned on,
and all the tracks can be recorded in real time. This
type of recording is mainly utilized when using an
external sequencer. For example, on the currently
selected track, (the track selected in the
parameters), the performance on the EX 5/7
keyboard is recorded, while at the same time
performance data is recorded on other tracks from
an external sequencer.
In MULTI mode, you can select either Over Dubbing
or Replace type of recording.
When MULTI mode is set to “off,” real time
recording can only take place on one specified track
at a time.
[F5]: STEP
Sets the STEP recording mode to “on” or “off.”
Press [F5], STEP is highlighted and the Step
recording mode is turned on. Then notes can be
programmed in one at a time. Press [F6]~[F7] to
cancel Step recording mode and return to real time
recording.
When STEP is not highlighted, real time recording is
always engaged.
[F6]: OVER(Over Dubbing)
Sets the OVER dubbing recording to “on” or “off.”
Press [F6], OVER is highlighted and the OVER
Dubbing is turned on. When recording in real
time, you can record over previously recorded data.
For example, after first recording a bass drum, you
can use this function to record a snare and high
hat on top without erasing the original data. Press
[F5]/[F7] to cancel the Over Dubbing recording.
[F7]: RPLC(Replace)
Sets Replace recording to “on” or “off.” Press [F7],
RPLC is highlighted and the Replace recording is
turned on. When recording in real time, you can
record over previously recorded data (erasing and
replacing the original data with the new data as
you record). Press [F5]/[F6] to cancel the Replace
recording.
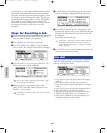
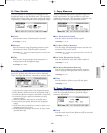
Real Time Recording
Real Time recording is just like a multi-track recorder
where you record as you play on each track (Tr1-8).
There are two types of recording methods, Over
Dubbing (recording over original data but not erasing
it) and Replace (erasing and replacing the original
data). Also there is Multi mode, that when set to “on,”
(lets you record on all the tracks simultaneously) and
when set to “off,” (lets you record one track at a time).
1In the PTN display of Pattern Play mode, select a
pattern number (01-50) to be recorded.
2In the PFX display of Pattern Play mode, set the
Length (loop length) for each track (1-8).
3In Pattern Play mode, press [REC] to enter Pattern
Record mode (stand-by record status).
4In the PTN display, set the necessary settings for
recording, such as the time signature and tempo, as
well as the click.
Pattern/E/qx 5/21/98 11:43 AM Page 224