


284
Appendix
How to Install the EXFLM1/
DRAM SIMM in the EX5/7
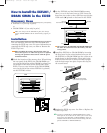
Necessary Items
• EXFLM1 x 2 (use only in pairs)
or
• DRAM SIMM x 2 (use only in pairs)
Make sure always use the EXFLMs in pairs, also always
use the DRAM SIMMs with the same memory capacity in
pairs.
Installation
You can install the EXFLM1 and DRAM SIMM after
removing the memory cover. For more information on
removing the memory cover, see How to Remove the
Memory Cover.
When installing the memory board (from when you
remove the cover to when the cover is replaced
securely) all operations must be done with the power
cord disconnected.
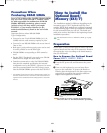
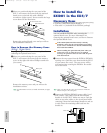
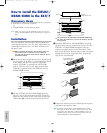
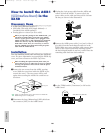
1Check the location of the memory slots. When facing
the rear panel of the EX5/7, on the back of the board
in the EX5/7, the two rows (to the right of the
sockets “EXFLM1” is printed) are the EXFLM1
sockets. The two rows (to the right of the sockets
“DRAM” is printed) before the EXFLM1 are the
DRAM SIMM sockets.
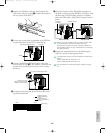
2On the EXFLM1 and the DRAM SIMM memory
there is a cut in the board next to 1PIN. Insert the
board into the socket so that 1PIN lines up with the
1PIN mark (▲) printed on the board in the EX5/7.
Hook
Hook
EXFLM1
Rear
DRAM
DRAM SIMM
DRAM SIMM
YFL
YFL
The sockets for the EXFLM1 and DRAM SIMM look
the same. Be careful not to insert the memory into the
wrong socket.
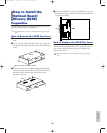
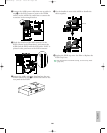
3Install the EXFLM1 or DRAM SIMM by inserting
the first board into the socket closest to you. Set the
EXFLM1 or DRAM SIMM completely into the
socket at an angle shown in the illustration. Then
push in the direction shown below so that it becomes
upright and the hook snaps into place. Repeat this
step for the second board.
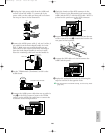
4Replace the memory cover by following the steps for
removal in the opposite order.
To remove a EXFLM1 or DRAM SIMM from a socket,
hold open the two hooks on the socket (one at each end)
and push on the EXFLM1 or DRAM SIMM so that it is
released from the hooks and becomes slanting, and then
pull the EXFLM1 or DRAM SIMM out.
Insert completely into the
socket at this angle.
The hooks catch and the board
stands vertical, securely inserted.
Hook
72PIN 1PIN
Hook hole
Cut that indicates 1 PIN
Hook hole
Hook
Hook
EXFLM1
Rear
DRAM
DRAM SIMM
DRAM SIMM
YFL
YFL
Option/E/qx 5/21/98 11:58 AM Page 284