


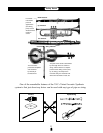


19
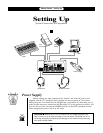
Getting Started
●
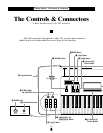
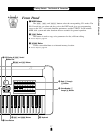
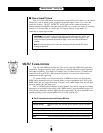
The Controls & Connectors
The Controls & Connectors
!2 Bank a through h Buttons
The VL1 has 128 internal voice memory locations arranged in 8 banks of 16 voices
each. These buttons select the voice bank from which an individual voice will be se-
lected.
☛ Getting Started page 35. Feature Reference page 15.
!3 Voice Number 1 through ^ Buttons
The voice number buttons are used in conjunction with the bank buttons to select
any of the VL1’s 128 internal voice memory locations. When editing voice parameters
they are also used to select and mute elements, an to turn effects and modifiers on or off.
☛ Getting Started page 35. Feature Reference page 15.
!4 Keyboard
The VL1 has a 49-key keyboard that is both velocity and after-touch sensitive for
broad, intimate expressive control.
!5 OCTAVE _ and + Buttons
Shift the pitch of the keyboard up or down one octave. A utility “Octave Hold”
function (page 153 of the Feature Reference manual) provides two modes: shift only
while the button is held, or press once to shift and again to release. MIDI note output
data is also shifted.
!6 π Wheel
This self-centering pitch wheel allows realistic upward and downward pitch bends.
!7 “ and ‘ Wheels
Can be assigned to any of the VL1’s extensive range of controller parameters for
extraordinary expressive control.
☛ Getting Started page 41.
!8 PHONES Jack
Accepts a standard pair of stereo headphones (1/4" stereo phone plug) for
headphone monitoring of the VL1 sound without the need for external amplification
equipment.
☛ Getting Started page 23.
!9 Breath Controller Jack
Plug the Yamaha BC2 Breath Controller supplied with the VL1 in here (an optional
BC1 Breath Controller may also be used).
☛ Getting Started page 23.
@0 Floppy Disk Drive
The VL1’s built-in floppy disk drive allows easy, economical, high-volume storage
of voice data. The disk-in-use indicator below the drive slot lights while any disk opera-
tion is in progress (
NEVER attempt to remove a disk or turn the power off while a disk
operation is in progress). The eject button, also below the disk slot, is used to remove
disks from the drive.
☛ Feature Reference page 162.