7
7. [PREVIEW] – This button allows you to see the last
value that was sent by a controller without actually
sending a value. Hold down this button and adjust a
controller to display the value in the LCD. Then, you
can either change it to a new value or return it to last
value that was sent.
8. [PROGRAM CHANGE] – Pressing this button will
enter Program Change mode. In this mode, you can
send a Program Change or Program with Bank
Change message to a hardware or software module.
9. TRANSPORT CONTROL BUTTONS – These five
buttons are dedicated buttons for sending transport
control commands. The transport control buttons can
be set to transmit either MMC (MIDI Machine
Control), MMC/MIDI SysEx, MIDI START/STOP or
pre-assigned MIDI CC values.
10. 12 ASSIGNABLE KNOBS – Each 360-degree knob
can be used to send continuous control data to a
desktop audio workstation or external MIDI device.
11. 4 ASSIGNABLE BUTTONS – These buttons can be
used as MIDI CC switches or Program Change
switches. They can function in Momentary or Toggle
Modes. When [TIME DIVISION] has been activated,
these 4 buttons are used to set the time division of
the Arpeggiator and Note Repeat features.
12. [CONTROL BANK] – The MPK25 features 2
independent banks of continuous controllers.
Effectively, this allows you to control up to 32
independent parameters with the knobs and buttons
on the MPK25. The [CONTROL BANK] button is
used to switch among the 2 banks. The LEDs above
the button will reflect the currently selected control
bank.
13. 12 MPC PRESSURE AND VELOCITY SENSITIVE
PADS – The pads can be used to trigger drum hits or
samples on your software or hardware module. The
pads are pressure and velocity sensitive, which
makes them very responsive and intuitive to play.
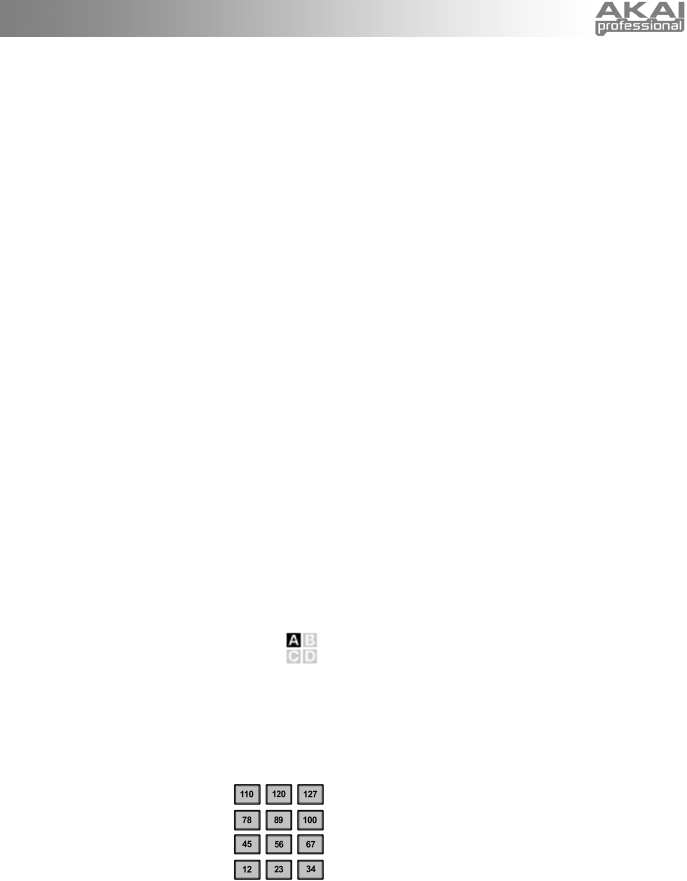
14. PAD BANK BUTTONS – These 4 buttons
switch among pad banks A, B, C, D. Each
bank can address a unique set of 12
sounds, giving you access of up to 48 different
sounds you can trigger with the pads. The currently
selected pad bank will be indicated on the LCD
display
15. [FULL LEVEL] – When [FULL LEVEL] is activated,
the pads always play back at a maximum velocity
(127), no matter how hard or softly you hit them.
16. [12 LEVEL] – When [12 LEVEL]
is activated, you can use the 12
pads to change a selected
sound’s velocity in 12 steps.
When you press the [12 LEVEL]
button, the last pad that was hit
gets mapped to all 12 pads. The
pads will now output the same
note number and pressure controller as the initial
pad, but the velocity is fixed at the values shown in
the diagram on the right, regardless of how hard you
hit them. This allows you to have more control over
the velocity of a sound.
17. [NOTE REPEAT] – Holding this button while striking
a pad causes the pad to retrigger at a rate based on
the current Tempo and Time Division settings. The
Note Repeat feature can be synced to an internal or
external MIDI Clock source. [NOTE REPEAT] can
function as a latching or momentary button.
18. [TIME DIVISION] – This button is used to specify the
rate of the Note Repeat and Arpeggiator features.
When [TIME DIVISION] is activated, you can press
one of the 4 switches to specify a time division. Each
switch toggles between a “straight” and “triplet” feel
for that time division. [TIME DIVISION] can function
as a momentary or toggle button.
Please note that while [TIME DIVISION] is active, the
4 assignable buttons will not function as MIDI CC or
Program Change switches until [TIME DIVISION] has
been de-activated.
19. [ARP ON/OFF] – This button enables and disables
the internal Arpeggiator. The Arpeggiator will only
function on notes being played on the keyboard. The
Arpeggiator feature on the MPK25 works in
conjunction with the Tempo and Time Division
settings, which specify the rate of arpeggiation.
Please note that the Arpeggiator can be synced
either to an internal or external MIDI Clock source
(such as a software DAW or a MIDI device).
20. [LATCH] – This button works in conjunction with the
Arpeggiator. When the Arpeggiator is turned on and
[LATCH] has been enabled, you can hold down a
combination of keys – the Arpeggiator will memorize
and continue to arpeggiate these notes, even if you
depress the keys. There are a couple of ways to use
the [LATCH] function:
a. While holding down the keys, you can add
more notes to the sequence by pressing down
additional keys.
b. If you depress the keys, release them, and
then press down a new combination of notes,
the Arpeggiator will memorize and arpeggiate
the new notes.
21. [OCTAVE + / -] – These buttons can be used to shift
the keyboard’s range up and down. The display will
indicate which octave you have shifted to. If both
buttons are pressed at the same time, the octave
shift will reset to 0.
22. [TAP TEMPO] – This button allows you to tap in a
new tempo. If the preset is reloaded, the tempo will
revert to the saved tempo value. (Please note that a
preset’s default tempo can be set in Edit Mode). Tap
Tempo does not work when the MPK25 is set to
External sync.
23. PITCH BEND WHEEL – Transmits MIDI Pitch Bend
information on a selected MIDI channel and port.
24. MODULATION WHEEL – This wheel can be used to
transmit continuous controller data. By default, the
modulation wheel will transmit MIDI CC #01.
