


CCoonnnneeccttiinngg ttoo aa BBooddyyppaacckk TTrraannssmmiitttteerr
• Refer to the manual of your bodypack trans-
mitter.
3 Use
IInnttrroodduuccttiioonn
The principal benefit of a microphone attached to
the user's clothes is that the microphone allows
the user to move about freely and keeps their
hands free.
OOppeerraattiinngg NNootteess
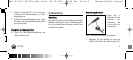
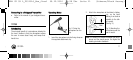
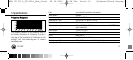
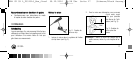
Fig. 2: Fixing the
microphone on the
clip.
1. Insert the microphone into the fixing clamp on
the supplied attachment clip.
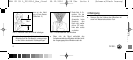
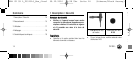
2. Attach the microphone to the talker's clothes,
e.g., on the lapel,
placing it as close as
possible to the talk-
er's mouth.
(See fig. 3.)
Fig. 3: Attaching the
microphone near the
user's mouth.
Note:The smaller the distance between the micro-
phone and the sound source, the higher the
usable gain before feedback.
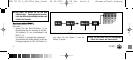
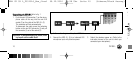
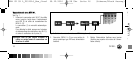
Connecting via MPA V L
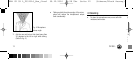
Refer to fig. 1.
1. Push the mini XLR connector (1) on the micro-
phone cable all the way into the mini XLR
socket (2) on the cable of the MPA V L (3).
The connector will lock automatically.
To disconnect the cable, press the unlocking
button on the mini XLR connector (1) and pull
the connector(1) out of the socket (2).
Important: To avoid damaging the cable, never
try to pull out the cable itself!
2. Connect the MPA V L (3) to a balanced XLR
microphone input with phantom power.
3. Switch the phantom power on. (Refer to the
instruction manual of the unit to which you
connected your microphone.)
11
CK 99 L
Min.!
Fig. 1: Connection diagram with optional MPA V L
BDA CK 99 L_F031014_Hex_final 09.12.2010 14:28 Uhr Seite 11 (Schwarz/Black Auszug)