


C E
B
A
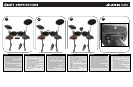
BOX CONTENTS
CONTENIDO DE LA CAJA
CONTENU DE LA BOÎTE
CONTENUTI DELLA
CONFEZIONE
VERPACKUNGSINHALT
INHOUD VERPAKKING
ENGLISH
Set the KICK TYPE SWITCH on the back of
the module to "SWITCH."
Using a 1/8" stereo cable, connect headphones
to the PHONES jack and/or a speaker system
or monitors to the OUTPUT jack on the back of
the module.
Connect the module to a power source with the
included power adapter (P). Turn on the
module first, then your speakers or monitors.
Use the zipties (included) to secure excess
cable length to the rack once you have
arranged everything to your satisfaction.
If you are playing on a hardwood floor, make
sure the screws at the corners of the pedal are
retracted so they do not damage the floor. If
you are playing on a carpeted floor, you may
attach the velcro strips (included) and use the
screws to secure the pedal to the carpet.
ESPAÑOL
Coloque el INTERRUPTOR DE TIPO DE
BOMBO de la parte trasera del módulo en la
posición "SWITCH".
Usando un cable estéreo de 1/8", conecte los
auriculares al jack PHONES y/o a un sistema
de altavoces o monitores por separado al jack
OUTPUT de la parte trasera del módulo.
Conecte el módulo a la alimentación eléctrica,
usando el adaptador de alimentación incluido
(P). Encienda primero el módulo y luego sus
altavoces o monitores.
Use los precintos tipo zip (incluidos) para
sujetar el exceso de cable al bastidor una vez
que haya dispuesto todo a su satisfacción.
Si va a tocar sobre un piso de madera dura,
asegúrese de que los tornillos de las esquinas
del pedal estén retraidos y no dañen el piso.
Si va a tocar sobre un piso alfombrado, puede
fijar las tiras de velcro (incluidas) y usar los
tornillos para fijar el pedal a la alfombra.
FRAN
Ç
AIS
Réglez l’interrupteur KICK TYPE situé à
l’arrière du module au réglage « SWITCH ».
À l’aide d’un câble stéréo 1/8 po, branchez un
casque d’écoute à la sortie PHONES et/ou un
système de sonorisation ou des moniteurs à la
sortie OUTPUT à l’arrière du module.
Branchez ensuite le module à une prise
d’alimentation à l’aide du bloc d’alimentation
inclus (P). Veuillez mettre le module sous
tension en premier, puis les haut-parleurs ou
les moniteurs.
Utilisez les attaches (incluses) afin de bien
fixer le surplus de câble du support une fois
que vous serrez satisfait du montage.
Si vous jouez sur un plancher de bois franc,
assurez-vous que les vis de coin des pédales
sont rétractées afin qu'elles n'endommagent
pas le plancher. Si vous jouez sur du tapis,
utilisez les attaches de velcro (incluses) et les
vis pour fixer la pédale au tapis.
DEUTSCH
KIPPSCHALTER an der Rückseite des Geräts auf
die Stellung "SWITCH" setzen.
Verbinden Sie mithilfe eines 3,5 mm Stereokabels
Ihre Kopfhörer mit der PHONES-Buchse und/oder
ein Lautsprechersystem oder Monitore mit der
OUTPUT-Buchse an der Rückseite des Moduls.
Verbinden Sie das Modul mit dem inkludierten
Stromadapter (P) mit einer Stromquelle. Schalten
Sie zuerst das Modul ein und dann erst Ihre
Lautsprecher oder Monitore.
Kabelbinder (beiliegend) verwenden, um
überlange Kabel zum Rack zu sichern, sobald
alles wunschgemäß aufgebaut und installiert ist.
Falls auf einem Parkettboden gespielt wird,
sicherstellen, dass die Schrauben an den Ecken
des Pedals nicht herausstehen und den Boden
beschädigen. Wird auf einem Teppichboden
gespielt, können die Velcro-Streifen (beiliegend)
und die Schrauben verwendet werden, um das
Pedal fest mit dem Teppich zu verbinden.
ITALIANO
Impostare l’INTERRUTORE KICK TYPE posto sul
retro del modulo sulla configurazione "SWITCH".
Servendosi di un cavo stereo da 1/8", collegare le
cuffie al jack PHONES (cuffie) e/o un impianto di
altoparlanti o monitor al jack OUTPUT (uscita)
posti sul retro del modulo.
Collegare il modulo ad una fonte di alimentazione
servendosi dell’adattatore di alimentazione in
dotazione (P). Accendere innanzitutto il modulo,
quindi altoparlanti o monitor.
Servirsi dei fermi (in dotazione) per fissare il cavo
in eccesso al rack una volta sistemato tutto come
desiderato.
Se si suona su un pavimento in parquet,
assicurarsi che le viti agli angoli del pedale siano
retratte in modo che non danneggino il pavimento.
Se si suona su un pavimento con moquette o
tappeti si possono attaccare delle strisce di velcro
(in dotazione) e servirsi delle viti per fissare il
pedale alla moquette o al tappeto stesso.
NEDERLANDS
Stel de KICK TYPE schakelaar aan de achterkant
van de module op "SWITCH".
Met behulp van een 1/8" stereo-kabel, koptelefoon
aansluiten op de PHONES aansluiting en / of een
luidsprekersysteem of monitors op de OUTPUT-
aansluiting aan de achterkant van de module.
Sluit de module op een voedingsbron met de
bijgeleverde voedingsadapter (P). Zet de module
eerste, dan is uw luidsprekers of monitoren.
Gebruik de tie-raps (meegeleverd) om losse
bekabeling aan het rek te bevestigen nadat alles
naar wens is opgesteld.
Als u op een hardhouten vloer speelt, zorg er dan
voor dat de schroeven op de hoeken van het
pedaal ingeschoven zijn zodat de vloer niet
beschadigd wordt. Als u op een vloer met tapijt
speelt, kunt u de (meegeleverde) klittenbandstrips
bevestigen en de schroeven gebruiken om het
pedaal aan het tapijt te bevestigen.
(2)
(
1
)
(
2
)
(
1
)
F G H
(1)
(
2
)
(
4
)
I J K
(
1
)
(1)
(
2
)
L M N
(
1
)
(
3
)
(
1
)
MANUAL VERSION 1.0
O P Q
(
1
)
(
1
)
(
2
)
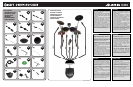
CONNECTION DIAGRAM
DIAGRAMA DE CONEXIÓN
SCHÉMA D’INSTALLATION
ANSCHLUSSÜBERSICHT
SCHEMA DEI COLLEGAMENTI
AANSLUITDIAGRAM
SNARE
CRASH
TOM 1
TOM 2
TOM 3
RIDE
KICK
DM6
(2)
D