


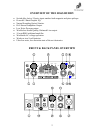
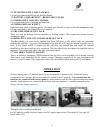

1. PASSSIVE/ ACTIVE BASS INPUT SWITCH.
This switch allows you to match the BassBuddy to match either active or passive basses either with
magnetic or piezo pickups.
PASSIVE
- Higher sensitivity, high impedance input (120mV/ 4.7M). For bass instruments that do
not have active electronics, suited for older ‘vintage’ basses. This setting is precisely matched to high
impedance pickups enabling them to faithfully reproduce the true frequency and dynamic range of the
instrument.
ACTIVE- Lower sensitivity input setting (300mV/100K) for basses with onboard electronics. Input
matched for low signal to noise ratio and optimum transfer function of electrical signal from modern
high-end basses.
2. VOLUME CONTROL.
This is the volume control for bass input only. It does not control the level of the stereo auxiliary input
socket (14) on back panel. When setting up your tone or plugging in your instrument, you should keep
this control at a low level. All instruments are different when it comes to how much output is from the
pickups. Likewise for players: depending on how hard or soft you play.
3. INSTRUMENT INPUT JACK.
This is a standard ¼ inch mono jack socket. We recommend that you DO NOT use “Monster” Brand
cables because we have found compatibility issues with their jack plugs and our input sockets. USING
“MONSTER” BRAND CABLES CAN DAMAGE THE INPUT JACK OR OTHER SOCKETS ON
THE BASS BUDDY Should any damage occur from using MONSTER CABLES warrantee for
repairs to unit are not covered under PJB warranty.
4. 5-BAND GRAPHIC EQUALIZER.
This is a dedicated bass instrument equalizer designed to give you optimized tone of your instrument.
The frequency bands have been set precisely so that your desired tone can be achieved with the
minimum amount of sliders. The EQ filters are set at: 60Hz -160Hz - 630Hz - 2.5KHz and 12KHz
with 18dB of boost or cut. This EQ typically has more control than other equalizers on your sound, so
do not use too much boost as this can overdrive other electronic components in your chain.
Be careful not to use excessive boost on lower frequencies as you may end up damaging your
headphones. If you hear distorted tones on the lower notes, this could be you headphones overloaded.
Back off the volume immediately.
5. COMPRESSION ADJUSTMENT LEVEL.
This will vary the level of the limiter threshold. The compression ratio is 3dB to 1. Adjust this to suit
your playing style and output power of instrument. Note that turning this control clockwise increases
the threshold level and so reduces compression. More compression is added by turning the control
counter-clockwise, like backing off the volume control.
6. HEADPHONE OUTPUT JACK.
This jack accepts ¼ inch stereo headphone jacks. A ¼ inch to mini jack adaptor plug is supplied for
headphones with smaller jack plugs.
7. LIMITER INDICATOR.
This blue L.E.D (Light Emitting Diode) will light up when the signal is being compressed. This will
vary on how hard the instrument is played and how the threshold is adjusted
8. LIMITER ON/OFF SWITCH.
Sends signal through limiter or bypass.
9. POWER ON/OFF SWITCH.
10. POWER LED INDICATOR
With power switched on the LED light will turn bright blue.
3