


OPERATING INSTRUCTIONS
Stand Alone:
A. This function is used when use only one unit or running more than one unit as an individual.
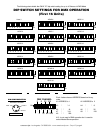
B. Set 1 and 10 on the dip switch to the on position (see “Master - Head 1” on page 3).
C. Plug the unit in, the unit will react to sound via its own internal microphone.
D. Adjust knob on rear of unit for desired music sensitivity.
Master / Slave Operation:
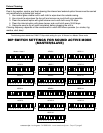
A. This function will allow you to link up to 16 units together.
B. In this mode the units will react to sound via the master units built in internal microphone.
C. The units will also run to the several preprogrammed chases.
D. Use XLR cables to daisy chain the fixtures together. Remembering the female XLR is the out-
put, and the male XLR is the input.
E. Be sure to follow the chart on page 3.
F. For longer cable runs we suggest a terminator at the last fixture.
Universal DMX Control:
1. This function allows you to us a standard DMX controller such as the American DJ Show
Designer™.
2. The use of a DMX controller will allow you to customize the use of fixtures allowing you
independent control of the colors, speed, and the ability to black out.
3. This will allow you to create your own programs or use your fixtures as spot lights.
4. The OnyxII™
is a DMX two channel fixture; channel one controls the color and shutter,
channel two controls the mirror movement.
5. When using a DMX controller and setting up for DMX operation follow the dip switch settings
on page 3. If starting at a higher DMX channel follow the standard DMX Binary Code for
a two (2) channel unit.
6. For help running in DMX operation consult the manual that comes with your DMX controller.
7. For longer cable runs we suggest using a terminator on the last fixture.
The 1/4” phone plug on the unit is for the optional OnyxII/C. Do not attempt to connect an
audio signal this jack, this will damage the PC board and void your manufactures warranty!
Lamp Replacement: Caution! Never open the unit when in use. Always disconnect the main
power before attempting to replace the lamp. Remember always replace with the same type lamp
and fuse.
A. Be sure to follow the proper procedures when handling halogen bulbs.
B. Loosen the screw on trap door located on top of the unit.
C. Remove the trap door.
D. Remove and replace the bulb.
E. Reassemble.
The American DJ Onyx II™ comes with a one (1) year limited warranty. We recommend filling out the
warranty registration card that came with your fixture to validate your warranty. For service contact
©American DJ® Los Angeles, CA 90058 USA - www.americandj.com - Onyx II™ page 2