


4
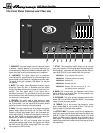
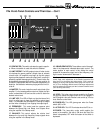
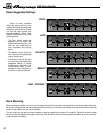
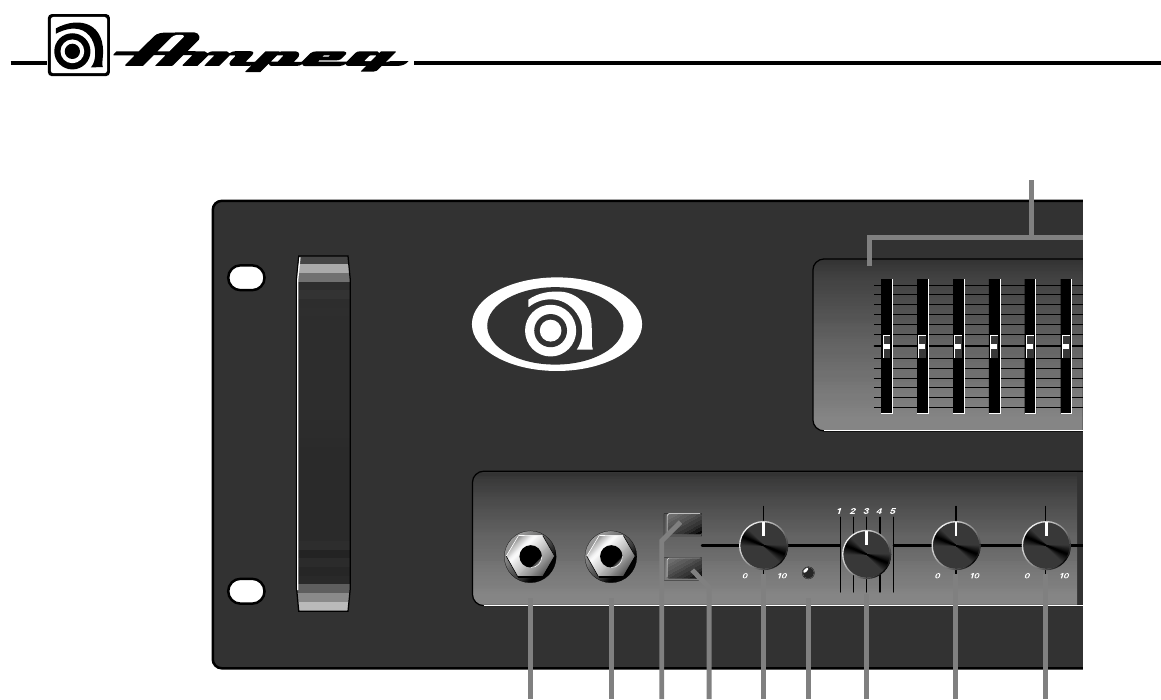
The Front Panel Controls and Their Use
-15dB0dB
GAIN
INPUT
BASS
STYLE
ULTRA MID
TEXTURE
MUTE
PEAK
33Hz 80Hz 150Hz 300Hz 600Hz 900Hz
0
+12dB
-12dB
1 2 6 75 8 93 4
18
1. 0dB INPUT: The signal output from an instrument (active
or passive – typically passive) or a line level signal may be
connected here by means of a shielded instrument cable. The
signal at this jack is sent into the preamp at full amplitude.
2. -15dB INPUT: The signal output from an instrument
(active or passive – typically active) or a line level signal may
be connected here by means of a shielded instrument cable.
The signal at this jack is padded 15dB before it is sent into
the preamp.
3. MUTE: This switch, when depressed, mutes all outputs
except the Tuner Out (#41). A footswitch can also control
muting if the Mute switch on the front panel is left in the “out”
position. (The front panel switch is still active with a
footswitch connected.) This is excellent for tuning your bass
with an electronic tuner without having to adjust any levels or
turn down your house volume.
4. TEXTURE: This switch adds a “tube emulation” stage
which changes the tone for a more aggressive sound. Using
the Texture switch, you can overdrive the amplifier without
typical (and harsh-sounding) solid state clipping.
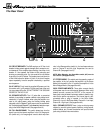
5. GAIN: This control sets the level of the signal entering the
preamp stage. Adjust this control until the Peak LED (#6)
flashes on strong signal peaks (but is not illuminated con-
stantly while playing). To obtain the best signal to noise ratio,
set the Gain control as described above and adjust the
Master (#14) to obtain the desired volume level.
6. PEAK LED: This LED will illuminate when the signal
entering the preamp stage is near the clipping level. Adjust
the Gain control (#5) until a strong signal from your instru-
ment causes this LED to flicker.
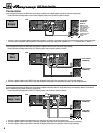
7. STYLE: This five-position switch allows you to vary the
tone of the amplifier. The following table lists each of the dif-
ferent settings – experiment with the Style and other EQ con-
trols (#8,9,10,18,19) for the results which suit you best.
POSITION 1: Fully “scooped” mids (mid cut)
POSITION 2: Traditional passive tone setting
POSITION 3: Basically flat
POSITION 4: Boosted high end
POSITION 5: Basically flat with low end roll off – for
loud playing without “muddiness”
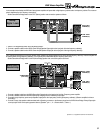
8. BASS: This is the primary low frequency control which
allows 12dB of cut or boost at 50Hz. The low frequency out-
put is flat at the center position.
9. ULTRA MID: This is the primary midrange control which
allows 7dB of cut at 400Hz or boost at 800Hz. The midrange
output is flat at the center position.
10. TREBLE: This is the primary high frequency control
which allows 18dB of cut or boost at 5kHz. The high fre-
quency output is flat at the center position.
11. EFFECTS MIX: This control varies the mix between the
direct (dry) signal and the effects (wet) when the effects loop
(#39,40) is used. Full counterclockwise results in all direct
signal (no effect) and full clockwise gives all effect and no
direct signal. The clockwise position is equivalent to a series
effects loop and should be used with such devices as limiters
and equalizers.
B4R Bass Amplifier