


SVT-CL
Changing the Tubes
Tubes wear out in direct proportion to how often and how hard you play the amplifier. Power tubes should be
checked at least once a year - more frequently if you use the amplifier nearly every day. When power tubes wear out,
the amplifier will begin to grow weak, lack punch, fade up and down, or lose highs and lows. Power tubes work togeth-
er in a push/pull configuration and should all be replaced at the same time with matched or balanced tubes. Your deal-
er can recommend the best replacement tubes for your amplifier.
Preamp tubes aren’t worked as hard as power tubes and typically last longer. When a preamp tube wears out, the
amplifier may squeal, get noisy, lose gain and sensitivity, or just quit working. A service center can determine which
tube(s) may need replacing.
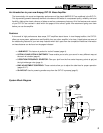
To get to the power tubes in the SVT-CL, the rear screen must be removed and the tube retainer(s) must be moved
out of the way. Qualified service persons may follow these steps to change the tubes:
• Turn the amp off, unplug it and let it cool for at least 5 minutes.
• Remove the screws which hold the perforated metal screen to the rear of the cabinet.
• Set the perforated metal screen aside.
• Remove the tube retainer(s) by lifting them off the tube(s) and moving them to one side.
• Grasp the tube at its top and gently work it out of its socket by rocking it slightly back and forth as you lift up
on it.
• When inserting new output tubes, align the tab in the tube’s plastic base with the slot in the socket and press
the tube gently but firmly into place by pushing down on its top.
• Replace the perforated metal screen and tighten its screws.
• Power up the amplifier and let it sit for at least 20 minutes. Bias the amplifier as directed in the section below.
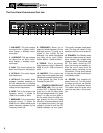
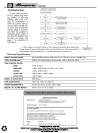
Setting Tube Bias
Allow the unit to warm up at proper AC line voltage for at least 20 minutes. With no input signal present, adjust each
control so that only the associated green LED is lit. The controls may be slightly interactive. If neither LED is lit, the
amp is over biased.This will result in some distortion in the power amp and a generally thin sound. If the green and
red LED are lit, the amp is under biased and too much current is flowing to the power tubes. This will give a big, full
sound but will also reduce the life of the power tubes. Once set, the controls should not have to be changed except as
needed for tube replacement, or to compensate for tube aging. Note that the AC line voltage may vary from place to
place and the LEDs will read slightly different. There is no need to fiddle with this every other day. Note that it is nor-
mal for the red LEDs to light when there is a signal present. Bias 1 Control adjusts the three left (as seen from the rear)
power tubes. Bias 2 Control adjusts the three right power tubes. By observing the LEDs as the Bias Controls are slow-
ly rotated clockwise, a number of tube problems can be diagnosed by the user:
Condition Problem Solution
Green comes on, then red No problem The longer the green LED is on before the
red LED comes on – the better matched the
tubes are.
Red comes on, then green Tubes not properly matched Set slighty before green comes on, obtain
matched tubes when possible.
Red comes on, no green One or more tubes are non-functioning Check to make sure tubes are all seated
properly; if so, find and replace bad tube(s).
None on Possibly no high voltage or bad Have unit checked by a service technician.
Bias Control or bad tube(s)
Both on all the time Possible bad Bias Control or bad tubes Have unit checked by a service technician.
If the tubes are bad enough to cause damage to the unit, the Fault Indicator (#11, Front Panel) will signal and the unit
will shut down.