


SAFETY:
SPECIAL FEATURES..................................................................................................... 9
REPLACING FUSES ..................................................................................................... 10
This product complies with DHHS Rules CFR21 Subpart J, applicable at the date of
manufacture
. Keep away from moisture. Do not operate if
electronic equipment is wet. Severe electrical shock can
occur!!! No user serviceable parts inside.
FRONT PANEL DIAGRAM......................................................................................... 11
TROUBLESHOOTING ............................................................................................12-13
SPECIFICATIONS......................................................................................................... 14
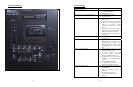
CONTROLS AND INDICATORS:
SET UP:
ON-OFF SWITCH:
When power switch is in the ON position, the BATTERY STATUS LED will be
illuminated. The color of the LED indicates the condition of the battery.
TO OPERATE
If using microphones or external input jacks, plug these in first. Turn system on (rocker
switch located on the Control Panel on the rear of the unit near the word POWER). The
Battery Status light located on lower left hand portion of Control Panel will light with a
green color, indicating that power is available. (See Controls and Indicators section if
light is color other than green) Rotate VOLUME control knob clockwise to obtain
desired listening level throughout the coverage area.
Green – adequately charged
Orange – battery Low
Red – battery must be recharged
To charge the batteries, connect the unit to 110VAC using the supplied power cord. For
full charge, allow battery to charge overnight. The red CHARGER ON LED will be
illuminated indicating battery is charging. Batteries will charge when unit is operating
with AC power. Unit will charge faster with the power in the “off” position.
If unit is not operating, refer to the Troubleshooting Table on pgs.12-13 for assistance.
Note: Channel 3 Volume Control also controls the Volume levels for the CD and Tape
Players.
The Travel Audio Pro must be left plugged in and charging
when not in use to maximize battery life. Recharging only
when the Battery Status LED is Orange or Red will shorten the
useful life of the internal batteries.
Specific information concerning Controls and Indicators are covered in the next pages of
this manual.
AC POWER
The unit can also be operated with AC power. Use supplied power cord to plug unit into
110V AC household power if charging the batteries or using unit with AC power.
MASTER VOLUME:
This is the master volume control for the system. Rotate clockwise to increase volume to
desired levels.
This device complies with Part 15 of FCC Rules. Operation is subject to the following two
conditions:
TREBLE
(1) This device may not cause harmful interference.
This control cuts or boosts the treble level. Rotate knob clockwise to increase treble to
desired level. Center detent is neither cut nor boosted.
(2) This device must accept any interference received, including interference that may cause
undesired operation
.
BASS
This control cuts or boosts the bass level. Rotate knob clockwise to increase bass to
desired level. Center detent is neither cut nor boosted.
MICROPHONE VOLUME
3
4