


Installation Information
1. The XEQ needs to be installed in the signal path between your source
unit and your external amplifier(s).
2. Physically mount the XEQ near the drivers listening position. Make sure
the EQ is kept clean, cool, and dry. Don't mount it under a cup holder or in
a storage box were it will be covered with the stuff that always seems to
collect in our cars.
3. . Hook up +12 volt power, ground, and remote turn-on. Make sure the
ground is perfectly clean and tight. Remove all the paint and under coat
before you screw it down. Don't trust the stock ground. Make a new one.
4. Connect the front output of you head unit to the front input of the XEQ.
5. Connect the Sub out to the "Direct Sub Input". This is optional. Make
sure the switches on top are configured correctly.
6. Don't fix the EQ permanently into place until your gains have been set.
7. Adjust the "Input Level" control on your XEQ to match the source unit's
output. With the head unit volume at about 75% of max, move the gain
switch from 0dB to +6 dB. Look at the input clip light on the front of the
EQ. It should NOT be on. It may flash occasionally. If it doesn't flash, move
the gains to +12dB. Unless you have a very low output head unit the clip
light will surely be flashing now. If it is move back to +6dB or +0dB.
8. Now the fun begins. With the EQ still out, begin adjusting the sub
crossover. Try to find a good neutral. You can always change the level
later.
9. Start tweaking. It's amazing how much a tiny adjustment to your EQ
frequency can change your system.
10. Enjoy the results
3
XEQ
XEQ
1
2
3
45
6
78
9
10 11
12
13
14
15
16
17
14
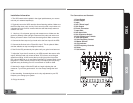
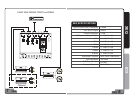
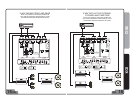
The Connections and Controls
1. Front Output
2. Rear Output
3. Input
4. Sub "Direct Input"
5. Sub Output
6. Power Connector
7. Input Gain
8. Sub Input Gain
9. Sub Crossover Switch
10. Sub "Direct Input" Switch
11. Sub EQ Bypass
12. Sub Frequency Control
13. Master Volume
14. Clip Indicator
15. EQ Frequency Controls
16. Fader
17. Sub Volume
XEQ IDX
XEQ
4