


ProKeys Sono 612 Quick Start Guide
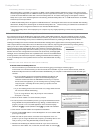
**IMPORTANT: When using ProKeys Sono class-compliant (i.e., without installing drivers) in Windows, the
computer will search for the M-Audio DFU (device firmware upgrade tool) and display a Found New Hardware
Wizard. The M-Audio DFU is a component of ProKeys Sono 61 that is enabled when the M-Audio drivers are
installed, but is not necessary for class-compliant operation. You have the following options:
A. Cancel the Found New Hardware Wizard and start using ProKeys Sono immediately.
The Found New Hardware Wizard will appear every time your computer detects that the device is
connected (e.g. upon computer or device restart, or disconnecting/reconnecting ProKeys Sono).
B. Follow the Found New Hardware Wizard until it gives the option not to be prompted to install this hardware
again.
Windows Vista Users:
▶
Select “Don’t show this message again for this device” in the first screen that appears.
▶
Click “Continue” in the confirmation screen that follows.
Windows XP Users:
▶
In the first screen, select ”No, not this time” and click “Next”
▶
In the second screen, select “Install the software automatically” and click “Next”
▶
Finally, make sure the check box labeled “Don’t prompt me again to install this software” is active, then
click Finish.
C. Install the M-Audio drivers as described in the “Driver Installation for ProKeys Sono 61” section of this
Quick Start Guide. After these drivers have been installed, the Found New Hardware Wizard for the
M-Audio DFU will no longer be displayed.
The ProKeys Sono 61 Voice Demos
ProKeys Sono has a built-in demo song for each instrument sound. To hear these demos:
1. Press the Edit Mode button so that the Edit mode LED lights.
2. Press one of the Voice Select buttons.
Demo playback can be stopped by pressing either the Edit Mode button or the Reverb button.
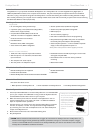
Using the Audio Inputs
A dynamic microphone can be connected to the XLR input located on the rear panel, and an instrument such as a guitar or bass
can be connected to the 1/4” input jack, also located on the rear panel.
†
Each of these two inputs has an independent preamp featuring a dedicated gain control knob, and signal and clip LEDs. Two
analog RCA inputs are also located on the back panel. Signal from these inputs is mixed with the Microphone and Instrument
input signals and routed to the 1/4” output jacks.
†
IMPORTANT: Be sure the Mic and Inst. Gain knobs are turned down before connecting equipment to these
two input jacks. Failure to do this can result in a loud pop or feedback which can damage your speakers or
hearing.
Additional Features in Edit Mode
ProKeys Sono provides many additional MIDI features and programming options. Pressing the Edit Mode button puts the keys of
the keyboard into Edit mode. This mode enables you to configure internal features of ProKeys Sono and transmit advanced MIDI
messages. Consult the User Guide found on the included M-Audio ProKeys Sono Drivers and Documentation CD-ROM for a
complete description of the ProKeys Sono Edit mode.
MIDI Connections
You can connect the ProKeys Sono 61 MIDI Output port to an external MIDI device’s MIDI Input port. This enables you to control
an external synthesizer or sound module using ProKeys Sono as a standalone keyboard controller. Alternatively, the MIDI Output
port can be configured to serve as a USB to MIDI interface. In this mode, ProKeys Sono 61 transmits MIDI data from sequencing
software running on your computer to MIDI devices connected to the ProKeys Sono MIDI Output port. More information on this
feature is included in the User Guide found on the M-Audio ProKeys Sono Drivers and Documentation CD-ROM.
A sustain pedal can also be connected to the 1/4” Sustain pedal jack on the back of ProKeys Sono.