


5
TenTips To ObtainThe Best Results
System Operation
1. Use only fresh alkaline batteries. Do not use “general purpose”
(carbon-zinc) batteries.
2. Position the receiver so that it has the fewest possible
obstructions between it and the normal location of the transmitter.
Line-of-sight is best.
3. The transmitter and the receiver should be as close together as
conveniently possible, but not less than 6' (2 m).
4. Do not place the receiver antennas within 3' (1 m) of another
receiver or antenna.
5. The receiver antennas should be kept away from any metal.
6. A receiver cannot receive signals from two transmitters at the
same time.
7. In the UniPak transmitter, the “MT” or “GT” input control not
in use should be set to minimum.
8. If the receiver output is set too low, the overall signal-to-noise ratio
of the system may be reduced. Conversely, if the volume control
of the receiver is set too high, it may over-drive the input of the
mixer/amplifier, causing distortion. Adjust the output level of the
receiver so the highest sound pressure level going into the
microphone (or the loudest instrument playing level) causes no
input overload in the mixer, and yet permits the mixer level
controls to operate in their “normal” range (not set too high or
too low).This provides the optimum signal-to-noise for the
entire system.
9. Turn the transmitter off when not in use. Remove the battery if
the transmitter is not to be used for a period of time.
10. Unplug the receiver from the AC outlet when the system is not
in use.
Turn down the receiver volume control and the mixer/amplifier
l
evel before starting up the wireless system. Do not switch on
the transmitter yet.
Receiver on...
Plug the power supply into an AC power source.The green
Power indicator on the front panel will light.
T
ransmitter on...
When the transmitter is switched on, the receiver’s yellow RF
signal indicator will light.The transmitters have a 3-position
power switch. When the switch is set to “Standby” (ST or
ST.BY), the transmitter produces RF with no audio signal. When
t
he switch is “On,” the transmitter produces both RF and audio.
Excessive audio input to the transmitter will cause the receiv-
er’s red AF Peak indicator to light.
ReceiverVolume
Under typical operating conditions, the receiver's volume
control should be turned all the way up, with overall system
audio gain adjusted at the mixer or amplifier.
Input Level Adjustment
Input trimmer controls in the transmitters enable you to
maximize performance for a particular microphone or guitar
sensitivity, or to adjust for different acoustic input levels.
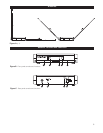
Adjusting Input Level - UniPakTransmitter
Slide the battery cover off the top part of transmitter and
remove the screwdriver from its clip (Fig. D). Gently turn both
the “MT” (MicTrimmer) and “GT” (Guitar Trimmer) controls to
their full counterclockwise positions (toward “LO”).
• Microphone: Adjusting input level
Gently turn only the “MT” (Mic Trimmer) control all the way
up (clockwise, toward “Hi”). Check for excessive gain by speak-
ing/singing into the microphone at typically loud levels while
watching the receiver’s AF Peak indicator. If the AF Peak indica-
tor does light, turn the MT control slightly counterclockwise
until the AF Peak indicator no longer lights with maximum audio
input to the transmitter.
• Guitar/Instrument:Adjusting input level
Gently turn only the “GT” (Guitar Trimmer) control all the way
up (clockwise, toward “Hi”). Check for excessive gain by
playing at typically loud levels while watching the receiver’s AF
Peak indicator. If the AF Peak indicator does light, turn the GT
c
ontrol slightly counterclockwise until the AF Peak indicator no
longer lights with maximum instrument input to the transmitter.
After adjusting input level, return the screwdriver to its clip
and reinstall the battery cover. No further transmitter gain
adjustments should be needed, as long as the input device
and the acoustic input level are not changed.
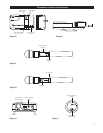
Adjusting Input Level - HandheldTransmitter
Unscrew the lower body cover and slide it downward, exposing
the screwdriver and Gain Trimmer control (Fig. G). Remove the
screwdriver from its clip. Gently turn the control to its full
clockwise position (toward the side marked “H”), the factory
setting. Check for excessive gain by speaking/singing into the
microphone at typically-loud levels while watching the receiver’s
AF Peak indicator. If the AF Peak indicator does light, turn the
Gain Trimmer control slightly counterclockwise until the AF Peak
indicator no longer lights with maximum audio input to the
mic/transmitter.
Return the screwdriver to its clip and close and secure the
lower body. No further transmitter gain adjustments should
be needed, as long as the acoustic input does not change
significantly.
CAUTION! The small trimmer controls are delicate; use
only the supplied screwdriver. Do not force the trimmers
beyond their normal 190
o
range of rotation.
Return the screwdriver to its storage clip when not in use.