


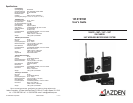

Thank you for purchasing Azden’s 105 wireless microphone system. Depending on which
system your ordered, this package will contain one or more of the following components:
the 105UPR receiver, the 15BT body-pack receiver with EX-503L lavalier microphone, the
15XT Plug-in transmitter and/or the 15HT handheld microphone/transmitter. This equip-
ment is designed primarily for video cameras but can be used with most electronic com-
ponents having a microphone level input. The 105UPR allows you to “receive” audio from
one transmitter at a time.
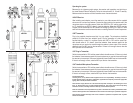
RECEIVER (105UPR)
(1) Remove the battery compartment lid by sliding it down.
(2) Insert two fresh Alkaline “AA” batteries into the compartment. Make sure the battery
polarity is correct as marked inside the battery compartment.
(3) POWER
Switches the receiver “ON” and “OFF”
(4) MIC OUT jack
The 105UPR is supplied with a mini-to-mini cable.
For mini jack microphone inputs: Use the supplied mini-to-mini cable.
Plug one end of the cable into the receiver and the other end of the
cable into the microphone input on the video camera.
For 3-pin XLR microphone inputs: Use the optional mini-to XLR
cable (MX-1). Plug the mini-plug end of the cable into the
receiver (use the screw-down sleeve to secure it to the receiver) and
plug the XLR end of the cable into the microphone input of
the video camera.
(5) Frequency Selection
Frequency adjustment is accomplished by setting the controls inside the bat-
tery compartment. With the frequency GROUP dial on the left (column A on
the included chart) you can select any of 10 frequency groups (numbered 0-9).
With the frequency CHANNEL dial on the right (column B on the
included chart) you can select any of 10 frequency channels (numbered 0-9).
There are actually 92 possible selections.
(6) Phone Jack
Plug the earphone into this jack to monitor the sound. The jack is wired to work
with either a mono or stereo headphone (you will hear mono in both ears when
using a stereo headphone).
(7) LED indicator
This LED turns RED when the receive is turned “ON” and GREEN when
receiving a signal from the transmitter.
HANDHELD MICROPHONE/TRANSMITTER (15HT)
(25) Remove the battery compartment cover by rotating it counterclockwise and
sliding it down.
(26) Insert two fresh Alkaline “AA” batteries into the compartment. Make sure the
battery polarity is correct as marked inside the battery compartment.
Inside the battery compartment you will also nd #27 and #28
(27) MIC LEVEL Control
The MIC LEVEL control enables you to adjust the audio level of the micro
phone. Using the supplied tool, turn the dial clockwise to increase, or
counterclockwise to decrease the microphone’s audio output level.
(28) Frequency Selection
Frequency adjustment is accomplished by setting the controls inside the bat-
tery compartment. With the frequency GROUP dial on the left (column A on
the included chart) you can select any of 10 frequency groups (numbered 0-9).
With the frequency CHANNEL dial on the right (column B on the
included chart) you can select any of 10 frequency channels (numbered 0-9).
There are actually 92 possible selections.