


STUDIO CONDENSER MICROPHONES C‑2
Specications4
Microphone installation7.
To attach the microphones to the microphone stands, two clamps are
included with the delivery. First screw a clamp onto the stand before
attacting the microphone itself.
Audio connection8.
Use a balanced XLR microphone cable with the following pin assignment:
pin 1 = shielding; pin 2 = +; pin 3 = -. Since your C-2 features gold-plated
contact points throughout, we recommend that you use only microphone
cables with gold-plated connectors.
Level setting / adjusting the basic sound9.
Adjust the gain control in the microphone channel of your mixing console
so that the peak LED lights up only occasionally or never at all. The EQ
controls in the microphone channel should be set to mid-travel position to
start with; low-cut lter and signal level attenunation should be switched
off. To get the sound you want, try changing the mic position relative to
the sound source or even move the microphone around in the recording
room of your studio. Adjusting the angle at which walls face the sound
source can also be helpful. Only when the desired basic sound has been
achieved, should you start to use equalizers and signal processors, if any
at all. Remember: less is often more!
Warranty10.
For our current warranty terms, please refer to our website at http://www.
behringer.com, or call +49 2154 9206 4166.
Specications11.
Transducer type condenser, 16 mm (0.63'')
Operating principle pressure gradient
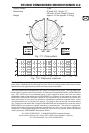
Polar pattern cardioid
Connector gold-plated balanced XLR connector
Open circuit sensitivity (@ 1 kHz) −41 dBV (0 dBV = 1 V/Pa)
Frequency response 20 Hz to 20 kHz
level attenuation −10 dB, switchable
Low-cut lter 6 dB/oct. @ 120 Hz (switchable)
Max. SPL (≤ 1 % THD @ 1 kHz) 140 dB (0 dB), 150 dB (−10 dB)
Equivalent noise level (IEC 651) 19 dBA
Signal-to-noise ratio 75 dB
Nominal impedance 75 Ω
Load impedance > 1 kΩ
Supply voltage +48 V