


Installing the microphone 3
STUDIO CONDENSER MICROPHONE C‑1U
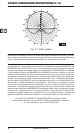
ations, since this directivity pattern tones down the pickup of sounds
located to the back of the microphone.
To place the microphone correctly, the BEHRINGER logo needs to
face the sound source being recorded.
Mounting the microphone3.
There is an adapter on your microphone that lets you mount it on mic
stands with either metric (Europe) or imperial-gauge threads (North
America). First dismantle the microphone from the stand mount adapter
by detaching the ne-thread shoulder screw at the bottom end of the
microphone. Fasten the adapter onto the microphone stand, place the
microphone into it and tighten the screw again.
Basically, the microphone in the stand mount adapter should stand
upright and face the sound source at a right angle. The angle of the
microphone to the sound source inuences the sound of the record-
ing; therefore, experiment with different positions until you achieve the
desired sound. To this end, you can rotate the mic in the stand mount
adapter by loosening the screw somewhat and tightening it again.
If necessary, you can bend the microphone out of its vertical position
by using the hinge on the microphone stand.
Please make sure to handle the microphone shaft with at‑ +
tention and care to avoid damaging the screw thread. In no
situation should you ever apply excessive force.
Of course, you can detach the C-1U from the stand mount adapter and
attach it to a commercially available suspension mount.
Installing the microphone4.
Technical requirements4.1
Your C-1U microphone comes with a USB connector. The audio signal
is sent from the microphone to the computer through this connection.
At the same time the computer uses the USB connection to supply
the microphone with the necessary power. A connection is made by
using the included USB cable with type-B connector.
Use only the included cable to ensure an optimal signal +
quality and a reliable power supply.