


3 SINGLE DIAPHRAGM CONDENSER MICROPHONE B-1 User Manual
Power Supply1.
Your condenser mic B-1 needs a +48-V phantom power supply.
Behringer assumes no liability for any damage caused by a defective
phantom power supply. Always mute the sound reinforcement system
before you switch on the phantom power supply. After power-up,
the B-1 needs about 6 seconds to stabilize.
Directivity, Low-Cut Filter and 2.
Level Attenuation
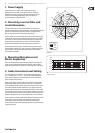
The capsule used in the B-1 with cardioid characteristics is ideal for the
directional recording of instruments or individual vocals. Cardioid characteristics
represent the most frequently used polar pattern in recording situations.
With this, unwanted sound in reverse phase is not picked up.
The low-cut lter can be activated with the switch on the front (position: left),
in order to lter low-frequency interference such as pop sounds, etc. With the
low-cut lter on, the B-1 provides an almost linear frequency response with
signals picked up at close proximity to the source. The built-in shielding
minimizes the microphone’s sensitivity to high-frequency interference.
Use the same switch to activate the -10 dB level attenuator (position: right),
which should be used with “pulse-type” signal sources producing high sound
pressure levels (e.g. kick drum). With the switch set to its center position,
both functions are disabled.
Mounting Microphone and 3.
Elastic Suspension
Attach the enclosed elastic suspension to the microphone stand. Fasten the
screw, once the suspension has been positioned properly. Open the elastic
suspension by pressing the two circular levers, then insert the B-1 from above.
Audio Conection/Level Setting4.
Use a balanced XLR microphone cable with the following pin assignment:
pin 1 = shielding; pin 2 = +; pin 3 = -. Since your B-1 features gold-plated
contact points throughout, we recommend that you use only microphone
cables with gold-plated connectors.
Adjust the gain control in the microphone channel of your mixing console so
that the peak LED lights up only occasionally or never at all. The EQ controls
in the microphone channel should be set to mid-travel position to start with;
low-cut lter and level attenuator should be o. Try to achieve the desired
sound by experimenting with the microphone position. Often, it will be useful
to set up acoustic barriers (“gobos”) at various angles towards the signal source.
Only when the desired basic sound has been achieved, should you start to use
equalizers and signal processors, if any at all (Remember: less is often more!)
The B-1 provides a level peak around 12 kHz producing some kind of “presence”
in this range; so, there is no need for high-frequency EQing which could
deteriorate the signal and raise the overall noise oor. On the contrary,
the B-1 provides that much-desired transparency which often gets lost during
recording and mixing.
Polar pattern
dB
20.0
10.0
-10.0
-20.0
20.0 100.0 1000.0 10000.0 Hz
0.0
Frequency response
90˚
60˚
30˚
0˚
330˚
300˚
270˚
240˚
210˚
180˚
150˚
120˚
0 dB
-5
-10
-15
-20
-25
-30
-35
-40
250
1000
4000
16000