


STUDIO CONDENSER MICROPHONE B-5
4
9. WARRANTY
5. MICROPHONE INSTALLATION
To properly attach your microphone to a microphone stand, a
clamp is included. First screw this clamp onto your stand before
attaching the microphone itself.
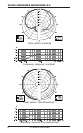
6. CHANGING MICROPHONE CAPSULES
When your B-5 leaves the assembly plant, it has the cardioid
pickup pattern capsule screwed onto its shaft. To loosen the
capsule, hold the shaft firmly and unscrew the capsule turning it
counter-clockwise.
+ When installing a capsule, please make sure to
handle both the capsule and the microphone shaft
with attention and care to avoid damaging the
screw thread. In no situation should you ever
apply excessive force.
7. AUDIO CONNECTION
To connect the B-5 to your equipment, use a balanced XLR
microphone cable with the following pin assignment: Pin 1 =
shielding, pin 2 = +, pin 3 = -. Since all contact points of the B-5
are gold-plated, your microphone cable too should feature gold-
plated connectors, if possible.
8. LEVEL SETTING / ADJUSTING THE BASIC SOUND
Adjust the gain control in the microphone channel of your mixing
console so that the peak LED lights up only occasionally or never
at all. The EQ controls in the microphone channel should be set to
mid-travel position to start with; low-cut filter and level attenuation
should be off. Try to achieve the desired sound by experimenting
with the microphone position. Often, it will be useful to set up
acoustic barriers (baffles) at various angles towards the signal
source. Only when the desired basic sound has been achieved,
should you start using equalizers and signal processors, if any
at all. Remember: less is often more!
9. WARRANTY
+ For our current warranty terms and conditions,
please visit our website at http://
www.behringer.com or send us a request by
e-mail (support@behringer.de), fax (+49 2154 9206
4199), or telephone (+49 2154 9206 4166).