


ULTRABASS BVT4500H/BVT5500H
Rear panel6
To emphasize a tone, you can turn the relevant tone control
toward 10 (maximum boost). Alternatively, you might con-
sider lowering adjacent bands. To de-emphasize a tone,
you can turn the relevant tone control toward 0 (maximum
cut).
When you choose to cut rather than boost an audio +
signal, you protect audio equipment from high signal
levels (clipping) and preserve valuable headroom.
GRAPHIC EQ features
With the TONE controls ((10) - (13)) discussed above, you em-
phasize and de-emphasize three fairly wide frequency bands.
However, with the GRAPHIC EQ features, you can emphasize
and de-emphasize 9 more narrow frequency bands. This lets you
rene the sound that you created with the TONE controls. The
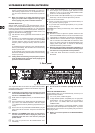
GRAPHIC EQ features include (14)-(16):
(14) EQ ON button: To turn graphic EQ and level features, push
this button.
(15) EQ faders: If you activated the frequency-band faders (14),
you can use each one to emphasize and de-emphasize
a specic frequency band. The center frequency of each
frequency band is displayed directly above the relevant
fader.
To emphasize (boost) a frequency band, slide the relevant
fader up. Alternatively, slide the faders for the surrounding
frequency bands down.
To de-emphasize (cut) a frequency band, slide the relevant
fader down. Alternatively, slide the faders for the surrounding
frequency bands up.
Cutting rather than boosting a frequency band protects +
audio equipment from high signal levels (clipping) and
preserves valuable headroom.
(16) LEVEL fader (BVT5500H only): To compensate possible
level changes of the equalized signal, slide this control
between +12 and -12. At “0” level, the BVT5500H neither
boosts nor cuts the equalized signal.
(17) EFFECTS MIX control (BVT5500H only): If you created an
effects loop, use this control to adjust the dry-wet mix.
As you turn this control toward:
0 (zero), you hear more of the = dry signal (without effects). At
zero, you hear only the dry signal.
10, you hear more of the = wet signal (effects). At 10, you hear
only the wet signal.
For details about creating an effects loop, see 3. REAR PANEL
((29) - (30)).
MASTER features
(18) MASTER control: To adjust the speaker volume and the
level of the PREAMP OUTPUT, turn this control toward 0 (no
volume/level) or, alternatively 10 (maximum volume/level).
(19) LIMITER button: The limiter reduces only the signal peaks
that can overdrive the POWER AMP and distort the audio
signal. The limiter prevents the BVT4500H/5500H from
clipping these signal peaks. To activate or alternatively
deactivate the limiter, push this button.
Because high signal peaks can damage loudspeakers, it +
is recommended to activate the limiter and not to play at
full volume for a long time without ear protection.
(20) LIMIT LED: When the limiter is activated, this LED is
illuminated.
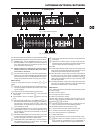
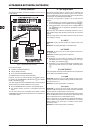
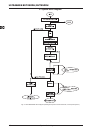
Rear panel3.
BVT4500H/BVT5500H rear panelFig. 3.1:
This chapter describes how to use the rear panel of the BVT4500H
and the BVT5500H, which includes the same features. Figure 3.1
illustrates these features.
To effectively use the jacks on the rear panel, you need +
to know about the BVT signal path. For details, refer to
the secion “THE SIGNAL PATH”.
(21) Serial number: To register your unit, you will need this unique
identier.
(22) Fuse compartment: For details about the appropriate fuse
type, refer to the “SPECIFICATIONS”. See also chapter
1.1.2. Replace this fuse only with the type specied for your
country.
(23) Power connector: To power the BVT4500H/5500H, plug the
power cord in this AC connector. The power cord comes with
the BVT.
Attention: The POWER switch does not fully discon- +
nect the unit from the mains. Unplug the power cord
completely when the unit is not used for prolonged
periods of time.
(24) Fan: This fan prevents the BVT4500H/5500H from
overheating.
Do not block the ventilation openings that cover the +
fan.
PARALLEL SPEAKER OUTPUT
Via the following jacks, you can simultaneously connect up to 3
speakers directly to the BVT:
(25) Two ¼" TS (mono, unbalanced) jacks.
(26) A single Neutrik Speakon compatible jack, for high-power
loudspeakers. The pin designation of the speaker is
pins 1+ and 1-. For details, refer to the chapter “AUDIO
CONNECTORS”.
If you use a single speaker or a high-power speaker, connect
this speaker to the Neutrik Speakon compatible jack. To prevent
electrical shock and ensure the correct polarity, this jack locks an
audio plug in place.
Before you connect speakers to the BVT4500H/5500H, +
turn it off.