


9
PRO MIXER DJX700
4. SPECIFICATIONS
AUDIO INPUTS
Mic 40 dB Gain, XLR,
electronically balanced input stage
Phono in 40 dB Gain, unbalanced input
Line in 0 dB Gain, unbalanced inputs
CD in 0 dB Gain, unbalanced inputs
Return 0 dB Gain, unbalanced input
AUDIO OUTPUTS
Master max. +21 dBu
Booth max. +21 dBu
Tape typ. 0 dBu
Send typ. 0 dBu
Phones Out max. 180 mW @ 75 Ω / 1% THD
EQUALIZER
Stereo Low +12 dB/-32 dB @ 50 Hz
Stereo Mid +12 dB/-32 dB @ 1.2 kHz
Stereo High +12 dB/-32 dB @ 10 kHz
Mic Low +15 dB/-15 dB @ 80 Hz
Mic Mid +15 dB/-15 dB @ 2.5 kHz
Mic High +15 dB/-15 dB @ 12 kHz
Kill Low -54 dB @ 50 Hz
Kill Mid -44 dB @ 1 kHz
Kill High -26 dB @ 10 kHz
DIGITAL EFFECTS PROCESSOR
DSP 24-bit TEXAS INSTRUMENTS
®
A/D-D/A converter 24-bit Sigma-Delta,
64/128-times oversampling
Sampling rate 46.875 kHz
SYSTEM SPECIFICATIONS
Signal-to-noise ratio > 80 dB (Line)
Crosstalk > 70 dB (Line)
Distortion (THD) < 0.03%
Frequency response 10 Hz - 55 kHz, +0/-3 dB
POWER SUPPLY
Mains voltages USA/Canada
120 V~, 60 Hz
Europe/U.K./Australia
230 V~, 50 Hz
Japan
100 V~, 50 - 60 Hz
General export model
120/230 V~, 50 - 60 Hz
Power consumption 32 W
Fuse 100 - 120 V~: T 1 A H
200 - 240 V~: T 500 mA H
Mains connection Standard IEC receptacle
DIMENSIONS/WEIGHT
Dimensions (H x W x D) approx. 4 1/10" (104.3 mm)
x 12 1/20" (320 mm)
x 14 3/5" (370.8 mm)
Weight approx. 3.9 kg (8 1/2 lbs)
BEHRINGER makes every effort to ensure the highest standard of quality. Necessary
modifications are carried out without notice. Thus, the specifications and design of the device
may differ from the information given in this manual.
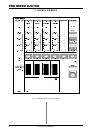
The externally processed signal is added to the MASTER
output signal via the RETURN connectors. The effect
signal volume may only be adjusted at the output control
of the effects device itself.
The MASTER output is for connecting to an amplifier and
can be adjusted with the MASTER fader .
+ Always turn the power amps on last to avoid inrush
currents that can easily damage your speakers.
And, to avoid sudden and unpleasant surprises
for your ears, make sure there is no signal at the
DJX700 before turning on the power amps. To be
sure, slide all the faders to the bottom and switch
all controls to the zero position.
The BOOTH output gives you an additional option of
connecting an amplifier in order to, for example, feed the
signal into your monitors or to bring sound to an extra area.
The BOOTH output level is regulated by using the BOOTH
LEVEL control of the MASTER section.
Using the TAPE output you can record your music by
connecting devices such as tape decks, DAT recorders
etc. Unlike the MASTER output, the output volume is fixed,
making it necessary for you to adjust the input level on the
recording device.
The POWER switch powers the DJX700 on. You should
always make sure that the POWER switch is in the Off
position when initially connecting the unit to the mains.
+ Please take note: Merely switching the unit off does
not mean that it is fully disconnected from the
mains. When not using the unit for prolonged
periods of time, please unplug the units power
cord from the power outlet.
This is the connector for the power cable. This is where
the advantage of a sophisticated internal power supply
can be seen: the pulse behaviour of each amplifying circuit
is mainly determined by the voltage reserves available.
Each mixing console is equipped with numerous
operational amplifiers (op amps) to process line level
signals. Due to limited output of their power supplies,
many mixing consoles show signs of stress when
subjected to heavy loads. But not your DJX700: the sound
is always clear and transparent.
FUSE HOLDER / VOLTAGE SETTING. Before connecting
the unit to the mains, ensure that the voltage setting
matches your local voltage. Blown fuses should only be
replaced by a fuse of the same type and rating. On some
units, the fuses holder can be switched to one of two
positions, i.e. 230 V and 120 V. Please note: should you
desire to operate the unit outside Europe at 120 V, a
higher fuse rating is required.
+ To disconnect power from main, pull out the main
cord plug. When installing the product, ensure that
the plug is easily accessible. If mounting in a rack,
ensure that the mains can be easily disconnected
by a plug or by an all-pole disconnect switch on or
near the rack.
SERIAL NUMBER. Please take the time to complete and
return the warranty card within 14 days of the date of
purchase. Or, simply register online at
www.behringer.com.
4. SPECIFICATIONS