


7
KEYBOARD AMP/PA SYSTEM KX1200
6
The HIGH control allows you to boost/cut the treble frequency range.
7
Use the MASTER control to determine the KX1200s overall volume level.
8
The stereo 1/4" HEADPHONES jack allows you to monitor the amps audio signal with a pair of
commercially available headphones. Connecting the headphones will mute the built-in speakers.
9
Use the POWER switch to switch your KX1200 on or off. The POWER LED located between the HIGH
and MASTER controls lights up when the unit is switched on.
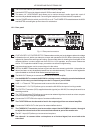
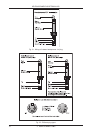
1.2.2 Rear panel
Fig. 1.2: Rear panel connectors
10
FUSE HOLDER / VOLTAGE SELECTOR. Please make sure that your local voltage matches the voltage
indicated on the unit, before you attempt to connect and operate the KX1200. Blown fuses may only be
replaced by fuses of the same type and rating. Some models allow for inserting the fuse holder in two
different positions, in order to switch over from 230-V to 115-V operation, and vice versa. Please note
that for 115-V operation outside Europe, you need to use a fuse of a higher rating.
11
Use the enclosed power cord to connect the unit to the mains.
12
SERIAL NUMBER. Please take the time to fill out and return the warranty card within 14 days after the
date of purchase, so as to be entitled to benefit from our extended warranty. Or use our online registration
option available on the World Wide Web at www.behringer.com.
13
The MAIN OUT allows you to connect the KX1200 to an external amplifier.
+ Use the MAIN OUT to connect the KX1200 to a mixing console, unless the console has balanced
inputs. In this case, you should always use the D.I. output of your KX1200.
14
LINE 1 - 4: These 1/4" TRS inputs are used to connect line-level instruments.
15
The balanced D.I. OUT (XLR) allows you to connect the KX1200 to the input of a mixing console.
16
The TAPE OUT connector (RCA) supplies the audio signal of your KX1200, for example to send it to a
recording machine.
17
The TAPE IN connector (RCA) allows you to connect an external signal source such as a drum computer
or other machine providing audio playbacks.
18
Connect the FX RETURN to the output of an external effects device.
+ The FX RETURN can also be used to feed in the output signal from an external amplifier.
19
Connect the FX/MON OUT to the input of an external effects device.
+ The FX/MON OUT can also be used as a monitor output. Use the FX/MON controls 1 through 4
to adjust the volume levels of the connected instruments as part of the monitor mix.
20
The MIC 1 input (XLR) allows you to connect a microphone.
+ Use channel 1 to connect either a microphone or a line-level signal, but never both at the
same time!
1. INTRODUCTION