


6 BASS V-AMP LX1B/BASS V-AMP PRO LX1B PRO User Manual
◊ When the TAP button (11) is depressed, the BASS control changes its
function to DEEP control, which influences the sound in the lower
frequency segment.
(5) The MID control lowers or elevates the mid frequencies.
◊ MID-SHIFT/SHAPE: When you select an amp simulation using the AMPS
control, press the TAP button to use the MID control to adjust the mid
frequency range (SHIFT). With amp simulations that don’t originally
have such a function, pressing the TAP button as described above
activates the BEHRINGER SHAPE filter instead.
(6) The TREBLE control regulates the upper frequency range of an
activatedpreset.
◊ Pressing the TAP button (11) changes the function of the TREBLE control
to PRESENCE control. This enables lowering/elevating upper frequency
range values of a filter selected for the amp model active at this time.
This filter simulates the frequency-dependent coupling of tube amps.
◊ Please pay attention to the special functions (described under ( 8 ) )
of the following points: ( 2 ) , ( 3 ) and ( 5 ) !
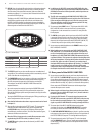
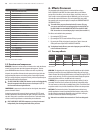
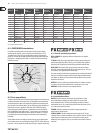
(7) The AMPS control lets you select one of the 32 amp simulations. 16 LEDs
surround this control, whereby 1 LED is assigned to 2 amp types. You select
one of the rst 16 amp types (white lettering) by simply turning the control.
To select the next 16 amps (17 - 32, grey lettering), keep the TAP button
pressed as you turn the AMPS control.
◊ The “17 - 32” LED in the lower left corner of the DISPLAY lights up when
one of the amp simulations numbered 17 - 32 is selected.
Additionally, you have the option to activate a PREAMP BYPASS via the
TUNER (9) and TAP (11) key combi-nation. When PREAMP BYPASS feature
is activated, no AMPS control LED is on. To disengage the PREAMP BYPASS
feature, either select an amp model of your choice or press the TUNER and
TAP keys again.
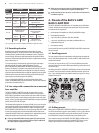
(8) These ve keys are used (among other things) for preset selection of the
presets bank shown in the display.
In EDIT mode (activated by simultaneously pressing the arrow keys described
under (10)), the function of individual keys is indicated by the print located
directly above the respective button:
• A: Activates the MIDI function. By utilizing the arrow keys, the MIDI channel
used for sending and receiving (1 to 16) can be set up.
After selecting a MIDI function via the A key, pressing the TAP key relays the
MIDI out connector to MIDI Thru. When in this mode, the unit sends no MIDI
information of its own; instead, it merely passes on the data received at
theMIDI In.
• B: Switches the DRIVE function on and o. When DRIVE is enabled, the
controls (2), (3) and (5) take up the following functions:
• GAIN regulates the distortion degree (“DRIVE”).
• The VOLUME control regulates an additional volume
control (“BOOST”).
• Use the MID control like the tone control on a simulated distortion
pedal (“TONE”).
Well-known oor eects units are simulated with these setups.
◊ When the DRIVE function is activated, turning the EFFECTS MIX controls
lets you also set up the Wah- Wah. The LEDs surrounding the EFFECTS
MIX control show the position of the pedal. When the LED is not on,
the Wah-Wah is inactive.
◊ When the Auto Wah/P-Funk’n is activated, the Wah- Wah cannot
be used.
• C: This key activates the CABINETS mode. Use the arrow keys to select a type
of loudspeaker or a combination of loudspeakers. You can also completely
switch o the speaker simulation (“-”). Additional information is available in
chapter 5.2.
• D: Activates the X-OVER function. Use the arrows to regulate the
cut-o frequency between high-pass and low-pass lter. This is done in
50gradients (please also see chapter 6.3).
• E: Activates the DENOISER function. You may change the threshold of
the expander by using the arrow keys. The EFFECTS control regulates the
sensitivity of the noise reduction system, while pressing TAP changes the
function of the EFFECTS control so that it regulates the frequency range of
the noise reduction system (also see ch. 5.3).
◊ After preset editing, press the TUNER/EXIT button to quit
(the EDIT MODE LED dies out).
◊ DIGITAL OUT: The digital output on the BASS V-AMP PRO can be
configured by pressing buttons A and B simultaneously. The display
shows “SP” for S/PDIF or “AE” for AES/EBU format. Alternating between
the two formats is done by using the TAP key. The LEDs let you see the
respective sample rate (internal synchronization and sampling rates of
44.1, 48 or 96 kHz or external wordclock synchronization; see table 2.1).
To select the most appropriate sampling rate for the receiving unit,
please use the arrow keys. Press the TUNER/EXIT key to quit.
◊ CONFIGURATION: By pressing the D and E keys simultaneously on your
BASS V-AMP PRO, you can select the global operating mode (keys B and
D on your BASS V-AMP), so that an adjustment to diverse studio and live
situations is possible (see chapter 3). Please press the TUNER/EXIT key
to quit.
(9) The TUNER key engages the tuner. Additionally, you can exit the EDIT mode
by pressing this key (see chapter 7).
(10) Both arrow keys are used to select the next preset bank (BANK DOWN und
BANK UP). Keeping the keys pressed lets you quickly jump through the
preset banks. Pressing both arrow keys at the same time engages the EDIT
mode. When you press one of the A - E buttons ((8)) afterwards, each arrow
key takes over an edit function.
(11) The TAP key has eight functions:
• “Tap”: Tap the TAP key in the rhythm of a tune, and the selected eect
adjusts automatically to the appropriate speed.
• “Deep”: By keeping the TAP key pressed, the BASS control assumes the
function of a DEEP control, so that it regulates the sound in the deep bass
end of the spectrum.
• “Mid-Shift/Shape”: When an amp simulation is selected using the AMPS
control, keep the TAP key pressed and use the MID control to regulate the
middle portion of the frequency range (SHIFT).
Our BEHRINGER SHAPE lter is automatically activated with amp simulations
that do not have such a function (as described above) in the original.
• “Presence”: Keep the TAP key pressed to use the TREBLE control to regulate
PRESENCE in a particular amp simulation.
• “2nd parameter”: The second eect parameter (regulated by the EFFECTS
control) is accessed by keeping the TAP button pressed (see chapter 6).
• “Amp models 17 - 32”: Keep the TAP key pressed and select the desired
simulation by using the AMPS control.
• “MIDI Thru”: The MIDI Out connector can be set to MIDI Thru (see (8) A).
• “Compressor”: The compressor control regulates the attack time when the
TAP key is kept pressed (see (14) ).