


4 TUBE CONDENSER MICROPHONE T-1 User Manual
Control Elements and Connections2.
Microphone2.1
You can tell that the T-1 is switched on when the small window glows red.
It is also possible to activate an attenuation of −20 dB on the side of the T-1,
for example, when signal sources are very loud. There is an XLR connector on
the bottom end of the microphone. Connect it to the power supply (PSU-T).
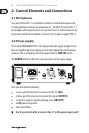
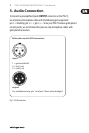
Power supply2.2
The included BEHRINGER PSU-T not only provides the supply voltage for the
tube preamplier but also employs a circuit that reduces the low frequency
response. This is activated on the front panel with the LOW CUT switch.
The POWER switch on the unit's rear panel turns on the power supply.
Here you also nd the following:
a seven-pin XLR connector to connect to the T-1 (• MIC),
a three-pin XLR connector to transmit the signal (• OUTPUT),
a switch to suppress signal humming noise (• GND LIFT),
an • IEC power receptacle
and a fuse holder.•
Use the provided cable to connect the T‑1 to the power supply unit!◊