


7
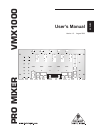
PRO MIXER VMX1000
2. CONTROL ELEMENTS
2.5 XPQ 3D surround function
The XPQ 3D surround function is a built-in effect that gives
your music a nice finishing touch, making every performance
truly memorable. By widening the stereo base, the sound comes
through more alive and transparent. Using the XPQ ON switch
activates the XPQ 3D surround function (corresponding
LED is lit) and the XPQ control
determines the intensity of
the effect.
2.6 Effects loop
Using the RET control, you determine the volume of the
effects signal that can be brought in at the RETURN input
on the rear (see ). To get the effects signal, you need
to connect the inputs of an effects unit to the SEND outputs
(see ) of your VMX1000. The outputs of the effects
unit are then connected to the RETURN inputs of your mixer.
2.7 CROSSFADER section
The VCA CONTROLLED CROSSFADER is used to cross
fade between the selected channels (see ). The
crossfader used in the VMX1000 is a professional 45-mm
fader.
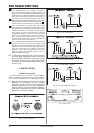
Use the CF CURVE control to modify the control character
of the crossfader between linear and logarythmic in an
infinite number of steps. When in linear characteristic mode,
the crossfader fades equally in each segment of its
movement range; in the logarythmic characteristic mode,
volume control is concentrated to the outer segment of the
faders range of motion.
Use the ASSIGN A and ASSIGN B rotary switches to
determine which input signals are routed to the A and B
sides of the CROSSFADER. With ASSIGN A, channels 1
through 4 can be selected; with ASSIGN B, channels 2
through 5. Then, you can alternate between these two
channels using the CROSSFADER (see ).
2.8 AUTO BPM COUNTER
The integrated auto BPM counter is an extremely useful feature.
It ensures smooth transition from one track to the next. It can
calculate the tempos of various tracks in BPM (beats per minute).
Both BPM counter sections are identical and both show the BPM
value of the two stereo channels routed to the crossfader.
The tempo of the track assigned by using the ASSIGN A or
ASSIGN B keys is shown in the respective DISPLAY .
Several tempo changes in one track would produce a constant
display of various BPM values and thus lead to unnecessary
confusion. Thats why each beat counter section has a SYNC
LOCK button that can be used during the song to limit the
range of possible tempo values. This makes sense if the counter
has already calculated a realistic value. You can do the same
manually with the BEAT ASSIST button . Push this button at
least three times in sync with the songs tempo, and the tempo
you tapped appears in the DISPLAY. The BEAT ASSIST and
SYNC LOCK buttons are each equipped with a LED.
To exit SYNC LOCK or BEAT ASSIST mode, simply press the
SYNC LOCK key in both channels once again.
+ When no signal is present (or when the signal level
is too low), the BPM display shows only dashes.
When the signal is present but can not be identified,
the display shows 160 BPM and then shows the
dashes. The beat counter then attempts to get
another readout. Therefore, 160 BPM is no usable
value; rather, it is simply an error message when
the signal can not be analyzed.
2.9 Connections
These are the LINE and CD inputs respectively, used for
connecting tape decks, CD or MD players etc. Unlike other
channels, channels 4 and 5 feature two line inputs.
The PHONO inputs for channels 1 through 3 are intended
for connecting turntables. Channels 1 through 3 can be
switched over to line level (see
).
Using the PHONO/LINE switches, you can change the
input sensitivity of the PHONO inputs on channels 1 through
3 to line level (switch pressed). This way, you can even
connect a tape deck or a CD player to the PHONO inputs.
+ IMPORTANT: Always pay attention to the correct
position of the PHONO/LINE switch when connecting
a line level signal to a phono input. The switch must
be in its pressed position (LINE)! Otherwise,
overdriving may lead to permanent damage to the
phono input.
The GND connectors are used for grounding turntables.
The MIC AUX signal, adjustable using the AUX controls on
the microphone channels (see ), is laid out at this SEND
jack connector. For example, the input of an external reverb
can be connected here.
An external stereo effects signal can be fed back into the
VMX1000 using the RETURN L/R jack connectors. If you
connect a mono effects signal, you need to use the left
RETURN L connector. The effect volume can only be
adjusted on the output control of the effects unit.
SERIAL NUMBER. Please take the time to complete and
return the warranty card within 14 days of the date of
purchase. Or, simply register online at
www.behringer.com.
The balanced MAIN 1 XLR outputs are used for connecting
a power amplifier. Use the VOL 1 control to adjust the
volume (see ).
Hitting the MONO key changes the stereo
MAIN 1 output signal into a mono signal. Doing this makes
sense when you for example use your PRO MIXER in large
rooms where the speakers are placed far from each other.
A stereo signal would have a disrupting effect, since the
speakers each transmit a somewhat different signal. If
you press MONO, an identical signal is transmitted to both
MAIN 1 outputs. The BAL 1 control (see ) has no
function here.
You can connect an additional amplifier to the
SUBWOOFER output in order to drive a passive
subwoofer. If you wish to use an active subwoofer,
connect it directly to this output. Either way, you get more
bass power out of your music.
Use the LEVEL control to adjust the volume of the
SUBWOOFER output signal.
Use the X/O control to adjust the upper cut-off frequency
of the SUBWOOFER signal (adjustable between 30 and
200 Hz). All frequencies with values below the cut-off
frequency will be reproduced.
The MAIN 2 output allows you to connect an amplifier to
drive monitor speakers or to provide sound in another room/
area (zone). The VOL 2 control (see ) adjusts the
MAIN OUT section.
Using the TAPE output, you can record your music by
connecting equipment such as tape decks, DAT recorders
etc. Unlike the MAIN outputs, the output volume is fixed,
making it necessary for you to adjust the input level on the
recording device.