Behringer Xenyx Musical Instrument User Manual


8
XENYX
502/802/1002/1202
CD/TAPE OUTPUT





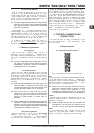
2.3.4 Signal assignment
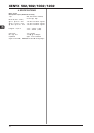
Fig. 2.12: Assignment switches of the main section
CD/TAPE TO MIX
TAPE TO MIX



CD/TAPE TO CTRL ROOM (502: CD/TAPE TO PHONES)
CD/TAPE TO CTRL ROOM/PHONES



+ If you are recording a signal via the CD/TAPE OUTPUT
and wish to listen to this simultaneously via the
CD/TAPE INPUT, do not use the CD/TAPE TO MIX
switch. Doing this would create a feedback loop,
since the signal would be routed, via the main mix,
back to tape via the CD/TAPE OUTPUT. To monitor
the CD/TAPE INPUT, use the CD/TAPE TO CTRL ROOM
switch to assign the tape signal to the monitor(s)
or headphones. This will avoid the tape signal being
routed to the CD/TAPE OUTPUT.
FX TO CTRL ROOM





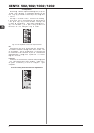
2.3.5 Phantom power and LED displays
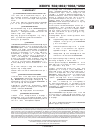
Fig. 2.13: Phantom power and control LEDs
+48 V (802/1002/1202 only)
+48 V
PHANTOM

+ Please do not connect microphones to the mixer
(or the stagebox/wallbox) as long as the phantom
power supply is switched on. Connect the micro-
phones before you switch on the power supply. In
addition, the monitor/PA loudspeakers should be
muted before you activate the phantom power
supply. After switching on, wait approx. one minute
in order to allow system stabilization.
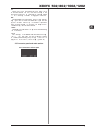
POWER
POWER
LEVEL INDICATOR


LEVEL SETTING:










+ The peak meters of your XENYX display the level
virtually independent of frequency. A recording level
of 0 dB is recommended for all signal types.
2. CONTROL ELEMENTS AND CONNECTORS