


To get the most out of this, or any quality microphone, it is essential
to pair it with a good microphone preamplifier. Most professional
recordists prefer to have outboard preamps on hand, and will choose
solid-state or vacuum tube models based on their unique character-
istics. To maintain the integrity of your signal, try using Blue’s
Cranberry, Blueberry
or
Kiwi
high-definition mic cable along with
Blue’s outstanding Class-A vacuum tube mic preamp,
Robbie
(left)
.
And, whenever possible, connect your pre’s output directly to your
recorder or A/D converter, bypassing the mixing board and any unnecessary components.
The Dragonfly includes the Series 2 shock. To mount the Dragonfly on a mic stand, you may find
it easiest to 1) loosen the boom stand arm or threaded end of the mic stand, 2) grasp the mic and
shockmount assembly in one hand, and 3) screw the mic stand threads into the Dragonfly mount.
This procedure will assure that the elastic shockmount bands stay in place and eliminates any pos-
sibilityof damage to the mic. The swivel mount can be angled over 180° by adjusting the thumbscrew.
To secure the delicate capsule during transport and storage, two set screws are provided.
These screws go into the solid metal ring around the circumference of the spherical grille, and
should be in place when you first take the mic out of its case. Remove them before using the
Dragonfly, and replace them at the end of the session.
The Dragonfly requires +48V phantom power, which is provided by most mic preamps, mixing
consoles, or separate phantom power supplies. It is important to note that some units, though
rated at 48 volts, may supply insufficient or unstable phantom power, which can result in
distortion and/or degraded performance when used with the Dragonfly.
To avoid damage to audio components when connecting phantom power, follow this simple
procedure: 1) Turn down the mic preamp gain, headphones, and your studio monitors; 2)
Connect microphone cable to the Dragonfly and microphone input jack; 3) Turn on phantom
power; 4) Turn up the mic preamp gain, etc. To disconnect or re-route the Dragonfly: 1) Turn
down the mic preamp gain, headphones, and your studio monitors; 2) Turn off phantom power
and wait ten seconds before disconnecting the mic.
Once the Dragonfly is on the stand and powered up, make sure that the active, on-axis side of
the capsule (the shiny hemisphere of the grille) is facing the desired source. For example, if you
are speaking into the mic, the shiny hemisphere will be in front of your mouth and the solid
metal ring around the circumference of the grille will be aligned vertically, with the two screw
holes on top. The Dragonfly is a cardioid mic and is designed to reject off-axis sound arriving
at the back of the capsule (the dull metal hemisphere).
And now, here are some recording tips that will allow you to get the most out of the Dragonfly.
Vocals
A little-known secret in the recording world is that vocalists love singing
into beautifully engineered microphones like the Dragonfly. Put it in front
of any singer and you’re guaranteed to get a truly inspired vocal performance.
For a “big” vocal sound, position the vocalist within one to four inches of
the capsule (be sure to use a quality pop filter like Blue’s
The Pop
). Tilt the
capsule up (towards the forehead) for more projection and head tone,
straight on at the mouth for maximum brightness and intelligibility, or
down towards the chest for more robust full lows and smoother highs.
Electric Guitar
The Dragonfly is an excellent mic for any clean amp sound, ranging from
bright rhythm chords to warm jazzy tones. Rotate the capsule towards the
center of the speaker to capture more highs, or turn the capsule toward the
edge of the cone for a fuller sound with more low end. For overdriven or
distorted tones, move the mic towards the outer edge of the cone, or back
it away from the amp a foot or more to add a little room sound and soften
the extreme high end. Give the Dragonfly a try on electric bass, too!
Acoustic Guitar
Large diaphragm mics require careful placement when used on acoustic
guitar, but the Dragonfly’s clarity and superb transient response are well-
suited to this job. For a balanced sound with plenty of sparkling high end,
place the microphone facing the guitar neck, right where the neck joins the
body (usually around the 12th-14th frets). For starters, keep the mic as
close as possible, and tilt the capsule toward the soundhole to capture a
blend of low end and pick sound. If you need more lows, move the
microphone closer to the soundhole. For more high end detail, move the
Dragonfly further from the guitar, either at the same neck position or
above the instrument up by the guitarist’s head.
Drums
The Dragonfly’s slim profile, rotating capsule and fast transient response
offer numerous advantages when recording drums. For kit and hand drums,
begin by placing the microphone two to four inches above the rim of the
hoop (where the head is secured to the shell). Angle the capsule toward the
player’s stick or hand to pick up more attack and definition. Turning the
capsule toward the shell will soften the sharp attack of a hand drum, or to
T H E D R A G O N F L Y
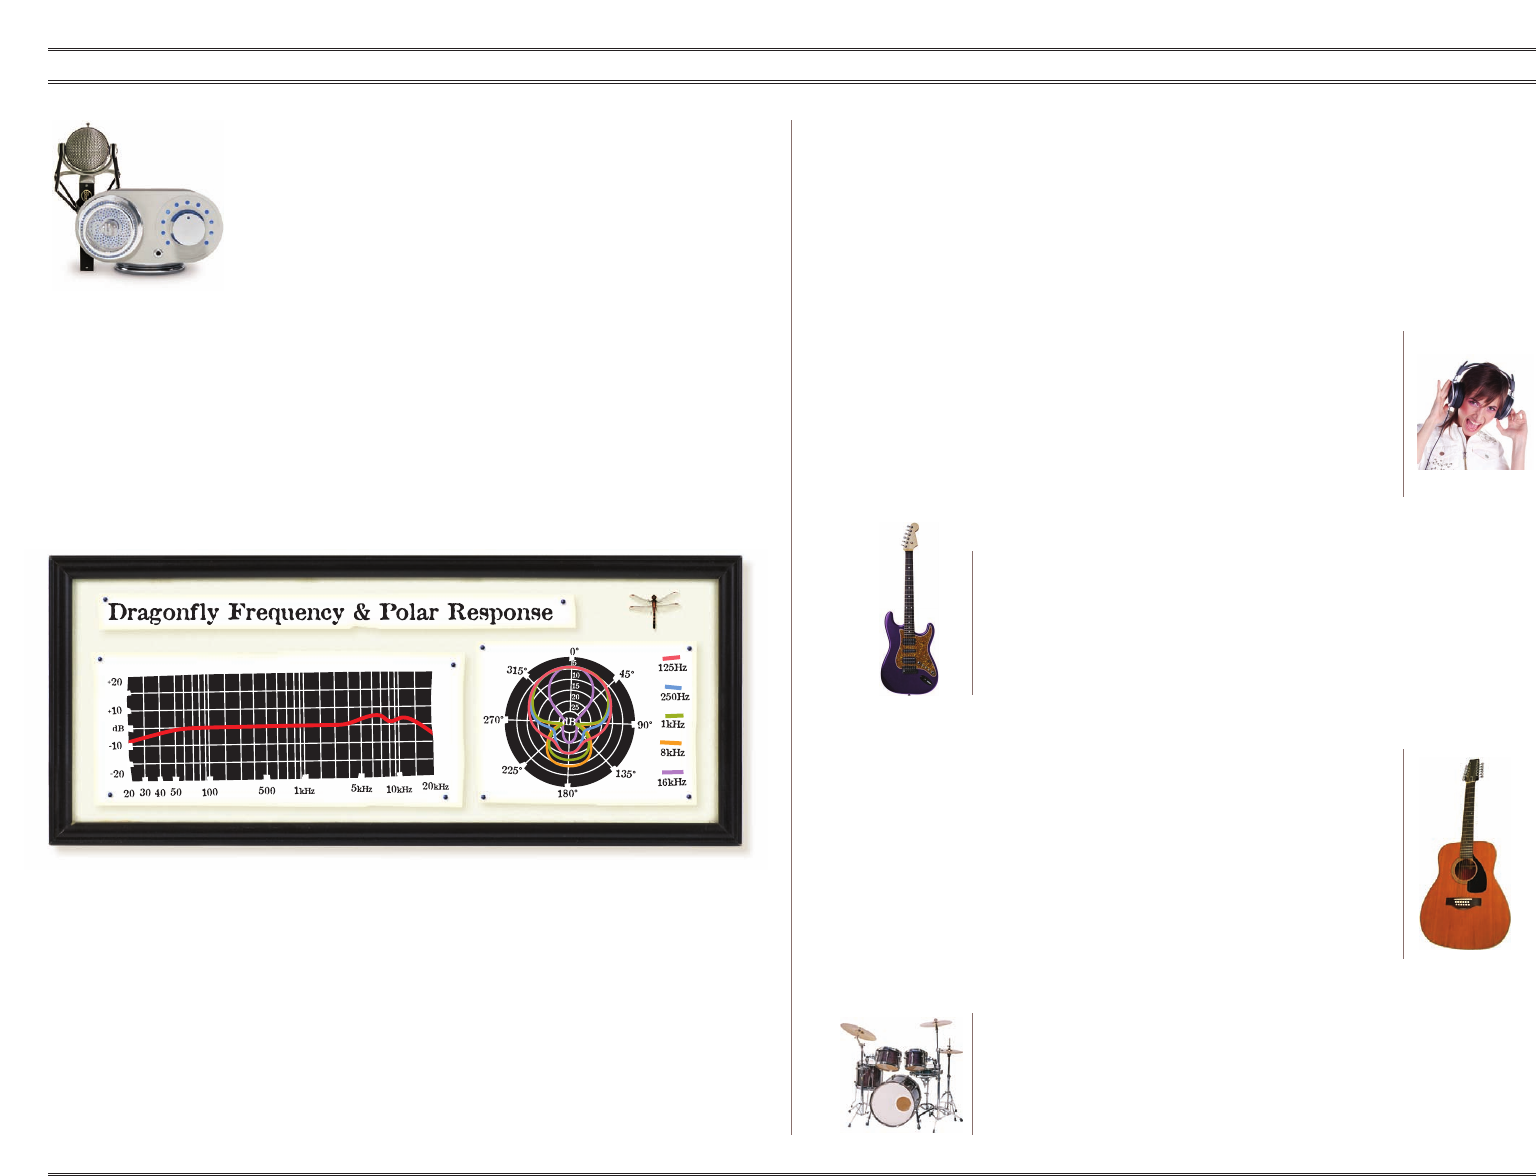
These frequency charts are only a beginning. It gives the recordist a basis of the sound provided. How the microphone reacts in a particular application will
differ greatly becauseof many variables. Room acoustics, distance from sound source (proximity), tuning of the instrument and mic cabling are
only a few of the interacting issues. For an artist or an engineer, how the microphones are used creates the basis of the sound.