


E-32
Getting Ready
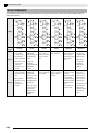
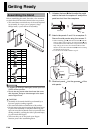
Before assembling the stand, first take a few moments
to check that all of the items shown below are present.
• This stand does not include any of the tools required
for assembly. It is up to you to prepare a large
Philips head (+) screwdriver for assembly.
IMPORTANT!
• If anything is missing or damaged, contact your local
CASIO service provider.
• Do not use any screws other than those that come
with the stand. Doing so risks damage to the stand
and/or Digital Piano.
CAUTION
• Assembly of the stand should be performed by at
least two people working together.
• This stand should be assembled on a flat surface.
• Do not remove the tape securing the keyboard cover
in place until assembly is complete. Removing the
tape can cause the keyboard cover to open and close
during assembly, creating the risk of personal injury
to your hands and fingers.
• Take care that you do not pinch your fingers
between parts when assembling them.
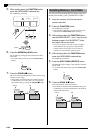
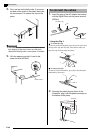
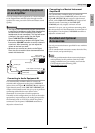
1.
Unfasten the band 1 that bundles the pedal
cable to the back of crosspiece D and pull the
pedal cord out from the crosspiece.
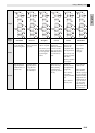
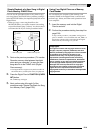
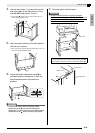
2.
Attach side panels A and B to crosspiece D.
Secure the side panels using four screws E.
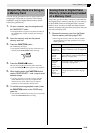
• When installing part 2, slide the brackets 3 into the
slots in either end crosspiece D. If the brackets 3 are
not inserted into the ends of the crosspiece
D
as far as
they will go, the screws E will not be able to enter
into the screw holes of the brackets 3, which can strip
the threads of the screws.
• Cover the screw heads with the caps J.
3.
Slide back panel
C
into the grooves
4
of the
side panels.
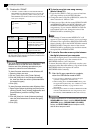
Assembling the Stand
C
D
A
B
Part Qty
E
4
F
6
G
2
H
2
I
2
J
4
K
2
L
1
M
1
N
1
1
Pedal cable
A
D
B
J
J
3
2
E
E
C
4