


E-26
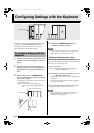
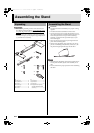
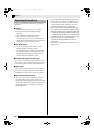
Assembling the Stand
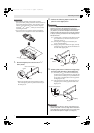
4.
Perform the following steps to secure the side
panel to the digital piano.
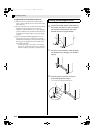
(4-1) Press downwards on side panel
A
to ensure that
it is inserted as far as it will go into the bracket on
the side of the digital piano.
(4-2) Use the
D
screws to secure side panel
A
to the
digital piano.
5.
Insert foam piece K
-(
c
)
under side panel A as
shown in the illustration.
IMPORTANT!
• The foam piece should be located directly under the two
screw holes (
) in the side panel.
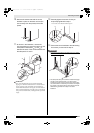
6.
Repeat steps 2 through 5 to attach side panel
B to the other side of the digital piano.
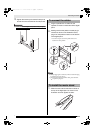
7.
With the speaker box C laying on its side as
shown in the illustration, secure side panels
A and B to the speaker box C. Secure the
side panels using four screws D.
• Align the screw holes of the speaker box
C
with the
screw holes of the side panels as you install the
screws
D
.
• Partially tighten the screws on one side of the speaker
box
C
and then fully tighten the screws on the other
side.
• Next, fully tighten the screws that you partially
tightened.
• You can also install the speaker box
C
so it faces
towards the back of the stand.
8.
After ensuring that all of the screws are fully
tightened, remove the packing material and
stand up the stand.
• After standing up the stand, cover each of the eight
screws you have installed up to this point with screw
caps
E
.
9.
Attach the brackets I to the pedal unit F,
and temporarily secure them with screws G.
D
A
(4-1)
(4-2)
Bracket
K
-(c)
A
If you plan to locate the digital piano against a wall,
proceed to step 10 on page E-28.
B
C
A
D
D
I
-(b)
I
-(a)
F
G
G
B
PX720_03_e.fm 26 ページ 2007年8月10日 金曜日 午後2時24分