


BT220H
Bass Amplifier
4
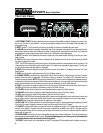
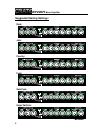
1. ELECTRONIC TUNER: This active electronic tuner is on whenever the amplifier is turned on, allowing you constant, “real-
time” tuning. The tuner is fully chromatic – use the flat and sharp indicators until the LED between them illuminates, indi-
cating proper tuning.
2. INPUT: Use this 1/4” jack to connect your bass to the amplifier by means of a shielded instrument cable.
3. -15dB/0dB: Use this switch to match the output signal level of your instrument to the amplifier. If your instrument has stan-
dard pickups, setting the switch to the 0dB position (switch in the out position) should yield the best results. If your bass has
active electronics or high output pickups, set the switch to the -15dB position (switch depressed).
4. MUTE: This switch, when depressed, interrupts the signal prior to the power amplifier, allowing you to tune your instru-
ment in silence.
5. GAIN: Use this control to adjust the amount of distortion for the Distortion channel. As you rotate the control clockwise
the amount of distortion increases.
NOTE: The BT220H employs an internal noise gate on the Distortion channel to keep residual noise to a minimum. The
Clean channel’s Level control (#9) must be turned up above “0” in order for the noise gate to trigger properly. The Gain con-
trol (#5) and input signal level also affect the noise gate.
6. SHAPE: Use this control to adjust the tone of the Distortion channel, from a studio “V”-shaped tone to a more “live,” more
present sound.
7. LEVEL: Use this control to adjust the output level of the Distortion channel.
8. CHANNEL SWITCH: Use this switch to select either channel. With the switch in the out position, the Clean channel is
selected. When the switch is depressed, the Distortion channel is selected. The adjacent LED illuminates when the
Distortion channel is selected. NOTE: When using the footswitch (#27): when this switch is depressed, the footswitch switch-
es between the Distortion channel and the Clean channel; when this button is in the out position, the Clean channel is always
active, and the footswitch turns the Distortion channel on and off, allowing you a blend of both channels.
9. LEVEL: Use this control to adjust the output level of the Clean channel, and as part of the Octave level control (see #14).
10. LOW: Use this control to adjust the low frequency output of the Clean channel.
11. LOW MID: Use this control to adjust the lower-midrange frequency output of the Clean channel.
12. HIGH MID: Use this control to adjust the upper-midrange frequency output of the Clean channel.
13. HIGH: Use this control to adjust the high frequency output of the Clean channel.
14. OCTAVE: The BT220H features internal circuitry which creates a second signal which is one octave lower than the input
signal. Use this control in conjunction with the Clean channel’s Level control (#9) to adjust the level of the octave signal.
15. MASTER: Use this control to adjust the overall output level of the amplifier.
16. LIMIT LED: This LED illuminates when the internal limiting circuit is active. Occasional flashing during playing is normal.
If the Limit LED remains illuminated, reduce the output level of the amplifier until the LED flashes.
17. CD INPUT: Use these RCA jacks to connect the line level (or headphones) output of a CD player, tape deck or rhythm
machine to the amplifier. The signal level from these jacks is adjusted by the Master control (#15). If the signal from the
source connected to these jacks is too strong, use the output level control on the source to adjust the signal to obtain the
proper level for a good mix.
18. HEADPHONES: Use this jack to listen to the amplifier through a pair of stereo headphones. The external speakers are
disconnected when the headphones jack is used. To avoid possible damage to your hearing, do not use headphones
for extended periods of time at extremely loud listening levels.
19. POWER: Use this switch to turn the amplifier on and off. The adjacent LED illuminates when the amplifier is turned on.
21 34 5 6 7 8 9
The Front Panel: