


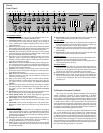
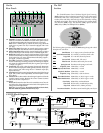

On the
Front Panel:
0 10 0 10
0 100 10 0 100 100 100 10
0 10 500Hz 1.2kHz
0
–15 +15
0
–15 +15
0
–15 +15 0 10
Rev Ret Eff Ret
Depth
ChorusInstrument
RateGain
Input
Low Mid Contour High Freq Cut
Rev/Eff
Send
0 –30dB
–15dB
Hi ZLow Z Gain
Vocal / Mic
Rev/Eff
Send
Off
On
Active
Peak
Piezo
100Hz 330Hz
1kHz
4kHz 10kHz
+12dB
–12dB
0
+12dB
–12dB
0
Graphic Eq Power
Master
0 10
Level
Crate Acoustic CA112D
500Hz
175 1.2k
80Hz 4kHz
GainHi Z
Aux
Rev/Eff
Send
1 2 3 4 5 6 7 8 9 10 11 12 13 14
15 16 1817 19 20 21 23 24 25 26 2722
SPR
LAR
SAR
DLY
Multi
Mode
Effects
The Instrument channel:
1: Input. The signal output from your acoustic instrument may be con-
nected here by means of a shielded instrument cable.
2: Active/Piezo switch. Use this switch to select the type of pickup on
your instrument. For active electronic pickups, set the switch to
“active” (switch out). For passive/magnetic pickups, set it to “piezo”
(switch depressed).
3: Gain. This serves as the input level control for the instrument channel
of the amplifier. For the best signal to noise ratio set this control so the
Peak LED (#4) flashes when playing your instrument fairly hard.
4: Peak LED. This LED flashes when the signal level into the preamp
approaches clipping. Adjust the Gain control (#3) until a strong signal
from your instrument causes this LED to flash.
5: Low. This serves as the instrument channel’s primary bass control.
Adjust this control to get the best sounding bass response for your
instrument. Excessive boost of the low control can cause an unnatur-
al howling and should be avoided.
6: Mid. This serves as the instrument channel’s primary midrange con-
trol. Adjust this control to get the best projection and midrange tones
for your instrument. The center point of the mid control is chosen by
the setting of the contour control (#7).
7: Contour. Use this control to set the center point of the mid control
(#6). Set this control at the frequency which gives you the most natur-
al-sounding midrange tones.
8: High. This serves as the instrument channel’s primary treble control.
Adjust this control so your high notes and harmonic overtones are
lively but not overpowering.
9: Freq. Use this control along with the Cut control (#10) to eliminate
instrument feedback. For information on the proper use of this con-
trol, please read the section entitled “To Eliminate Instrument
Feedback.”
10: Cut. Use this control along with the Freq control (#9) to eliminate
instrument feedback. For information on the proper use of this con-
trol, please read the section entitled “To Eliminate Instrument
Feedback.”
11: Rev/Eff send. Use this control to adjust the amount of internal reverb
and/or external effect (if used) for the instrument channel.
12: Chorus On/Off switch. This switch, when depressed, applies the
internal chorus effect to the instrument channel.
13: Chorus Depth. Use this control to adjust the magnitude of the chorus
effect. Rotating this control clockwise increases the intensity of the
effect.
14: Chorus Rate. Use this control to adjust the rate of the chorus effect.
Rotating this control clockwise increases the rate at which the effect
occurs.
The V
ocal/Aux channel:
15: Low-Z input. The signal output from a low impedance microphone
may be connected here by means of a shielded, balanced microphone
cable terminated with an XLR connector. The Low-Z jack has 15 volts
phantom power applied to pins 2 and 3. (Mics not requiring phantom
power will not be affected.)
16: Hi-Z input. The signal output from a high impedance microphone or
a line level signal may be connected here by means of a shielded sig-
nal cable terminated with a 1/4” tip/sleeve connector.
17: Gain. This serves as the input level control for the vocal/aux channel
of the amplifier. Adjust this control for the best mix with the signals
from the other channels.
18: Rev/eff send. Use this control to adjust the amount of internal reverb
and/or external effect (if used) for the vocal/aux channel.
The Aux channel:
19: Hi-Z input. The signal output from a high impedance microphone or
a line level signal may be connected here by means of a shielded sig-
nal cable terminated with a 1/4” tip/sleeve connector.
20: Gain. This serves as the input level control for the aux channel of the
amplifier. Adjust this control for the best mix with the signals from the
other channels.
21: Rev/eff send. Use this control to adjust the amount of internal reverb
and/or external effect (if used) for the aux channel..
The Ef
fects Section:
22: Rev Ret. Use this control to adjust the amount of the internal reverb –
the further you turn to the right the deeper the effect.
23: Eff Ret. Use this control to adjust the amount of effect applied from an
external signal processor (if used).
The Master Section:
24: Graphic EQ. Use these sliders to control the output frequencies indi-
cated below each control. The center position of each control is flat (no
boost or cut). Use the graphic EQ to adjust the output of the CA112D
to best suit your tastes and to compensate for room acoustics.
25: Level. Use this control to set the overall output level of the amplifier.
26: Power Switch. Use this switch to apply power to the amplifier: the
amp is on when the top of the switch is depressed, off when the bot-
tom of the switch is depressed. This switch will illuminate when the
amplifier is on.
To Eliminate Instrument Feedback:
One of the most common problems encountered when amplifying
acoustic instruments, especially in small environments, is feedback.
Acoustic instruments typically have inherent qualities which cause reso-
nant feedback at specific frequencies. Instrument tone controls and sound
board equalizers are helpful in getting rid of the problem, but they typical-
ly operate around relatively wide frequency bands. This almost always
means the musician must sacrifice sound quality in his quest to do away
with feedback. Crate’s feedback elimination circuit isolates only the offend-
ing frequency. Consequently, instrument feedback from the amplifier can
be eliminated without affecting the overall sound.
Chances are, you may not have a problem with feedback at all. In that
case, set the amplifier’s Freq and Cut controls fully counter-clockwise.
However, if you do encounter feedback while playing, set the Cut control
to -30dB (fully clockwise) and adjust the Freq control until the feedback is
gone. Reduce the Cut to the 12 o’clock position and readjust the Freq con-
trol as needed. Continue reducing the Cut control and readjusting the Freq
control until there is no more feedback with the Cut control as far counter-
clockwise as possible. This approach effectively eliminates instrument feed-
back without sacrificing the quality of your sound.