


On the
Front Panel:
Input
Mid
Gain
0 10
HighLow
0
–15 +15
Rev/Eff
Send
0 10
Depth
0 10
Rate
0 10
Gain
0 10
Low
0
–15 +15
High
0
–15 +15
Rev/Eff
Send
0 10
Level
0 10
Rev
Return
0 10
Chorus
Phantom
Low-Z
Hi-Z
Power
Freq
Cut
-15dB
Piezo
Active
Shape
Instrument
Chorus
Vocal / Aux
Master
Peak
Chorus
0
–15 +15
500Hz
Crate Acoustic CA60
80Hz 4kHz
0
–15 +15
0 –30dB
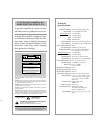
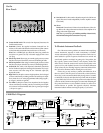
1 3 124 52 6 7 8 9 10 11 13 14 15
16 18 1917 20 21 22 23 24 25
The Instrument channel:
1: Input. The signal output from your acoustic instrument may be con-
nected here by means of a shielded instrument cable.
2: Active/Piezo switch. Use this switch to select the type of pickup on
your instrument. For active electronic pickups, set the switch to
“active” (switch out). For passive/magnetic pickups, set it to “piezo”
(switch depressed).
3: Shape. This switch, when depressed, serves as a mid-cut control,
adding fullness to the sound of your instrument.
4: Gain. This serves as the input level control for the instrument channel
of the amplifier. For the best signal to noise ratio set this control so the
Peak LED (#5) flashes when playing your instrument fairly hard.
5: Peak LED. This LED flashes when the signal level into the preamp
approaches clipping. Adjust the Gain control (#4) until a strong signal
from your instrument causes this LED to flash.
6: Low. This serves as the instrument channel’s primary bass control.
Adjust this control to get the best sounding bass response for your
instrument. Excessive boost of the low control can cause an unnatural
howling and should be avoided.
7: Mid. This serves as the instrument channel’s primary midrange con-
trol. Adjust this control to get the best projection and midrange tones
for your instrument.
8: High. This serves as the instrument channel’s primary treble control.
Adjust this control so your high notes and harmonic overtones are
lively but not overpowering.
9: Freq. Use this control along with the Cut control (#10) to eliminate
instrument feedback. For information on the proper use of this con-
trol, please read the section entitled “To Eliminate Instrument
Feedback.”
10: Cut. Use this control along with the Freq control (#9) to eliminate
instrument feedback. For information on the proper use of this con-
trol, please read the section entitled “To Eliminate Instrument
Feedback.”
11: Rev/Eff send. Use this control to adjust the amount of internal reverb
and/or external effect (if used) for the instrument channel.
12: Chorus On/Off switch. This switch, when depressed, applies the
internal chorus effect to the instrument channel.
13: Chorus Depth. Use this control to adjust the magnitude of the chorus
effect. Rotating this control clockwise increases the intensity of the
effect.
14: Chorus Rate. Use this control to adjust the rate of the chorus effect.
Rotating this control clockwise increases the rate at which the effect
occurs.
The V
ocal/Aux channel:
15: Low-Z input. The signal output from a low impedance microphone
may be connected here by means of a shielded, balanced microphone
cable terminated with an XLR connector.
16: Hi-Z input. The signal output from a high impedance microphone or
a line level signal may be connected here by means of a shielded sig-
nal cable terminated with a 1/4” tip/sleeve connector.
17: Phantom Power switch. This switch, when depressed, applies 15
volts phantom power to pins 2 and 3 of the Low-Z input jack (#15), for
proper operation of microphones requiring phantom power. (Mics not
needing phantom power will not be affected by this switch.)
18: Chorus On/Off switch. This switch, when depressed, applies the
internal chorus effect to the vocal/aux channel. (Chorus is only avail-
able for this channel when the instrument channel’s chorus switch,
#12, is depressed.)
19: Gain. This serves as the input level control for the vocal/aux channel
of the amplifier. Adjust this control for the best mix with the signals
from the instrument channel.
20: Low. This serves as the vocal/aux channel’s primary bass control.
Adjust this control to get the best sounding bass response for this
channel. Excessive boost of the low control can cause an unnatural
howling and should be avoided.
21: High. This serves as the vocal/aux channel’s primary treble control.
Adjust this control so the high notes and harmonic overtones are live-
ly but not overpowering.
22: Rev/eff send. Use this control to adjust the amount of internal reverb
and/or external effect (if used) for the vocal/aux channel.
The Master Section:
23: Rev Return. Use this control to adjust the amount of internal reverb –
rotate the control clockwise to increase the effect, counter-clockwise to
decrease it.
24: Level. Use this control to set the overall output level of the amplifier.
25: Power Switch. Use this switch to apply power to the amplifier: the
amp is on when the top of the switch is depressed, off when the bot-
tom of the switch is depressed. This switch will illuminate when the
amplifier is on.