


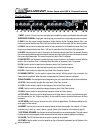
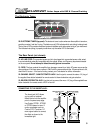
The Front Panel:
4
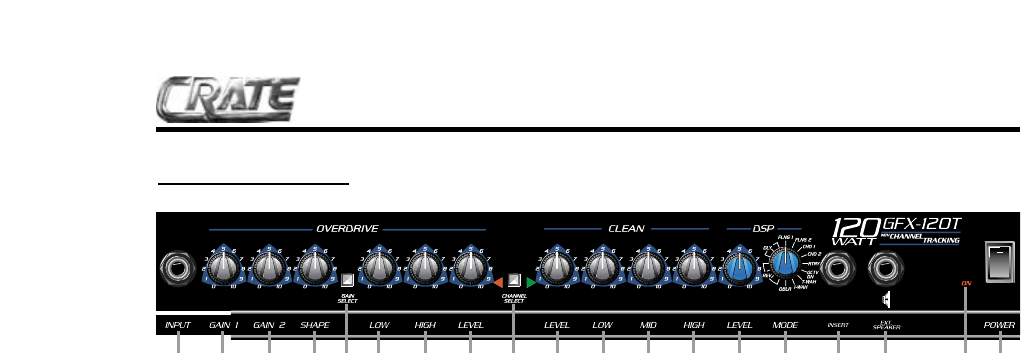
1 2 3 4 6 7 8 10 11 12 13 14 15 16 17 19185 9
1: INPUT: Use this 1/4” jack to connect your guitar to the amplifier by means of a shielded instrument cable.
OVERDRIVE CHANNEL: A high gain channel giving you sounds from a slight edge to serious overdrive.
2: GAIN 1: Use this control to adjust the amount of light distortion for the Overdrive channel. Gain 1 pro-
duces less intense distortion than Gain 2 (#3) and is active when the Gain switch (#5) is in the out position.
3: GAIN 2: Use this control to adjust the amount of heavy distortion for the Overdrive channel. Gain 2 pro-
duces more intense distortion than Gain 1 (#2) and is active when the Gain switch (#5) is depressed.
4: SHAPE: Use this control to “dial in” the tone for the Overdrive channel when Gain 2 is selected. Rotating
the control counterclockwise enhances the mid frequencies, while rotating the control clockwise enhances
the low and high frequencies. This control is active only when Gain 2 is selected.
5: GAIN SELECT: Use this switch to select which gain control is active for the Overdrive channel. With the
switch in the out position, Gain 1 is selected. When the switch is depressed, Gain 2 is selected.
6: LOW: Use this control to adjust the low frequency level of the Overdrive channel.
7: HIGH: Use this control to adjust the high frequency level of the Overdrive channel.
8: LEVEL: Use this control to adjust the output level of the Overdrive channel.
9: CHANNEL SWITCH: Use this switch to select either channel. With the switch in the out position, the
Clean channel is selected. When the switch is depressed, the Overdrive channel is selected.
CLEAN CHANNEL: A normal gain channel designed to give you crystal clear sounds to medium distortion.
10: LEVEL: Use this control to adjust the output level of the Clean channel.
11: LOW: Use this control to adjust the low frequency level of the Clean channel.
12: MID: Use this control to adjust the midrange frequency level of the Clean channel.
13: HIGH: Use this control to adjust the high frequency level of the Clean channel.
14: DSP LEVEL: Use this control to adjust the amount of digital effect: in its fully counterclockwise posi-
tion the signal will be “dry” (without any effect). As you rotate the control clockwise the amount of effect
increases.
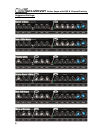
15: DSP MODE: Use this control to select one of the 16 built-in digital effects. The effects available are list-
ed on page 3 of this manual.
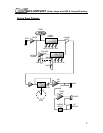
16: INSERT: Use this jack to connect an external effects device to the amplifier. Use a stereo 1/4” male Y
connector: ring = send, tip = return, sleeve = ground. (Refer to the illustration at the bottom of page 5.)
17: EXTERNAL SPEAKER: Use this jack to connect the amplifier to an external speaker. This jack is wired
in series with the internal speaker, which remains active even when an external speaker is connected.
18: ON LED: This LED will illuminate when power is applied to the amplifier.
19: POWER: Use this switch to turn the amplifier on (top of the switch depressed) and off (bottom of the
switch depressed).
GFX-120T/212T Guitar Amps with DSP & Channel Tracking