


GT10
Guitar Amplifier
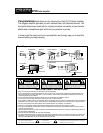
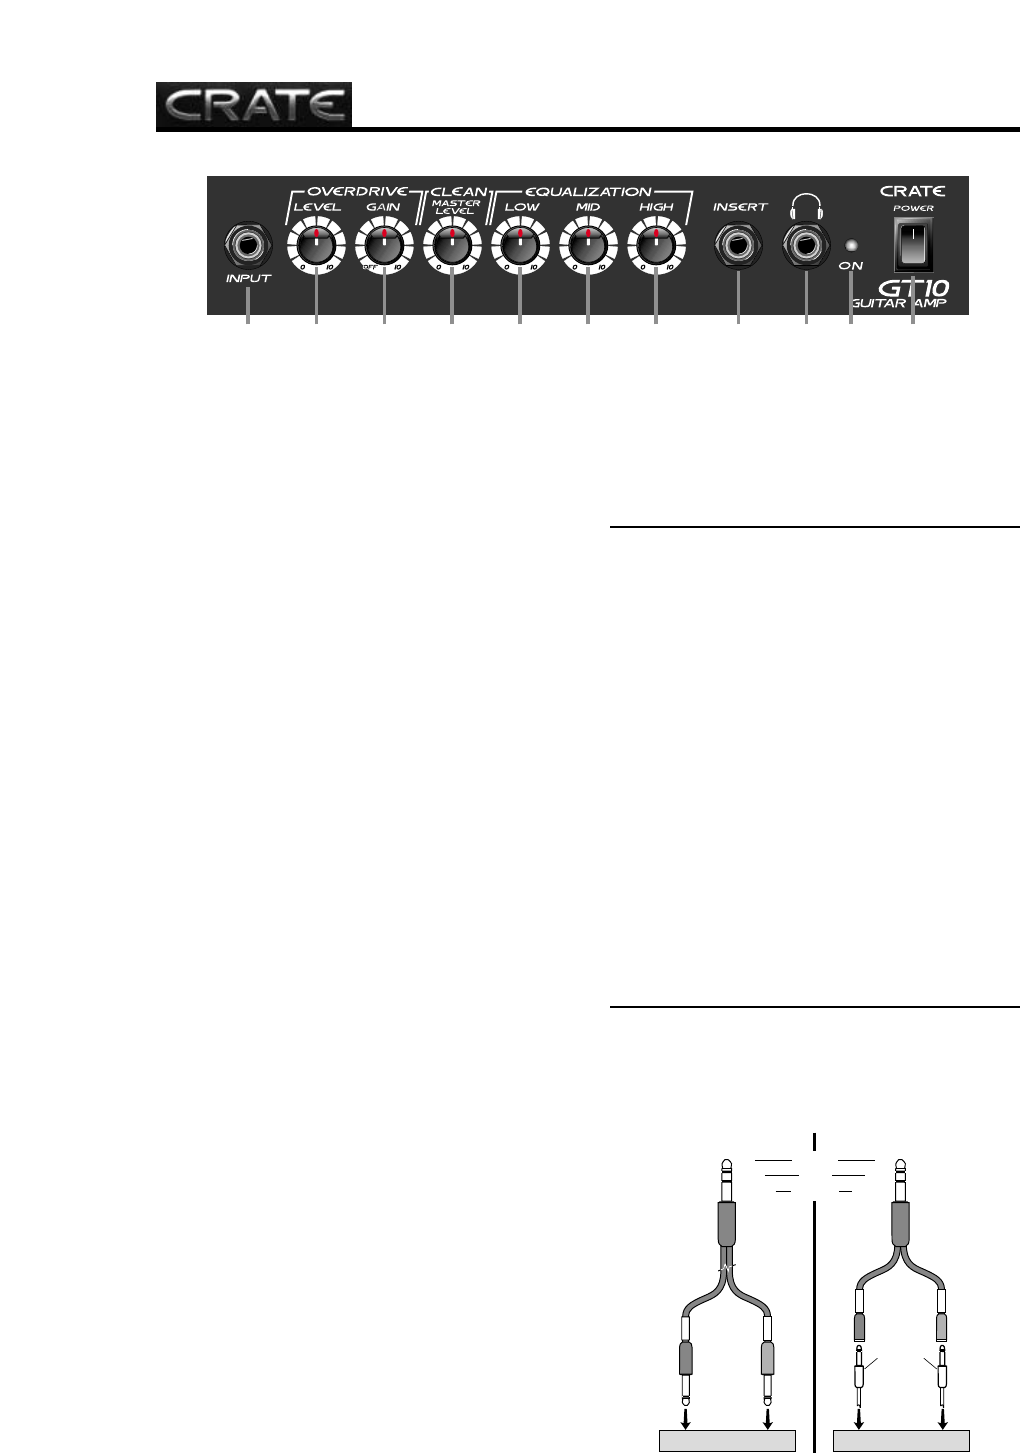
1 2 3 4 5 6 8 9 10 117
1: INPUT: Connect your guitar to this jack by means of
a shielded instrument cable.
2: OVERDRIVE LEVEL: Use this control to increase
the volume and add “crunch” to your sound. This control
is only active when the Overdrive Gain control (#3) is
turned on. (For more information please see the section
entitled “Getting Your Sound.”)
3: OVERDRIVE GAIN: Use this control in conjunction
with the Overdrive Level control (#2) to add distortion to
your sound. (For more information please see the sec-
tion entitled “Getting Your Sound.”)
4: CLEAN MASTER LEVEL: Use this control to set the
overall output level of the amp. (For more information
please see the section entitled “Getting Your Sound.”)
5: LOW: Use this control to adjust the output level of the
low frequencies. Rotating this control counter clockwise
reduces the low frequency output; rotating it clockwise
increases it.
6: MID: Use this control to adjust the output level of the
midrange frequencies. Rotating this control counter
clockwise reduces the midrange frequency output; rotat-
ing it clockwise increases it.
7: HIGH: Use this control to adjust the output level of the
high frequencies. Rotating this control counter clockwise
reduces the high frequency output; rotating it clockwise
increases it.
8: INSERT: Use this jack to connect an external effects
to the amplifier. Use a stereo 1/4” male Y-cord: ring =
send, tip = return, sleeve = ground. Send goes to the
effect’s input; return comes from its output. (For more
information please see the section entitled “Connecting
to the Insert Jack.”)
9: HEADPHONES: Use this jack to connect a pair of
stereo headphones for private listening. The external
speaker is disconnected when headphones are in use.
10: POWER LED: This LED will illuminate when power
is applied to the amplifier.
11: POWER SWITCH: Use this switch to turn the ampli-
fier on and off.
12: AC LINE IN: (Rear panel, not shown) The ground-
ed power cord should only be plugged into a grounded
power outlet that meets all applicable electrical codes
and is compatible with the voltage, power, and frequen-
cy requirements stated on the rear panel. Do not
attempt to defeat the safety ground connection.
Getting Your Sound: The Level, Gain and Master
Level controls (#2, 3 & 4) can be used together to cre-
ate a wide variety of sounds. The following guidelines
will help you achieve your desired sound.
Clean Sounds: Set the Gain control to “OFF” (the Level
control will be inactive). Use the Master Level control to
set the output level.
“Crunch” Sounds: Set the Level control to 11 o’clock
and the Gain to 9 o’clock. Use the Master Level control
to set the output level. (The Master Level control should
be adjusted to a lower setting as the Level and Gain
controls are increased.)
Rhythm Sounds: Set the Level control around 11
o’clock and the Gain at or near “10”. Use the Master
Levelcontrol to set the output level.
Lead Sounds: Set the Level and Gain controls at or near
“10”. Use the Master Level control to set the output level.
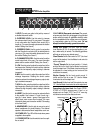
Connecting to the Insert Jack: Use Crate’s STP201,
STP202 or STP203 stereo-to-mono Y-cord or an
adapter such as Crate’s YPP117 and 2 1/4” mono sig-
nal cables to connect to the effect as shown:
TIP
RING
SLEEVE
RETURN
SEND
GROUND
Stereo-to-mono Y-cord:
to Insert
jack
to Insert
jack
(STP201, 3'
STP202, 6'
STP203, 9')
(YPP117)
(1/4"-TO-1/4"
MONO CABLES)
to
effect
"OUT"
jack
to
effect
"IN"
jack
TIP
RING
SLEEVE
Y-adapter and 2 cables:
RING
RING
TIP
TIP
to
effect
"OUT"
jack
to
effect
"IN"
jack
External Effect External Effect