


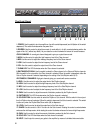
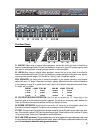

The Front Panel:
4
123 4 5 6 97 8
1. POWER: Use this switch to turn the amplifier on (top of the switch depressed) and off (bottom of the switch
depressed). The switch illuminates when the power is on.
2. REVERB: Use this control to adjust the amount of reverb effect: in its fully counterclockwise position the
signal will be “dry” (without any effect). As you rotate the control clockwise the amount of reverb increases.
CLEAN CHANNEL: A normal gain channel designed to give you crystal clean sounds.
3. HIGH: Use this control to adjust the high frequency level of the Clean channel.
4. MID: Use this control to adjust the midrange frequency level of the Clean channel.
5. LOW: Use this control to adjust the low frequency level of the Clean channel.
6. VOL: Use this control to adjust the output level of the Clean channel.
7. CLEAN LED: This LED illuminates when the Clean channel is selected.
8. RHYTHM/SOLO/CLEAN: Use this switch to select the Clean channel or the Solo and Rhythm channels.
With the switch in the out position, the Clean channel is selected. When the switch is depressed, either the
Solo or Rhythm channel is selected, depending on the setting of the Solo/Rhythm switch (#15).
RHYTHM/SOLO CHANNELS: High gain channels giving you sounds with serious overdrive.
9. LEVEL: Use this control to adjust the output level of the Rhythm channel.
10. HIGH: Use this control to adjust the high frequency level of the Solo/Rhythm channel.
11. MID: Use this control to adjust the midrange frequency level of the Solo/Rhythm channel.
12. LOW: Use this control to adjust the low frequency level of the Solo/Rhythm channel.
13. GAIN: Use this control to adjust the amount of distortion produced by the Rhythm channel.
14. RHYTHM LED: This LED illuminates when the Rhythm channel is selected.
15. SOLO/RHYTHM: Use this switch to select the Rhythm or Solo channel. With the switch in the out posi-
tion, the Rhythm channel is selected. When this switch is depressed, the Solo channel is selected. This switch
is active only when the Rhythm/Solo/Clean switch (#8) is depressed.
16. LEVEL: Use this control to adjust the output level of the Solo channel.
17. SHAPE: Use this control to “dial in” the tone for the Solo channel. Rotating the control counterclockwise
enhances the mid frequencies, while rotating the control clockwise enhances the low and high frequencies.
18. GAIN: Use this control to adjust the amount of distortion produced by the Solo channel.
19. SOLO LED: This LED illuminates when the Solo channel is selected.
20. INPUT: Use this jack to connect your guitar to the amplifier by means of a shielded instrument cable.